RabbitMq
未解决事项
未解决事项1
端口一览表
4369  Erlang端口
25672 集群通信端口
15672 Rabbitmq管理控制台端口
5672  Rabbitmq服务端口
8100  HAProxy 配置监控页面绑定端口
5671  HAProxy rabbitmq_cluster集群通信端口

firewall-cmd  --zone=public --permanent --add-port=4369/tcp
firewall-cmd  --zone=public --permanent --add-port=25672/tcp
firewall-cmd  --zone=public --permanent --add-port=15672/tcp
firewall-cmd  --zone=public --permanent --add-port=5672/tcp
firewall-cmd  --zone=public --permanent --add-port=8100/tcp
firewall-cmd  --zone=public --permanent --add-port=5671/tcp
firewall-cmd --reload
总体流程
- 入门
- 核心
- 工作模式
- 发布订阅模式
- 路由模式
- 主题模式
- 发布确认模式
- 高级
- 私信对对
- 延迟队列
- 发布确认高级
- 发布确认
- 回退消息
- 备份消息
- 幂等性问题
- 优先级队列
- 惰性队列
- 集群部分
- 搭建集群
- 镜像队列
- haproxy+keepalive 实现集群
- federation exchange
- federation quenue
- shovel
RabbitMq 的作用
- 流量削峰
- 应用解耦 传递给别人消息,不需要每个都发。将功能模块最小化。
- 异步处理
A传给B 后,不需要B立即返回,B可能执行很长时间,A不需要等待B的返回,等A处理完了,再将处理结果返回给A
MQ 分类
- activeMq 较少丢失,,官方对维护较少,高吞吐量较少
- kafkaMq 为大数据而生,日志采集等。
- rocketMq 阿里巴巴 ,0丢失
- RabbitMq ErLang语言
四大核心关键词
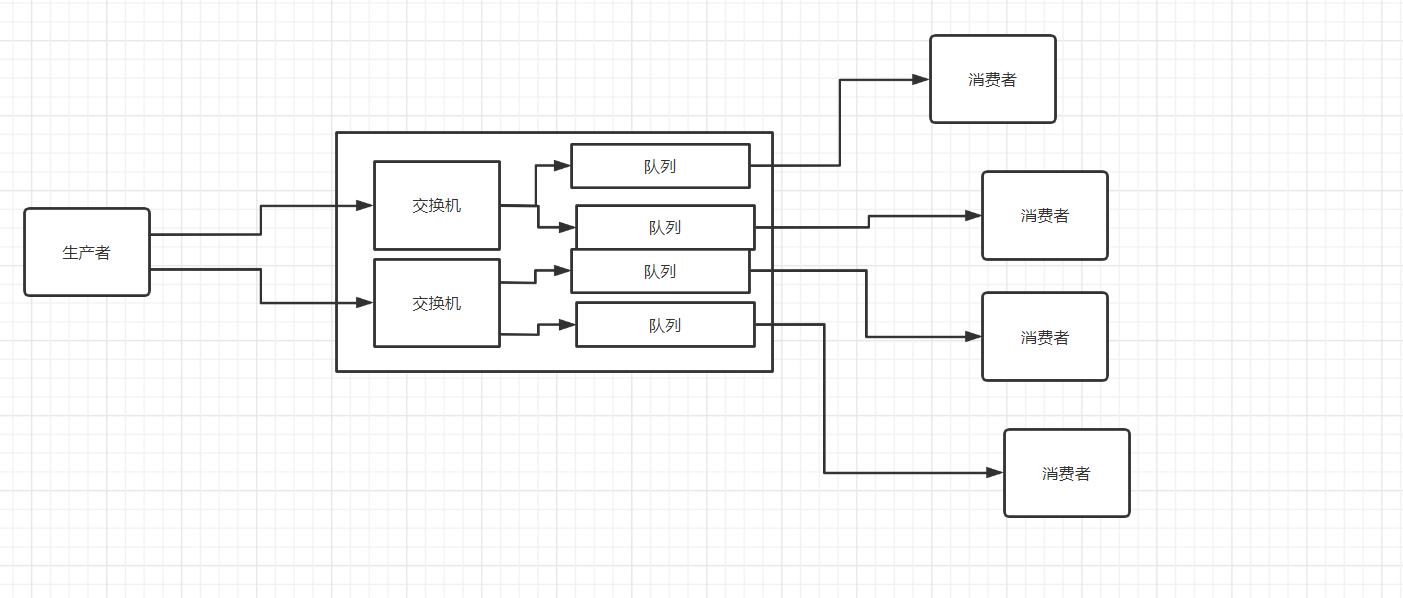
生产者
消费者
交换机
队列
基础模式 一个消费者对应一个队列,一个交换机对应多个队列
六大模式
RabbitMq 各个名词解释

上图右边是消费者!!!
Broker: 接收和分发消息的应用,RabbitMQ server 就是Message Broker
Virtual host: 出于多租户和安全因素设计的,把AMQP的基本组件划分到一个虚拟的分组中,类似于网络的namespace概念。当多个不同的用户使用同一个RabbitMQ server 提供服务时,可以划分出多个vhost ,每个用户在自己的host创建交换机、队列等
Connection: publish/consumer和broker之间的tcp 连接。
Channel: 如果每一次访问RabbitMQ 都建立一个connection ,在消息量大得时候建立TCP connection的开销时非常巨大的,效率也低channel是在connection 内部寄哪里的逻辑链接,如果应用程序支持多线程,通常每个线程穿件单独的chnnel 进行通讯,AMQP method包含了 channel id 帮助客户端和message broker识别channel ,所以channel之间是完全隔离的,channel作为轻量级的connection极大较少了操作系统上建立TCP connection 的时间和开销。相当于线程池之类,数据库连接的连接池之类的
Exchange: message到达的第一站,根据分发规则,匹配查询表中的 routing key ,分发消息到queue中,常用的类型有direct(point-to point),topic(publish-subscibe) 和fanout(multicast)模式。
安装下载
链接信息
安装类似于mavensearch
https://packagecloud.io/rabbitmq/erlang/install#bash-rpm
官网(https://www.rabbitmq.com/download.html)
rabbit mq 版本:3.10.7
提供多种下载方式,每种下载都需要安装erlang语言环境。
以下根据说明文档进行安装 说明文档 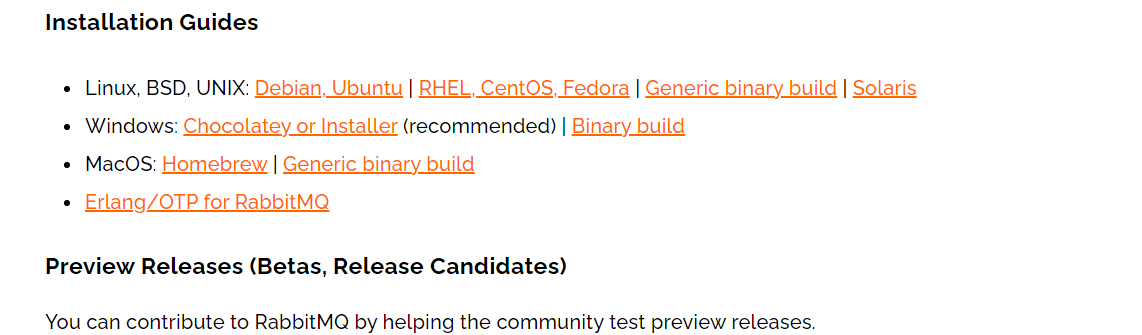 下载rabbitmq
 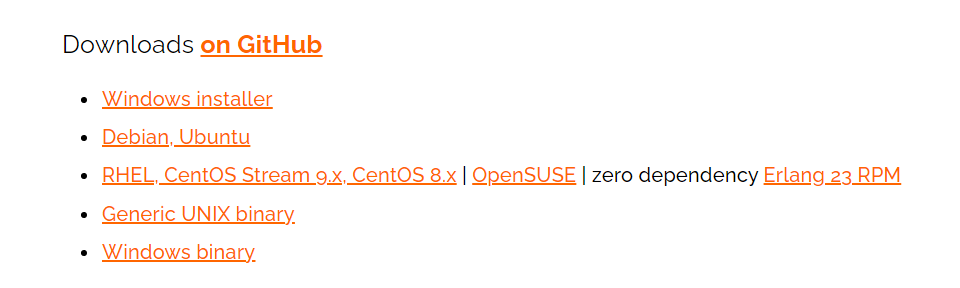 下载erlang
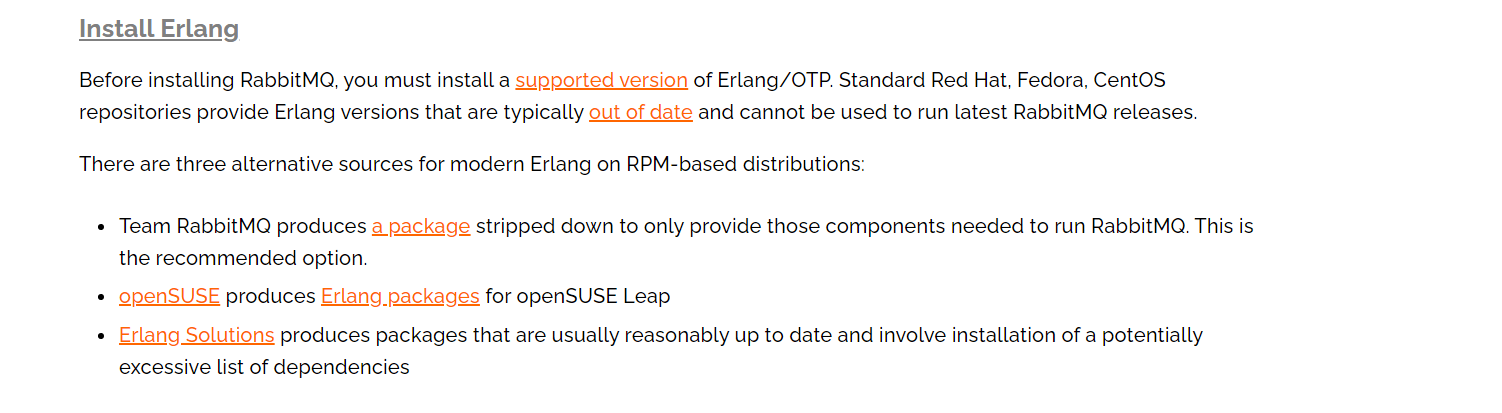
需要先下载erlang 再尔安装rabbitmq
提示
笔者在安装的时候,老是报错误,container 无法安装之类的,把docker 给卸载之后就可以了
# centos  安装
# 安装erlang 环境,下载release 并上传到服务器
yum install socat logrotate -y
rpm -ivh   erlang-25.0.3-1.el9.x86_64.rpm

rpm -ivh rabbitmq*.noarch.rpm


chkconfig rabbitmq-server on #开机启动

/sbin/service rabbitmq-server start

/sbin/service rabbitmq-server status

/sbin/service rabbitmq-server stop


# 启动失败 ,查看systemctl 的日志
journalctl -u rabbitmq-server.service

rabbitmq 【ERROR: epmd error for host "192":badarg (unknown POSIX error)】

#需要在host文件映射host 和主机名

# 第二种方法
vi /etc/rabbitmq/rabbitmq-env.conf
NODENAME=rabbit@localhost

# 安装插件
 rabbitmq-plugins enable rabbitmq_management

 ip:15672 即可访问web界面
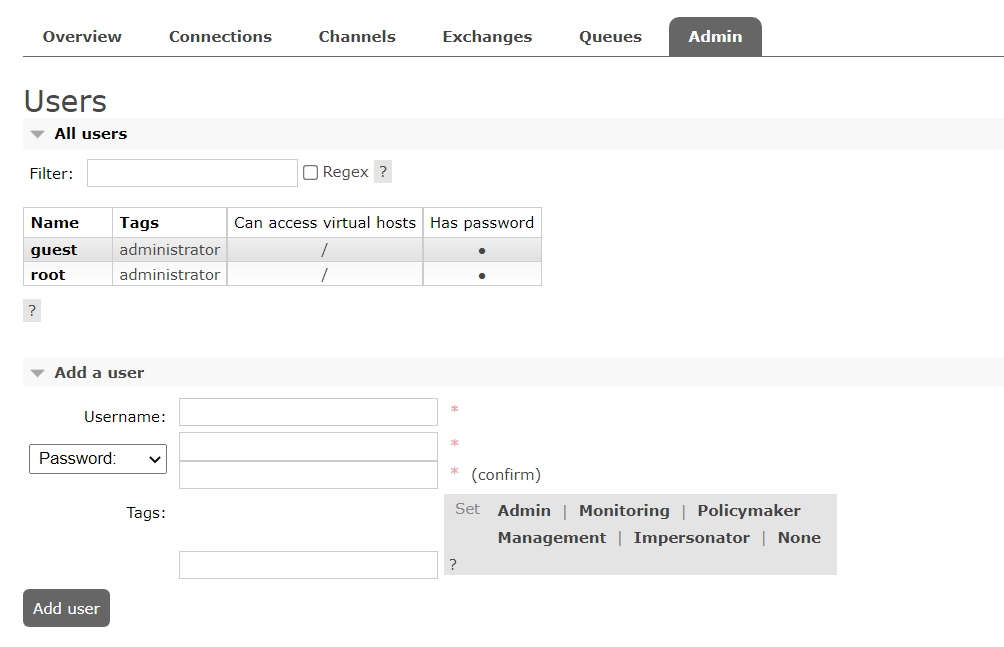
权限
rabbitmqctl add_user root root
rabbitmqctl set_user_tags root administrator

# 用户具有 /vhost这个virtual host 中得所有资源得配置 写 读 权限
rabbitmqctl set_permissions -p  "/"root".*"".*"".*"
rabbitmqctl set_permissions -p  "/" root  ".*" ".*" ".*"
set_permissions [-p  <vhosts> ] <user> <conf> <write> <read>

#列出当前用户
rabbitmqctl list_users

guest 缺少权限
/代表 在/的虚拟host 下,在每个虚拟host中,交换机和队列都是不同的,有点类似于数据库的不同裤
项目实战
客户端官网
https://www.rabbitmq.com/java-client.html
几种模式
简单模式
直接生产者 -> 消费者
生产者代码
package com.burny.rabbitmq.one;

import com.rabbitmq.client.Channel;
import com.rabbitmq.client.Connection;
import com.rabbitmq.client.ConnectionFactory;
import lombok.extern.slf4j.Slf4j;


@Slf4j
public class Producer {

    public static final String ip = "192.168.1.176";
    public static final String port = "192.168.1.176";
    public static final String username = "root";
    public static final String password = "root";
    //队列名称
    public static final String queue_name = "hello";

    public static final String content = "hello world";

    public static void main(String[] args) throws Exception {
        //创建连接工厂
        ConnectionFactory factory = new ConnectionFactory();
        factory.setHost(ip);
        factory.setUsername(username);
        factory.setPassword(password);

        //创建连接
        Connection connection = factory.newConnection();

        //获取信道
        Channel channel = connection.createChannel();

        //实现信道绑定队列
        /**
         * String queue, boolean durable, boolean exclusive, boolean autoDelete,
         *                                  Map<String, Object> arguments
         *队列名称
         * 是否持久化, 默认不持久化,指的是队列持久化:
         * 该队列是否只供一个消费者消费,即排他,是否进行消息共享,一个消息只能被一个消费者消费
         * 是否自动删除
         * 最后一个消费者端开链接猴,该队列是否自动删除
         *
         */
        channel.queueDeclare(queue_name, true, false, false, null);


        //发送消息体
        /**
         *发送到哪个交换机,""为默认交换机
         * 路由的key值是哪个,本次是队列的名称
         * 其他参数
         * 发送消息的消息体
         */
        channel.basicPublish("", queue_name, null, content.getBytes());

        //在web界面找到 QUEUE 中的hello队列: ready :正在准备被消费者消费,总共有一个消息,
        //重启发现队列还在,但是消息不见了.即持久化队列,但是没有持久化消息


    }

}
消费者
package com.burny.rabbitmq.one;

import com.rabbitmq.client.*;

/**
 * @Note TODO
 * @Author cyx
 *
 */

public class Consumer {

    public static final String ip = "192.168.1.176";
    public static final String port = "192.168.1.176";
    public static final String username = "root";
    public static final String password = "root";
    //队列名称
    public static final String queue_name = "hello";

    public static final String content = "hello world";

    public static void main(String[] args) throws Exception {

        ConnectionFactory factory = new ConnectionFactory();
        factory.setHost(ip);
        factory.setUsername(username);
        factory.setPassword(password);

        //创建连接
        Connection connection = factory.newConnection();

        //获取信道
        Channel channel = connection.createChannel();

        //声明:
        DeliverCallback deliverCallback = (consumerTag, message) -> {
            System.out.println("成功接收消息");
            System.out.println(message.getBody());
        };
        CancelCallback cancelCallback = (consumerTag) -> {
            System.out.println("消费被中断");
        };
        //基础消费
        /**
         *绑定队列名称
         * 自动应答
         * 消费失败的回调
         * 消费成功的回调
         */
        channel.basicConsume(queue_name, true, deliverCallback, cancelCallback);

    }
}
工作队列模式(Work Queues)
工作队列 又称 任务队列.主要思想是避免立即整形资源密集型的任务,而不得不等待它完成.相反我们安排任务在之后执行.我们把任务封装为消息并将其发送到队列.在后台运行的工作进程将弹出任务并最终执行作业.当有多个工作线程时,这些工作线程将一起处理这些任务
轮询分发模式
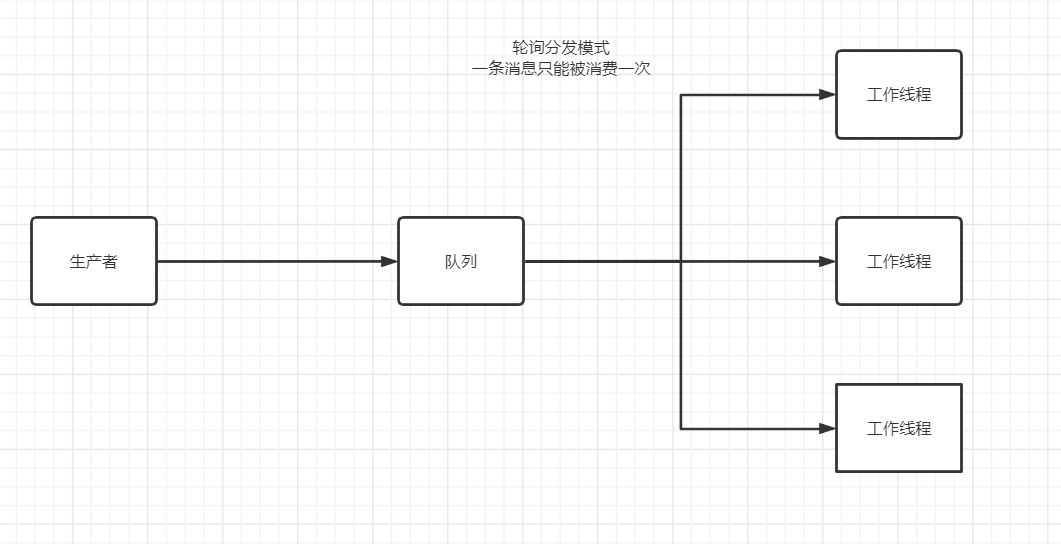
工作线程==消费者
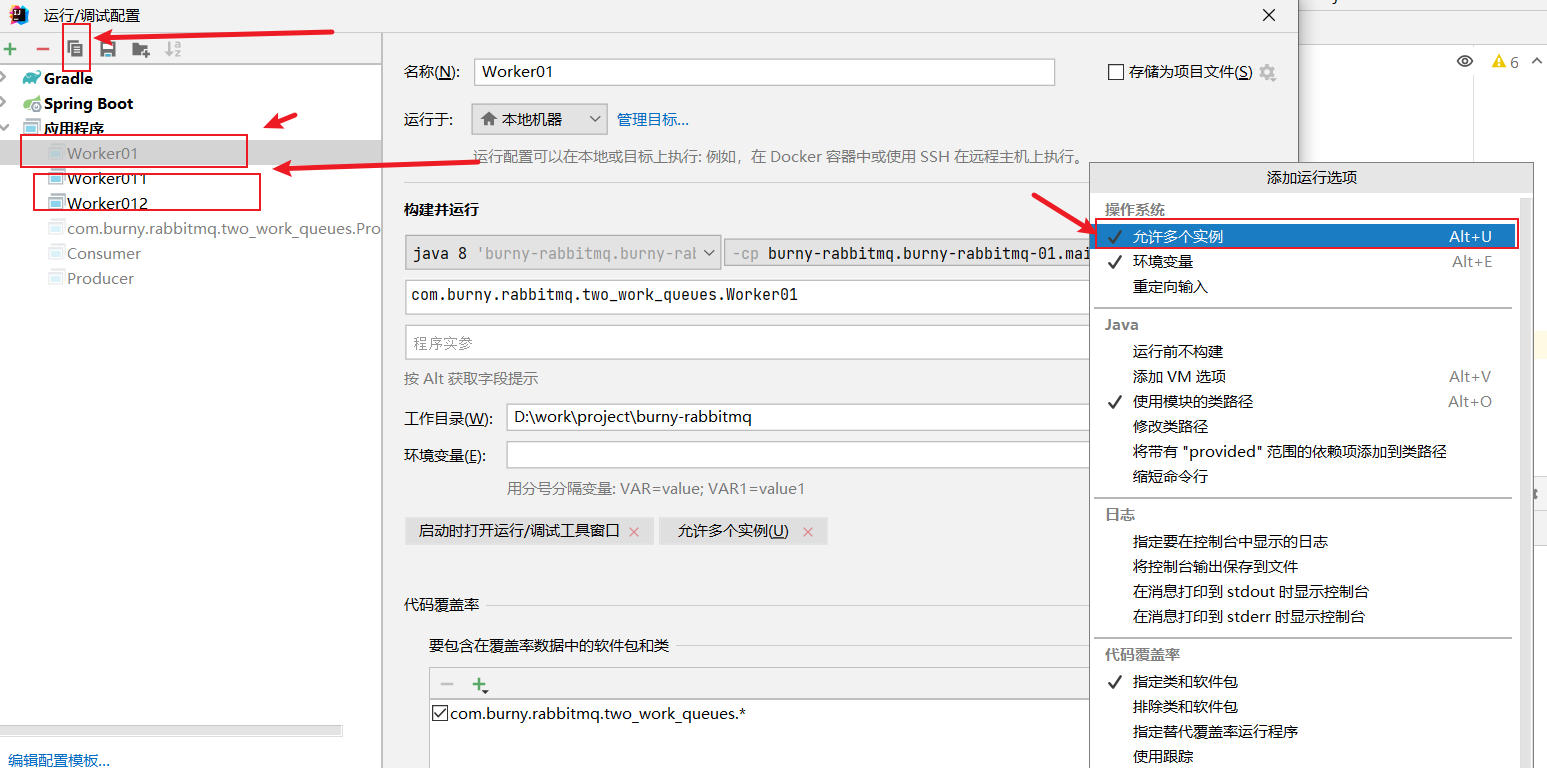
要点:idea 如何多例并行
package com.burny.rabbitmq.common;

import com.rabbitmq.client.Channel;
import com.rabbitmq.client.Connection;
import com.rabbitmq.client.ConnectionFactory;
import jdk.internal.org.objectweb.asm.tree.FieldInsnNode;
import lombok.SneakyThrows;

/**
 * @Note TODO
 * @Author cyx
 *
 */

public class Info {
    public static final String ip = "192.168.1.176";
    public static final String username = "root";
    public static final String password = "root";

    public static  final String queue_name="hello";

    public static final  String pre="接收到消息: ";

    public static  final String callback="消费者取消消费的回调";

    @SneakyThrows
    public static Channel getC() {
        ConnectionFactory factory = new ConnectionFactory();
        factory.setHost(ip);
        factory.setUsername(username);
        factory.setPassword(password);
        //创建连接
        Connection connection = factory.newConnection();
        //获取信道
        Channel channel = connection.createChannel();
        return channel;
    }


}

package com.burny.rabbitmq.two_work_queues;

import com.burny.rabbitmq.common.Info;
import com.rabbitmq.client.CancelCallback;
import com.rabbitmq.client.Channel;
import com.rabbitmq.client.DeliverCallback;
import lombok.SneakyThrows;
import lombok.extern.slf4j.Slf4j;

import java.util.Random;
import java.util.UUID;

/**
 * @Note TODO
 * @Author cyx
 *
 */

@Slf4j
public class Worker01 {


    @SneakyThrows
    public static void main(String[] args) {
        log.info(UUID.randomUUID().toString());
        Channel channel = Info.getC();
        DeliverCallback deliverCallback=(consumerTag,message)->{
            log.info(Info.pre+new String(message.getBody()));
        };
        CancelCallback callback=(consumerTag)->{
            log.info(Info.callback);
        };
        channel.basicConsume(Info.queue_name,true,deliverCallback,callback);
    }
}

package com.burny.rabbitmq.two_work_queues;

import com.burny.rabbitmq.common.Info;
import com.rabbitmq.client.Channel;
import com.rabbitmq.client.Connection;
import com.rabbitmq.client.ConnectionFactory;
import lombok.extern.slf4j.Slf4j;

import java.util.Scanner;

/**
 * @Note TODO
 * @Author cyx
 *
 */

@Slf4j
public class Producer {

    //队列名称
    public static final String queue_name = "hello";

    public static final String content = "hello world";

    public static void main(String[] args) throws Exception {
        Channel channel = Info.getC();
        //exclusive:消息是否被共享,独占
        channel.queueDeclare(queue_name, true, false, false, null);
        Scanner scanner=new Scanner(System.in);
        while (scanner.hasNext()){
            String next = scanner.next();
            for (int i = 0; i < 100; i++) {
                channel.basicPublish("", queue_name, null, (next+i).getBytes());
            }
        }

    }

}
经验证:为轮询的工作队列

消息应答
概念:
只要消费者不应答,队列中消息不会被删除.
自动应答
接收到消息即自动应答,并不代表消息已经完成消费
这种模式在高吞吐量和数据传输安全性房间做权衡.
这种模式适合仅仅适用于在消费者可以高效并以某种速率能够处理这些消息
可以允许少部分消息丢失
手动应答
手动应答的方式可以减少网络拥堵
消息应答的方法
channel.basicAck(long deliveryTag, boolean multiple); //用户肯定确认 rabbitmq 已知道该消息并且成功的处理消息,可以将其丢弃了
channel.basicNack(long deliveryTag, boolean multiple, boolean requeue); //用户否定确认
channel.basicReject(long deliveryTag, boolean requeue); // 不处理该消息了,直接拒绝,可以让信道直接丢弃信息
multiple
true 代表批量应答channel上尚未应答的消息
比如说channel 传送的tag 的消息 5 6 7 8 当前tag是8 ,那么其他都会被确认收到消息应答
false 只会应答8 ,其他消息依然不会被确认收到消息应答
消息自动重新入队
如果消费者由于某些原因失去链接,其通道已关闭,链接已关闭或TCP链接丢失,导致消息未发送ACK确认,mq将了解到消息未完全处理,并将其对重新怕对.如果此时其他消费者可以处理,它将很快重新分发给另一个消费者,这样,即使某个消费者偶尔死亡,也可以确保不会丢失任何消息.
代码一:启动报错
channel.queueDeclare(queue_name, true, true, false, null);
生产者端将queueDeclare exclusive 即第三个参数改为true 启动报错.
点击查看代码
20:46:34.857 [main] DEBUG com.rabbitmq.client.impl.ConsumerWorkService - Creating executor service with 4 thread(s) for consumer work service
Exception in thread "main" java.io.IOException
	at com.rabbitmq.client.impl.AMQChannel.wrap(AMQChannel.java:129)
	at com.rabbitmq.client.impl.AMQChannel.wrap(AMQChannel.java:125)
	at com.rabbitmq.client.impl.AMQChannel.exnWrappingRpc(AMQChannel.java:147)
	at com.rabbitmq.client.impl.ChannelN.queueDeclare(ChannelN.java:968)
	at com.rabbitmq.client.impl.recovery.AutorecoveringChannel.queueDeclare(AutorecoveringChannel.java:343)
	at com.burny.rabbitmq.two_work_queues.Producer.main(Producer.java:26)
Caused by: com.rabbitmq.client.ShutdownSignalException: channel error; protocol method: #method<channel.close>(reply-code=405, reply-text=RESOURCE_LOCKED - cannot obtain exclusive access to locked queue 'hello' in vhost '/'. It could be originally declared on another connection or the exclusive property value does not match that of the original declaration., class-id=50, method-id=10)
	at com.rabbitmq.utility.ValueOrException.getValue(ValueOrException.java:66)
	at com.rabbitmq.utility.BlockingValueOrException.uninterruptibleGetValue(BlockingValueOrException.java:36)
	at com.rabbitmq.client.impl.AMQChannel$BlockingRpcContinuation.getReply(AMQChannel.java:502)
	at com.rabbitmq.client.impl.AMQChannel.privateRpc(AMQChannel.java:293)
	at com.rabbitmq.client.impl.AMQChannel.exnWrappingRpc(AMQChannel.java:141)
	... 3 more
Caused by: com.rabbitmq.client.ShutdownSignalException: channel error; protocol method: #method<channel.close>(reply-code=405, reply-text=RESOURCE_LOCKED - cannot obtain exclusive access to locked queue 'hello' in vhost '/'. It could be originally declared on another connection or the exclusive property value does not match that of the original declaration., class-id=50, method-id=10)
	at com.rabbitmq.client.impl.ChannelN.asyncShutdown(ChannelN.java:517)
	at com.rabbitmq.client.impl.ChannelN.processAsync(ChannelN.java:341)
	at com.rabbitmq.client.impl.AMQChannel.handleCompleteInboundCommand(AMQChannel.java:182)
	at com.rabbitmq.client.impl.AMQChannel.handleFrame(AMQChannel.java:114)
	at com.rabbitmq.client.impl.AMQConnection.readFrame(AMQConnection.java:739)
	at com.rabbitmq.client.impl.AMQConnection.access$300(AMQConnection.java:47)
	at com.rabbitmq.client.impl.AMQConnection$MainLoop.run(AMQConnection.java:666)
	at java.lang.Thread.run(Thread.java:748)
代码二:同一个信道可以作为接收信道和发送信道
//骚操作
public class Producer {

    //队列名称
    public static final String queue_name = "hello";

    public static final String content = "hello world";

    public static void main(String[] args) throws Exception {
        Channel channel = Info.getC();
        //exclusive:消息是否被共享
        channel.queueDeclare(queue_name, true, false, false, null);
        DeliverCallback deliverCallback = (consumerTag, delivery) -> {
            log.info(Info.pre + new String(delivery.getBody()));
            long deliveryTag = delivery.getEnvelope().getDeliveryTag();
            log.info(String.valueOf(deliveryTag));
            channel.basicAck(delivery.getEnvelope().getDeliveryTag(),false);
        };
        CancelCallback callback = (consumerTag) -> {
            log.info(Info.callback);
        };

        Scanner scanner = new Scanner(System.in);
        while (scanner.hasNext()) {
            String next = scanner.next();
            for (int i = 0; i < 1000000; i++) {
                log.info("发送一次"+i);
                //同一个信道又发送又接收.发送还是
                channel.basicPublish("", queue_name, null, (next + i).getBytes("UTF-8"));
                channel.basicConsume(Info.queue_name, false, deliverCallback, callback);
                //byte[] body = channel.basicGet(queue_name, false).getBody();
                //log.info("pro"+new String(body));
            }
        }

    }

}
代码三:正常的生产端和消费端
工具类
package com.burny.rabbitmq.common;

import com.rabbitmq.client.Channel;
import com.rabbitmq.client.Connection;
import com.rabbitmq.client.ConnectionFactory;
import lombok.SneakyThrows;

/**
 * @Note TODO
 * @Author cyx
 *
 */

public class Info {
    public static final String ip = "192.168.1.176";
    public static final String username = "root";
    public static final String password = "root";

    public static final String queue_name = "hello";

    public static final String pre = "接收到消息: ";

    public static final String callback = "消费者取消消费的回调";


    @SneakyThrows
    public static Channel getC() {
        ConnectionFactory factory = new ConnectionFactory();
        factory.setHost(ip);
        factory.setUsername(username);
        factory.setPassword(password);
        //创建连接
        Connection connection = factory.newConnection();
        //获取信道
        Channel channel = connection.createChannel();
        return channel;
    }


}
:::: code-group ::: code-group-item 生产者
package com.burny.rabbitmq.two_work_queues;

import com.burny.rabbitmq.common.Info;
import com.rabbitmq.client.CancelCallback;
import com.rabbitmq.client.Channel;
import com.rabbitmq.client.DeliverCallback;
import lombok.extern.slf4j.Slf4j;

import java.util.Scanner;

/**
 * @Note TODO
 * @Author cyx
 *
 */

@Slf4j
public class Producer {

    public static void main(String[] args) throws Exception {
        Channel channel = Info.getC();
        //exclusive:消息是否被共享
        channel.queueDeclare(Info.queue_name, true, false, false, null);
        Scanner scanner = new Scanner(System.in);
        while (scanner.hasNext()) {
            String next = scanner.next();
            for (int i = 0; i < 1000000; i++) {
                log.info("发送一次"+i);
                channel.basicPublish("", Info.queue_name, null, (next + i).getBytes("UTF-8"));
            }
        }

    }

}
::: ::: code-group-item 消费者
package com.burny.rabbitmq.two_work_queues;

import com.burny.rabbitmq.common.Info;
import com.rabbitmq.client.CancelCallback;
import com.rabbitmq.client.Channel;
import com.rabbitmq.client.DeliverCallback;
import lombok.SneakyThrows;
import lombok.extern.slf4j.Slf4j;

import java.util.UUID;

/**
 * @Note TODO
 * @Author cyx
 *
 */

@Slf4j
public class Worker01 {


    @SneakyThrows
    public static void main(String[] args) {
        Channel channel = Info.getC();
        DeliverCallback deliverCallback = (consumerTag, delivery) -> {
            log.info(Info.pre + new String(delivery.getBody()));
            long deliveryTag = delivery.getEnvelope().getDeliveryTag();
            log.info(String.valueOf(deliveryTag));
            channel.basicAck(delivery.getEnvelope().getDeliveryTag(),false);
        };
        CancelCallback callback = (consumerTag) -> {
            log.info(Info.callback);
        };
        channel.basicConsume(Info.queue_name, false, deliverCallback, callback);

    }
}
::: ::::
消息重新入队,(需要再研究一下)
如果已接收但未应答,并且宕机了.则消息会重新入队
持久化
队列持久化
生产端绑定队列的时候的第二个参数
 Queue.DeclareOk queueDeclare(String queue, boolean durable, boolean exclusive, boolean autoDelete,
                                 Map<String, Object> arguments) throws IOException;

channel.queueDeclare(Info.queue_name, true, false, false, null);
注意:如果原先的队列不是持久化的,则需要重新删除并新建.否则会报错.
即绑定的时候队列属性已经生成,不可更改.
消息持久化
注意:只能说明生产者把消息到达队列后持久化.并不能保证消息百分百不丢失!!即生产者把消息发送到队列之前,磁盘未持久化就宕机了.
//生产者
channel.basicPublish("",Info.queue_name, MessageProperties.PERSISTENT_TEXT_PLAIN,(next).getBytes("UTF-8"));
不公平分发
之前的都是轮询分发.
需要在消费之前的设置
//消费者
        //设置成不公平分发,即能者多劳
        channel.basicQos(1);
//默认公平分发, 即
        channel.basicQos(0);
预取值(prefetch)
经测试:此种情况下是在有些客户端未应答延迟很久,才会这样按比例执行
如果是不存在客户端迟迟未应答,则是公平分发原则
即比例分发,例如有AB两个客户端,可以设置A 接收 总数据量的30% B 接收 总数据量的 70%
//消费者
//表示能收到总数据量的
//消费者A
        channel.basicQos(2);
//消费者B
   channel.basicQos(5);
//消费者C
 channel.basicQos(3);
综上所述, A 消费 2/(2+5+3) B 消费 5/(2+5+3) C 消费 3/(2+5+3)
但是消费的数量并不是绝对的正确,可能由于时间等原因,会有所偏差
发布确认模式(解决消息丢失)
前提:
确保队列持久化,
消息持久化

默认是不开启发布确认模式,
//生产者
        channel.confirmSelect();
发布确认策略
- 单个确认发布
- 批量确认发布
- 异步确认发布
单个确认发布(同步)
生产者
channel.basicPublish("", Info.queue_name, MessageProperties.PERSISTENT_TEXT_PLAIN, (next).getBytes("UTF-8"));
//单个确认发布
  channel.waitForConfirms();
批量确认发布(同步)
缺点:如果在出现差错,无法确认具体是哪一条出错.只能说明是在哪一批次出现问题.
//先声明批量确认的数量
private static  final Integer batch=100;
 for (int i = 0; i < 2000; i++) {
                if (i%batch==0){
                    channel.waitForConfirms();
                }
            }
异步确认

//生产者

            //异步确认

            ConfirmListener confirmListener=new ConfirmListener() {
                @Override
                public void handleAck(long deliveryTag, boolean multiple) throws IOException {
                    //消息成功时处理
                    //参数说明:消息的标记,是否批量确认
                }

                @Override
                public void handleNack(long deliveryTag, boolean multiple) throws IOException {
                    //消息拒绝时处理 区别于接收但是没有发送成功与否回来.
                    //参数说明:消息的标记,是否批量确认

                }
            };
            channel.addConfirmListener(confirmListener);
//添加监听器需要在消息发送之前就监听
            channel.basicPublish("", Info.queue_name, MessageProperties.PERSISTENT_TEXT_PLAIN, (next).getBytes("UTF-8"));
异步未确认消息
把未确认的消息放到一个基于内存的能被发布线程访问的队列,比如说ConcurrentLinkedQueue这个队列在confirm callbacks 与发布线程之间进行消息的传递.
确认收到,成功收到和拒绝接收都把concurrentlinked 中删除
 ConcurrentSkipListMap<Long,String> outStandingConfirm=new ConcurrentSkipListMap<>();
            String content="消息内容";
//下次发送时候的key
            outStandingConfirm.put(channel.getNextPublishSeqNo(),content);
            ConfirmListener confirmListener1 = new ConfirmListener() {
                @Override
                public void handleAck(long deliveryTag, boolean multiple) throws IOException {
                    //消息成功时处理
                    //参数说明:消息的标记,是否批量确认
                    outStandingConfirm.headMap(deliveryTag);
                    if (multiple){
                        outStandingConfirm.headMap(deliveryTag);
                        outStandingConfirm.clear();
                    }else {
                        outStandingConfirm.remove(deliveryTag);
                    }
                }

                @Override
                public void handleNack(long deliveryTag, boolean multiple) throws IOException {
                    //消息拒绝时处理
                    //参数说明:消息的标记,是否批量确认
                    outStandingConfirm.headMap(deliveryTag);


                }
            };
性能,质量对比
异步 > 批量 > 单个
交换机
只需要用到队列的称为 工作模式,简单模式
用到交换机有以下三种模式
路由模式
发布订阅模式
主题模式
类型
直接类型(direct) 即 路由模式
主题类型 topic
标题类型 headers 非常少用
扇出类型 fanout 即 发布订阅模式 广播模式 (待确定)
无名类型: 默认为
""用空字符串表示无名类型
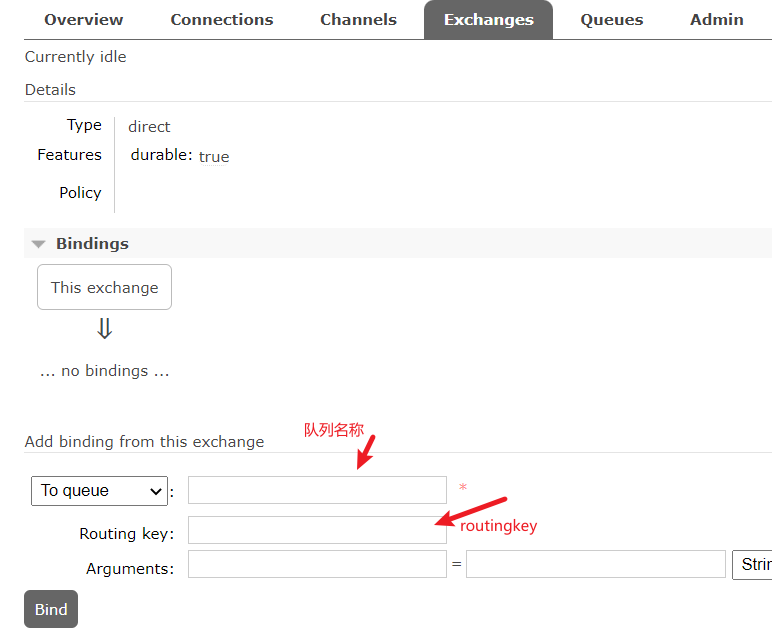
消息路由发送到队列中其实是有
routingkey(bingdingkey )绑定key指定的临时队列
不带有持久化的队列,每当链接到rabbit时,需要一个全新的空队列,为此我们可以创建一个具有随机名称的队列,其次,
一旦消费者断开链接,队列将自动删除.//穿建临时队列 channel.queueDeclare().getQueue();绑定
交换机绑定队列名称
扇出交换机(Fanout)
它是将接收到的所有消息广播到她知道的所有队列中.
routingkey 为空字符串即 ""
:::: code-group ::: code-group-item 生产者
package com.burny.rabbitmq.five_exchange;

import com.burny.rabbitmq.common.Info;
import com.rabbitmq.client.BuiltinExchangeType;
import com.rabbitmq.client.Channel;
import com.rabbitmq.client.ConfirmListener;
import lombok.SneakyThrows;
import lombok.extern.slf4j.Slf4j;

import java.io.IOException;
import java.nio.charset.StandardCharsets;
import java.util.Scanner;

/**
 * @Note TODO
 * @Author cyx
 *
 */
@Slf4j
public class Producer {
    private static final Integer batch = 100;

    @SneakyThrows
    public static void main(String[] args) {
        //如果发送前需要确保消费者已经处于监听状态,否则消息会丢失
        Channel channel = Info.getC();
        //channel.exchangeDeclare(Info.exchange_name, BuiltinExchangeType.FANOUT);
        channel.confirmSelect();
        channel.exchangeDeclare(Info.exchange_name, BuiltinExchangeType.FANOUT, true, false, null);
        //internal 参数:如果为true 则无法发第二遍
        Scanner scanner = new Scanner(System.in);


        ConfirmListener confirmListener1 = new ConfirmListener() {
            @Override
            public void handleAck(long deliveryTag, boolean multiple) throws IOException {
                System.out.println("消息已经被接收");
            }

            @Override
            public void handleNack(long deliveryTag, boolean multiple) throws IOException {
                System.out.println("消息已经被接拒收");


            }
        };

        while (scanner.hasNext()) {
            byte[] bytes = scanner.next().getBytes(StandardCharsets.UTF_8);
            for (int i = 0; i < 10; i++) {
                channel.addConfirmListener(confirmListener1);
                channel.basicPublish(Info.exchange_name, "", null, bytes);
                System.out.println("发送次数" + i + (new String(bytes)));
            }
        }


    }


}
::: ::: code-group-item 消费者01
package com.burny.rabbitmq.five_exchange;

import com.burny.rabbitmq.common.Info;
import com.rabbitmq.client.BuiltinExchangeType;
import com.rabbitmq.client.Channel;
import com.rabbitmq.client.DeliverCallback;
import com.rabbitmq.client.Delivery;
import lombok.SneakyThrows;

import java.io.IOException;

/**
 * @Note TODO
 * @Author cyx
 *
 */

public class Consumer01 {
    @SneakyThrows
    public static void main(String[] args) {
        Channel channel = Info.getC();
        //声明交换机
        //channel.exchangeDeclare(Info.exchange_name, BuiltinExchangeType.FANOUT,true,false,true,null);
        //生成临时队列,队列名称是随机的,当消费者断开与队列的连接,则队列会自动删除.
        String queue = channel.queueDeclare().getQueue();
        //绑定交换机与队列
        channel.queueBind(queue,Info.exchange_name,"",null);

        channel.basicConsume(queue,false,((message,delivery)->{
            System.out.println(new String(delivery.getBody()));
            channel.basicAck(delivery.getEnvelope().getDeliveryTag(),false);
        }),(consumerTag -> {
            System.out.println(new String(consumerTag));
        }));
    }
}
::: ::: code-group-item 消费者02
package com.burny.rabbitmq.five_exchange;

import com.burny.rabbitmq.common.Info;
import com.rabbitmq.client.BuiltinExchangeType;
import com.rabbitmq.client.Channel;
import lombok.SneakyThrows;

/**
 * @Note TODO
 * @Author cyx
 *
 */

public class Consumer02 {
    @SneakyThrows
    public static void main(String[] args) {
        Channel channel = Info.getC();
        //生成临时队列,队列名称是随机的,当消费者断开与队列的连接,则队列会自动删除.
        String queue = channel.queueDeclare().getQueue();
        //绑定交换机与队列
        channel.queueBind(queue,Info.exchange_name,"",null);

        channel.basicConsume(queue,true,((consumerTag,message)->{
            System.out.println(new String(message.getBody()));
        }),(consumerTag -> {
            System.out.println(new String(consumerTag));
        }));
    }
}
::: ::::
总结:
- 如果先启动生产者,没有启动消费者,生产者发送后是会被消费.这样即订阅发布模式,只有订阅之后,才能接收到发布
- 生产者设置的监听器,需要每次发送之前都监听.如果是将监听器添加一次,则监听会收到消费者回答的次数不确定,见下代码
- 广播模式中,生产者的
routingkey任意字符串,例如 "" 或者 "fds" 等, - 对第三的解释是:只要是绑定到广播模式的交换机,routingkey就不起作用
- 生产者的
ConfirmListener,如果n个客户端,则生产者每发送一条消息,则会收到n个回调消息(前提:每发送一次前都要添加监听器).
下述是第二点的代码以及结果
:::: code-group ::: code-group-item 生产者
package com.burny.rabbitmq.five_exchange;

import com.burny.rabbitmq.common.Info;
import com.rabbitmq.client.BuiltinExchangeType;
import com.rabbitmq.client.Channel;
import com.rabbitmq.client.ConfirmListener;
import lombok.SneakyThrows;
import lombok.extern.slf4j.Slf4j;

import java.io.IOException;
import java.nio.charset.StandardCharsets;
import java.util.Scanner;

/**
 * @Note TODO
 * @Author cyx
 *
 */
@Slf4j
public class Producer {
    private static final Integer batch = 100;

    @SneakyThrows
    public static void main(String[] args) {
        //如果发送前需要确保消费者已经处于监听状态,否则消息会丢失
        Channel channel = Info.getC();
        //channel.exchangeDeclare(Info.exchange_name, BuiltinExchangeType.FANOUT);
        channel.confirmSelect();
        channel.exchangeDeclare(Info.exchange_name, BuiltinExchangeType.FANOUT, true, false, null);
        //internal 参数:如果为true 则无法发第二遍
        Scanner scanner = new Scanner(System.in);


        ConfirmListener confirmListener1 = new ConfirmListener() {
            Integer a=0;
            @Override
            public void handleAck(long deliveryTag, boolean multiple) throws IOException {
                log.info("消息已别接收,deliveryTag:{},监听器收到的总次数:{}",deliveryTag,a);
                a++;
            }

            @Override
            public void handleNack(long deliveryTag, boolean multiple) throws IOException {
                System.out.println("消息已经被接拒收");


            }
        };
        channel.addConfirmListener(confirmListener1);

        while (scanner.hasNext()) {
            byte[] bytes = scanner.next().getBytes(StandardCharsets.UTF_8);
            String s = new String(bytes);
            for (int i = 0; i < 1000; i++) {
                channel.basicPublish(Info.exchange_name, "", null, (s+i).getBytes(StandardCharsets.UTF_8));
                System.out.println("发送次数" + i +";发送内容:"+ (new String(bytes))+";下一次发送的deliveryTag"+channel.getNextPublishSeqNo());
            }
        }


    }


}
::: ::: code-group-item 消费者1
package com.burny.rabbitmq.five_exchange;

import com.burny.rabbitmq.common.Info;
import com.rabbitmq.client.BuiltinExchangeType;
import com.rabbitmq.client.Channel;
import com.rabbitmq.client.DeliverCallback;
import com.rabbitmq.client.Delivery;
import lombok.SneakyThrows;

import java.io.IOException;

/**
 * @Note TODO
 * @Author cyx
 *
 */

public class Consumer01 {
    @SneakyThrows
    public static void main(String[] args) {
        Channel channel = Info.getC();
        //声明交换机
        //channel.exchangeDeclare(Info.exchange_name, BuiltinExchangeType.FANOUT,true,false,true,null);
        //生成临时队列,队列名称是随机的,当消费者断开与队列的连接,则队列会自动删除.
        String queue = channel.queueDeclare().getQueue();
        //绑定交换机与队列
        channel.queueBind(queue,Info.exchange_name,"",null);

        channel.basicConsume(queue,false,((message,delivery)->{
            System.out.println(new String(delivery.getBody()));
            channel.basicAck(delivery.getEnvelope().getDeliveryTag(),false);
        }),(consumerTag -> {
            System.out.println(new String(consumerTag));
        }));
    }
}
::: ::::
结果
这是发送的内容
发送次数0;发送内容:这是发送的内容;下一次发送的deliveryTag2
发送次数1;发送内容:这是发送的内容;下一次发送的deliveryTag3
发送次数2;发送内容:这是发送的内容;下一次发送的deliveryTag4
发送次数3;发送内容:这是发送的内容;下一次发送的deliveryTag5
发送次数4;发送内容:这是发送的内容;下一次发送的deliveryTag6
发送次数5;发送内容:这是发送的内容;下一次发送的deliveryTag7
发送次数6;发送内容:这是发送的内容;下一次发送的deliveryTag8
发送次数7;发送内容:这是发送的内容;下一次发送的deliveryTag9
发送次数8;发送内容:这是发送的内容;下一次发送的deliveryTag10
发送次数9;发送内容:这是发送的内容;下一次发送的deliveryTag11
发送次数10;发送内容:这是发送的内容;下一次发送的deliveryTag12
发送次数11;发送内容:这是发送的内容;下一次发送的deliveryTag13
发送次数12;发送内容:这是发送的内容;下一次发送的deliveryTag14
发送次数13;发送内容:这是发送的内容;下一次发送的deliveryTag15
发送次数14;发送内容:这是发送的内容;下一次发送的deliveryTag16
17:40:04.307 [AMQP Connection 192.168.1.176:5672] INFO com.burny.rabbitmq.five_exchange.Producer - 消息已别接收,deliveryTag:1,监听器收到的总次数:0
发送次数15;发送内容:这是发送的内容;下一次发送的deliveryTag17
发送次数16;发送内容:这是发送的内容;下一次发送的deliveryTag18
//中间省略
发送次数61;发送内容:这是发送的内容;下一次发送的deliveryTag63
发送次数62;发送内容:这是发送的内容;下一次发送的deliveryTag64
发送次数63;发送内容:这是发送的内容;下一次发送的deliveryTag65
发送次数64;发送内容:这是发送的内容;下一次发送的deliveryTag66
发送次数65;发送内容:这是发送的内容;下一次发送的deliveryTag67
17:40:04.318 [AMQP Connection 192.168.1.176:5672] INFO com.burny.rabbitmq.five_exchange.Producer - 消息已别接收,deliveryTag:8,监听器收到的总次数:1
发送次数66;发送内容:这是发送的内容;下一次发送的deliveryTag68
发送次数67;发送内容:这是发送的内容;下一次发送的deliveryTag69
发送次数68;发送内容:这是发送的内容;下一次发送的deliveryTag70
发送次数69;发送内容:这是发送的内容;下一次发送的deliveryTag71
发送次数70;发送内容:这是发送的内容;下一次发送的deliveryTag72
发送次数71;发送内容:这是发送的内容;下一次发送的deliveryTag73
发送次数72;发送内容:这是发送的内容;下一次发送的deliveryTag74
//中间省略
发送次数986;发送内容:这是发送的内容;下一次发送的deliveryTag988
发送次数987;发送内容:这是发送的内容;下一次发送的deliveryTag989
发送次数988;发送内容:这是发送的内容;下一次发送的deliveryTag990
发送次数989;发送内容:这是发送的内容;下一次发送的deliveryTag991
发送次数990;发送内容:这是发送的内容;下一次发送的deliveryTag992
发送次数991;发送内容:这是发送的内容;下一次发送的deliveryTag993
发送次数992;发送内容:这是发送的内容;下一次发送的deliveryTag994
发送次数993;发送内容:这是发送的内容;下一次发送的deliveryTag995
发送次数994;发送内容:这是发送的内容;下一次发送的deliveryTag996
发送次数995;发送内容:这是发送的内容;下一次发送的deliveryTag997
发送次数996;发送内容:这是发送的内容;下一次发送的deliveryTag998
发送次数997;发送内容:这是发送的内容;下一次发送的deliveryTag999
发送次数998;发送内容:这是发送的内容;下一次发送的deliveryTag1000
发送次数999;发送内容:这是发送的内容;下一次发送的deliveryTag1001
17:40:04.480 [AMQP Connection 192.168.1.176:5672] INFO com.burny.rabbitmq.five_exchange.Producer - 消息已别接收,deliveryTag:34,监听器收到的总次数:4
17:40:04.484 [AMQP Connection 192.168.1.176:5672] INFO com.burny.rabbitmq.five_exchange.Producer - 消息已别接收,deliveryTag:42,监听器收到的总次数:5
17:40:04.487 [AMQP Connection 192.168.1.176:5672] INFO com.burny.rabbitmq.five_exchange.Producer - 消息已别接收,deliveryTag:45,监听器收到的总次数:6
17:40:04.497 [AMQP Connection 192.168.1.176:5672] INFO com.burny.rabbitmq.five_exchange.Producer - 消息已别接收,deliveryTag:50,监听器收到的总次数:7
17:40:04.497 [AMQP Connection 192.168.1.176:5672] INFO com.burny.rabbitmq.five_exchange.Producer - 消息已别接收,deliveryTag:53,监听器收到的总次数:8
17:40:04.501 [AMQP Connection 192.168.1.176:5672] INFO com.burny.rabbitmq.five_exchange.Producer - 消息已别接收,deliveryTag:58,监听器收到的总次数:9
17:40:04.505 [AMQP Connection 192.168.1.176:5672] INFO com.burny.rabbitmq.five_exchange.Producer - 消息已别接收,deliveryTag:73,监听器收到的总次数:10
17:40:04.506 [AMQP Connection 192.168.1.176:5672] INFO com.burny.rabbitmq.five_exchange.Producer - 消息已别接收,deliveryTag:77,监听器收到的总次数:11
17:40:04.517 [AMQP Connection 192.168.1.176:5672] INFO com.burny.rabbitmq.five_exchange.Producer - 消息已别接收,deliveryTag:82,监听器收到的总次数:12
17:40:04.521 [AMQP Connection 192.168.1.176:5672] INFO com.burny.rabbitmq.five_exchange.Producer - 消息已别接收,deliveryTag:93,监听器收到的总次数:13
17:40:04.524 [AMQP Connection 192.168.1.176:5672] INFO com.burny.rabbitmq.five_exchange.Producer - 消息已别接收,deliveryTag:97,监听器收到的总次数:14
17:40:04.532 [AMQP Connection 192.168.1.176:5672] INFO com.burny.rabbitmq.five_exchange.Producer - 消息已别接收,deliveryTag:106,监听器收到的总次数:15
17:40:04.536 [AMQP Connection 192.168.1.176:5672] INFO com.burny.rabbitmq.five_exchange.Producer - 消息已别接收,deliveryTag:119,监听器收到的总次数:16
17:40:04.537 [AMQP Connection 192.168.1.176:5672] INFO com.burny.rabbitmq.five_exchange.Producer - 消息已别接收,deliveryTag:124,监听器收到的总次数:17
17:40:04.543 [AMQP Connection 192.168.1.176:5672] INFO com.burny.rabbitmq.five_exchange.Producer - 消息已别接收,deliveryTag:130,监听器收到的总次数:18
17:40:04.551 [AMQP Connection 192.168.1.176:5672] INFO com.burny.rabbitmq.five_exchange.Producer - 消息已别接收,deliveryTag:135,监听器收到的总次数:19
17:40:04.553 [AMQP Connection 192.168.1.176:5672] INFO com.burny.rabbitmq.five_exchange.Producer - 消息已别接收,deliveryTag:140,监听器收到的总次数:20
17:40:04.569 [AMQP Connection 192.168.1.176:5672] INFO com.burny.rabbitmq.five_exchange.Producer - 消息已别接收,deliveryTag:153,监听器收到的总次数:21
17:40:04.570 [AMQP Connection 192.168.1.176:5672] INFO com.burny.rabbitmq.five_exchange.Producer - 消息已别接收,deliveryTag:166,监听器收到的总次数:22
17:40:04.571 [AMQP Connection 192.168.1.176:5672] INFO com.burny.rabbitmq.five_exchange.Producer - 消息已别接收,deliveryTag:179,监听器收到的总次数:23
17:40:04.579 [AMQP Connection 192.168.1.176:5672] INFO com.burny.rabbitmq.five_exchange.Producer - 消息已别接收,deliveryTag:182,监听器收到的总次数:24
17:40:04.593 [AMQP Connection 192.168.1.176:5672] INFO com.burny.rabbitmq.five_exchange.Producer - 消息已别接收,deliveryTag:189,监听器收到的总次数:25
17:40:04.616 [AMQP Connection 192.168.1.176:5672] INFO com.burny.rabbitmq.five_exchange.Producer - 消息已别接收,deliveryTag:198,监听器收到的总次数:26
17:40:04.620 [AMQP Connection 192.168.1.176:5672] INFO com.burny.rabbitmq.five_exchange.Producer - 消息已别接收,deliveryTag:205,监听器收到的总次数:27
17:40:04.620 [AMQP Connection 192.168.1.176:5672] INFO com.burny.rabbitmq.five_exchange.Producer - 消息已别接收,deliveryTag:206,监听器收到的总次数:28
17:40:04.621 [AMQP Connection 192.168.1.176:5672] INFO com.burny.rabbitmq.five_exchange.Producer - 消息已别接收,deliveryTag:212,监听器收到的总次数:29
17:40:04.633 [AMQP Connection 192.168.1.176:5672] INFO com.burny.rabbitmq.five_exchange.Producer - 消息已别接收,deliveryTag:215,监听器收到的总次数:30
17:40:04.635 [AMQP Connection 192.168.1.176:5672] INFO com.burny.rabbitmq.five_exchange.Producer - 消息已别接收,deliveryTag:216,监听器收到的总次数:31
17:40:04.635 [AMQP Connection 192.168.1.176:5672] INFO com.burny.rabbitmq.five_exchange.Producer - 消息已别接收,deliveryTag:229,监听器收到的总次数:32
17:40:04.637 [AMQP Connection 192.168.1.176:5672] INFO com.burny.rabbitmq.five_exchange.Producer - 消息已别接收,deliveryTag:237,监听器收到的总次数:33
17:40:04.642 [AMQP Connection 192.168.1.176:5672] INFO com.burny.rabbitmq.five_exchange.Producer - 消息已别接收,deliveryTag:243,监听器收到的总次数:34
17:40:04.644 [AMQP Connection 192.168.1.176:5672] INFO com.burny.rabbitmq.five_exchange.Producer - 消息已别接收,deliveryTag:254,监听器收到的总次数:35
17:40:04.644 [AMQP Connection 192.168.1.176:5672] INFO com.burny.rabbitmq.five_exchange.Producer - 消息已别接收,deliveryTag:258,监听器收到的总次数:36
17:40:04.648 [AMQP Connection 192.168.1.176:5672] INFO com.burny.rabbitmq.five_exchange.Producer - 消息已别接收,deliveryTag:265,监听器收到的总次数:37
17:40:04.649 [AMQP Connection 192.168.1.176:5672] INFO com.burny.rabbitmq.five_exchange.Producer - 消息已别接收,deliveryTag:269,监听器收到的总次数:38
17:40:04.653 [AMQP Connection 192.168.1.176:5672] INFO com.burny.rabbitmq.five_exchange.Producer - 消息已别接收,deliveryTag:275,监听器收到的总次数:39
17:40:04.655 [AMQP Connection 192.168.1.176:5672] INFO com.burny.rabbitmq.five_exchange.Producer - 消息已别接收,deliveryTag:280,监听器收到的总次数:40
17:40:04.659 [AMQP Connection 192.168.1.176:5672] INFO com.burny.rabbitmq.five_exchange.Producer - 消息已别接收,deliveryTag:286,监听器收到的总次数:41
17:40:04.662 [AMQP Connection 192.168.1.176:5672] INFO com.burny.rabbitmq.five_exchange.Producer - 消息已别接收,deliveryTag:300,监听器收到的总次数:42
17:40:04.667 [AMQP Connection 192.168.1.176:5672] INFO com.burny.rabbitmq.five_exchange.Producer - 消息已别接收,deliveryTag:307,监听器收到的总次数:43
17:40:04.670 [AMQP Connection 192.168.1.176:5672] INFO com.burny.rabbitmq.five_exchange.Producer - 消息已别接收,deliveryTag:312,监听器收到的总次数:44
17:40:04.674 [AMQP Connection 192.168.1.176:5672] INFO com.burny.rabbitmq.five_exchange.Producer - 消息已别接收,deliveryTag:316,监听器收到的总次数:45
17:40:04.676 [AMQP Connection 192.168.1.176:5672] INFO com.burny.rabbitmq.five_exchange.Producer - 消息已别接收,deliveryTag:329,监听器收到的总次数:46
17:40:04.677 [AMQP Connection 192.168.1.176:5672] INFO com.burny.rabbitmq.five_exchange.Producer - 消息已别接收,deliveryTag:333,监听器收到的总次数:47
17:40:04.681 [AMQP Connection 192.168.1.176:5672] INFO com.burny.rabbitmq.five_exchange.Producer - 消息已别接收,deliveryTag:346,监听器收到的总次数:48
17:40:04.685 [AMQP Connection 192.168.1.176:5672] INFO com.burny.rabbitmq.five_exchange.Producer - 消息已别接收,deliveryTag:349,监听器收到的总次数:49
17:40:04.687 [AMQP Connection 192.168.1.176:5672] INFO com.burny.rabbitmq.five_exchange.Producer - 消息已别接收,deliveryTag:362,监听器收到的总次数:50
17:40:04.690 [AMQP Connection 192.168.1.176:5672] INFO com.burny.rabbitmq.five_exchange.Producer - 消息已别接收,deliveryTag:372,监听器收到的总次数:51
17:40:04.691 [AMQP Connection 192.168.1.176:5672] INFO com.burny.rabbitmq.five_exchange.Producer - 消息已别接收,deliveryTag:376,监听器收到的总次数:52
17:40:04.694 [AMQP Connection 192.168.1.176:5672] INFO com.burny.rabbitmq.five_exchange.Producer - 消息已别接收,deliveryTag:382,监听器收到的总次数:53
17:40:04.696 [AMQP Connection 192.168.1.176:5672] INFO com.burny.rabbitmq.five_exchange.Producer - 消息已别接收,deliveryTag:388,监听器收到的总次数:54
17:40:04.702 [AMQP Connection 192.168.1.176:5672] INFO com.burny.rabbitmq.five_exchange.Producer - 消息已别接收,deliveryTag:396,监听器收到的总次数:55
17:40:04.705 [AMQP Connection 192.168.1.176:5672] INFO com.burny.rabbitmq.five_exchange.Producer - 消息已别接收,deliveryTag:404,监听器收到的总次数:56
17:40:04.705 [AMQP Connection 192.168.1.176:5672] INFO com.burny.rabbitmq.five_exchange.Producer - 消息已别接收,deliveryTag:405,监听器收到的总次数:57
17:40:04.707 [AMQP Connection 192.168.1.176:5672] INFO com.burny.rabbitmq.five_exchange.Producer - 消息已别接收,deliveryTag:410,监听器收到的总次数:58
17:40:04.710 [AMQP Connection 192.168.1.176:5672] INFO com.burny.rabbitmq.five_exchange.Producer - 消息已别接收,deliveryTag:414,监听器收到的总次数:59
17:40:04.711 [AMQP Connection 192.168.1.176:5672] INFO com.burny.rabbitmq.five_exchange.Producer - 消息已别接收,deliveryTag:420,监听器收到的总次数:60
17:40:04.715 [AMQP Connection 192.168.1.176:5672] INFO com.burny.rabbitmq.five_exchange.Producer - 消息已别接收,deliveryTag:422,监听器收到的总次数:61
17:40:04.716 [AMQP Connection 192.168.1.176:5672] INFO com.burny.rabbitmq.five_exchange.Producer - 消息已别接收,deliveryTag:436,监听器收到的总次数:62
17:40:04.717 [AMQP Connection 192.168.1.176:5672] INFO com.burny.rabbitmq.five_exchange.Producer - 消息已别接收,deliveryTag:438,监听器收到的总次数:63
17:40:04.720 [AMQP Connection 192.168.1.176:5672] INFO com.burny.rabbitmq.five_exchange.Producer - 消息已别接收,deliveryTag:448,监听器收到的总次数:64
17:40:04.723 [AMQP Connection 192.168.1.176:5672] INFO com.burny.rabbitmq.five_exchange.Producer - 消息已别接收,deliveryTag:459,监听器收到的总次数:65
17:40:04.724 [AMQP Connection 192.168.1.176:5672] INFO com.burny.rabbitmq.five_exchange.Producer - 消息已别接收,deliveryTag:462,监听器收到的总次数:66
17:40:04.727 [AMQP Connection 192.168.1.176:5672] INFO com.burny.rabbitmq.five_exchange.Producer - 消息已别接收,deliveryTag:473,监听器收到的总次数:67
17:40:04.729 [AMQP Connection 192.168.1.176:5672] INFO com.burny.rabbitmq.five_exchange.Producer - 消息已别接收,deliveryTag:485,监听器收到的总次数:68
17:40:04.732 [AMQP Connection 192.168.1.176:5672] INFO com.burny.rabbitmq.five_exchange.Producer - 消息已别接收,deliveryTag:489,监听器收到的总次数:69
17:40:04.735 [AMQP Connection 192.168.1.176:5672] INFO com.burny.rabbitmq.five_exchange.Producer - 消息已别接收,deliveryTag:502,监听器收到的总次数:70
17:40:04.736 [AMQP Connection 192.168.1.176:5672] INFO com.burny.rabbitmq.five_exchange.Producer - 消息已别接收,deliveryTag:505,监听器收到的总次数:71
17:40:04.739 [AMQP Connection 192.168.1.176:5672] INFO com.burny.rabbitmq.five_exchange.Producer - 消息已别接收,deliveryTag:512,监听器收到的总次数:72
17:40:04.742 [AMQP Connection 192.168.1.176:5672] INFO com.burny.rabbitmq.five_exchange.Producer - 消息已别接收,deliveryTag:515,监听器收到的总次数:73
17:40:04.744 [AMQP Connection 192.168.1.176:5672] INFO com.burny.rabbitmq.five_exchange.Producer - 消息已别接收,deliveryTag:528,监听器收到的总次数:74
17:40:04.747 [AMQP Connection 192.168.1.176:5672] INFO com.burny.rabbitmq.five_exchange.Producer - 消息已别接收,deliveryTag:539,监听器收到的总次数:75
17:40:04.751 [AMQP Connection 192.168.1.176:5672] INFO com.burny.rabbitmq.five_exchange.Producer - 消息已别接收,deliveryTag:543,监听器收到的总次数:76
17:40:04.753 [AMQP Connection 192.168.1.176:5672] INFO com.burny.rabbitmq.five_exchange.Producer - 消息已别接收,deliveryTag:549,监听器收到的总次数:77
17:40:04.757 [AMQP Connection 192.168.1.176:5672] INFO com.burny.rabbitmq.five_exchange.Producer - 消息已别接收,deliveryTag:556,监听器收到的总次数:78
17:40:04.758 [AMQP Connection 192.168.1.176:5672] INFO com.burny.rabbitmq.five_exchange.Producer - 消息已别接收,deliveryTag:570,监听器收到的总次数:79
17:40:04.759 [AMQP Connection 192.168.1.176:5672] INFO com.burny.rabbitmq.five_exchange.Producer - 消息已别接收,deliveryTag:582,监听器收到的总次数:80
17:40:04.762 [AMQP Connection 192.168.1.176:5672] INFO com.burny.rabbitmq.five_exchange.Producer - 消息已别接收,deliveryTag:586,监听器收到的总次数:81
17:40:04.763 [AMQP Connection 192.168.1.176:5672] INFO com.burny.rabbitmq.five_exchange.Producer - 消息已别接收,deliveryTag:592,监听器收到的总次数:82
17:40:04.765 [AMQP Connection 192.168.1.176:5672] INFO com.burny.rabbitmq.five_exchange.Producer - 消息已别接收,deliveryTag:597,监听器收到的总次数:83
17:40:04.793 [AMQP Connection 192.168.1.176:5672] INFO com.burny.rabbitmq.five_exchange.Producer - 消息已别接收,deliveryTag:602,监听器收到的总次数:84
17:40:04.793 [AMQP Connection 192.168.1.176:5672] INFO com.burny.rabbitmq.five_exchange.Producer - 消息已别接收,deliveryTag:604,监听器收到的总次数:85
17:40:04.798 [AMQP Connection 192.168.1.176:5672] INFO com.burny.rabbitmq.five_exchange.Producer - 消息已别接收,deliveryTag:610,监听器收到的总次数:86
17:40:04.799 [AMQP Connection 192.168.1.176:5672] INFO com.burny.rabbitmq.five_exchange.Producer - 消息已别接收,deliveryTag:624,监听器收到的总次数:87
17:40:04.801 [AMQP Connection 192.168.1.176:5672] INFO com.burny.rabbitmq.five_exchange.Producer - 消息已别接收,deliveryTag:633,监听器收到的总次数:88
17:40:04.803 [AMQP Connection 192.168.1.176:5672] INFO com.burny.rabbitmq.five_exchange.Producer - 消息已别接收,deliveryTag:638,监听器收到的总次数:89
17:40:04.807 [AMQP Connection 192.168.1.176:5672] INFO com.burny.rabbitmq.five_exchange.Producer - 消息已别接收,deliveryTag:644,监听器收到的总次数:90
17:40:04.811 [AMQP Connection 192.168.1.176:5672] INFO com.burny.rabbitmq.five_exchange.Producer - 消息已别接收,deliveryTag:649,监听器收到的总次数:91
17:40:04.815 [AMQP Connection 192.168.1.176:5672] INFO com.burny.rabbitmq.five_exchange.Producer - 消息已别接收,deliveryTag:654,监听器收到的总次数:92
17:40:04.820 [AMQP Connection 192.168.1.176:5672] INFO com.burny.rabbitmq.five_exchange.Producer - 消息已别接收,deliveryTag:663,监听器收到的总次数:93
17:40:04.821 [AMQP Connection 192.168.1.176:5672] INFO com.burny.rabbitmq.five_exchange.Producer - 消息已别接收,deliveryTag:676,监听器收到的总次数:94
17:40:04.824 [AMQP Connection 192.168.1.176:5672] INFO com.burny.rabbitmq.five_exchange.Producer - 消息已别接收,deliveryTag:681,监听器收到的总次数:95
17:40:04.826 [AMQP Connection 192.168.1.176:5672] INFO com.burny.rabbitmq.five_exchange.Producer - 消息已别接收,deliveryTag:687,监听器收到的总次数:96
17:40:04.829 [AMQP Connection 192.168.1.176:5672] INFO com.burny.rabbitmq.five_exchange.Producer - 消息已别接收,deliveryTag:699,监听器收到的总次数:97
17:40:04.830 [AMQP Connection 192.168.1.176:5672] INFO com.burny.rabbitmq.five_exchange.Producer - 消息已别接收,deliveryTag:708,监听器收到的总次数:98
17:40:04.832 [AMQP Connection 192.168.1.176:5672] INFO com.burny.rabbitmq.five_exchange.Producer - 消息已别接收,deliveryTag:713,监听器收到的总次数:99
17:40:04.834 [AMQP Connection 192.168.1.176:5672] INFO com.burny.rabbitmq.five_exchange.Producer - 消息已别接收,deliveryTag:719,监听器收到的总次数:100
17:40:04.835 [AMQP Connection 192.168.1.176:5672] INFO com.burny.rabbitmq.five_exchange.Producer - 消息已别接收,deliveryTag:724,监听器收到的总次数:101
17:40:04.836 [AMQP Connection 192.168.1.176:5672] INFO com.burny.rabbitmq.five_exchange.Producer - 消息已别接收,deliveryTag:730,监听器收到的总次数:102
17:40:04.839 [AMQP Connection 192.168.1.176:5672] INFO com.burny.rabbitmq.five_exchange.Producer - 消息已别接收,deliveryTag:742,监听器收到的总次数:103
17:40:04.842 [AMQP Connection 192.168.1.176:5672] INFO com.burny.rabbitmq.five_exchange.Producer - 消息已别接收,deliveryTag:743,监听器收到的总次数:104
17:40:04.844 [AMQP Connection 192.168.1.176:5672] INFO com.burny.rabbitmq.five_exchange.Producer - 消息已别接收,deliveryTag:752,监听器收到的总次数:105
17:40:04.846 [AMQP Connection 192.168.1.176:5672] INFO com.burny.rabbitmq.five_exchange.Producer - 消息已别接收,deliveryTag:765,监听器收到的总次数:106
17:40:04.846 [AMQP Connection 192.168.1.176:5672] INFO com.burny.rabbitmq.five_exchange.Producer - 消息已别接收,deliveryTag:773,监听器收到的总次数:107
17:40:04.848 [AMQP Connection 192.168.1.176:5672] INFO com.burny.rabbitmq.five_exchange.Producer - 消息已别接收,deliveryTag:778,监听器收到的总次数:108
17:40:04.851 [AMQP Connection 192.168.1.176:5672] INFO com.burny.rabbitmq.five_exchange.Producer - 消息已别接收,deliveryTag:789,监听器收到的总次数:109
17:40:04.854 [AMQP Connection 192.168.1.176:5672] INFO com.burny.rabbitmq.five_exchange.Producer - 消息已别接收,deliveryTag:793,监听器收到的总次数:110
17:40:04.856 [AMQP Connection 192.168.1.176:5672] INFO com.burny.rabbitmq.five_exchange.Producer - 消息已别接收,deliveryTag:800,监听器收到的总次数:111
17:40:04.861 [AMQP Connection 192.168.1.176:5672] INFO com.burny.rabbitmq.five_exchange.Producer - 消息已别接收,deliveryTag:802,监听器收到的总次数:112
17:40:04.861 [AMQP Connection 192.168.1.176:5672] INFO com.burny.rabbitmq.five_exchange.Producer - 消息已别接收,deliveryTag:814,监听器收到的总次数:113
17:40:04.863 [AMQP Connection 192.168.1.176:5672] INFO com.burny.rabbitmq.five_exchange.Producer - 消息已别接收,deliveryTag:827,监听器收到的总次数:114
17:40:04.865 [AMQP Connection 192.168.1.176:5672] INFO com.burny.rabbitmq.five_exchange.Producer - 消息已别接收,deliveryTag:837,监听器收到的总次数:115
17:40:04.867 [AMQP Connection 192.168.1.176:5672] INFO com.burny.rabbitmq.five_exchange.Producer - 消息已别接收,deliveryTag:842,监听器收到的总次数:116
17:40:04.869 [AMQP Connection 192.168.1.176:5672] INFO com.burny.rabbitmq.five_exchange.Producer - 消息已别接收,deliveryTag:847,监听器收到的总次数:117
17:40:04.872 [AMQP Connection 192.168.1.176:5672] INFO com.burny.rabbitmq.five_exchange.Producer - 消息已别接收,deliveryTag:848,监听器收到的总次数:118
17:40:04.873 [AMQP Connection 192.168.1.176:5672] INFO com.burny.rabbitmq.five_exchange.Producer - 消息已别接收,deliveryTag:862,监听器收到的总次数:119
17:40:04.874 [AMQP Connection 192.168.1.176:5672] INFO com.burny.rabbitmq.five_exchange.Producer - 消息已别接收,deliveryTag:874,监听器收到的总次数:120
17:40:04.876 [AMQP Connection 192.168.1.176:5672] INFO com.burny.rabbitmq.five_exchange.Producer - 消息已别接收,deliveryTag:879,监听器收到的总次数:121
17:40:04.880 [AMQP Connection 192.168.1.176:5672] INFO com.burny.rabbitmq.five_exchange.Producer - 消息已别接收,deliveryTag:893,监听器收到的总次数:122
17:40:04.882 [AMQP Connection 192.168.1.176:5672] INFO com.burny.rabbitmq.five_exchange.Producer - 消息已别接收,deliveryTag:895,监听器收到的总次数:123
17:40:04.896 [AMQP Connection 192.168.1.176:5672] INFO com.burny.rabbitmq.five_exchange.Producer - 消息已别接收,deliveryTag:896,监听器收到的总次数:124
17:40:04.899 [AMQP Connection 192.168.1.176:5672] INFO com.burny.rabbitmq.five_exchange.Producer - 消息已别接收,deliveryTag:907,监听器收到的总次数:125
17:40:04.899 [AMQP Connection 192.168.1.176:5672] INFO com.burny.rabbitmq.five_exchange.Producer - 消息已别接收,deliveryTag:921,监听器收到的总次数:126
17:40:04.900 [AMQP Connection 192.168.1.176:5672] INFO com.burny.rabbitmq.five_exchange.Producer - 消息已别接收,deliveryTag:934,监听器收到的总次数:127
17:40:04.902 [AMQP Connection 192.168.1.176:5672] INFO com.burny.rabbitmq.five_exchange.Producer - 消息已别接收,deliveryTag:945,监听器收到的总次数:128
17:40:04.903 [AMQP Connection 192.168.1.176:5672] INFO com.burny.rabbitmq.five_exchange.Producer - 消息已别接收,deliveryTag:949,监听器收到的总次数:129
17:40:04.904 [AMQP Connection 192.168.1.176:5672] INFO com.burny.rabbitmq.five_exchange.Producer - 消息已别接收,deliveryTag:956,监听器收到的总次数:130
17:40:04.906 [AMQP Connection 192.168.1.176:5672] INFO com.burny.rabbitmq.five_exchange.Producer - 消息已别接收,deliveryTag:960,监听器收到的总次数:131
17:40:04.907 [AMQP Connection 192.168.1.176:5672] INFO com.burny.rabbitmq.five_exchange.Producer - 消息已别接收,deliveryTag:966,监听器收到的总次数:132
17:40:04.919 [AMQP Connection 192.168.1.176:5672] INFO com.burny.rabbitmq.five_exchange.Producer - 消息已别接收,deliveryTag:971,监听器收到的总次数:133
17:40:04.922 [AMQP Connection 192.168.1.176:5672] INFO com.burny.rabbitmq.five_exchange.Producer - 消息已别接收,deliveryTag:977,监听器收到的总次数:134
17:40:04.926 [AMQP Connection 192.168.1.176:5672] INFO com.burny.rabbitmq.five_exchange.Producer - 消息已别接收,deliveryTag:991,监听器收到的总次数:135
17:40:04.927 [AMQP Connection 192.168.1.176:5672] INFO com.burny.rabbitmq.five_exchange.Producer - 消息已别接收,deliveryTag:1000,监听器收到的总次数:136
直接交换机(direct exchange)
划重点:routingkey 的不同
画图
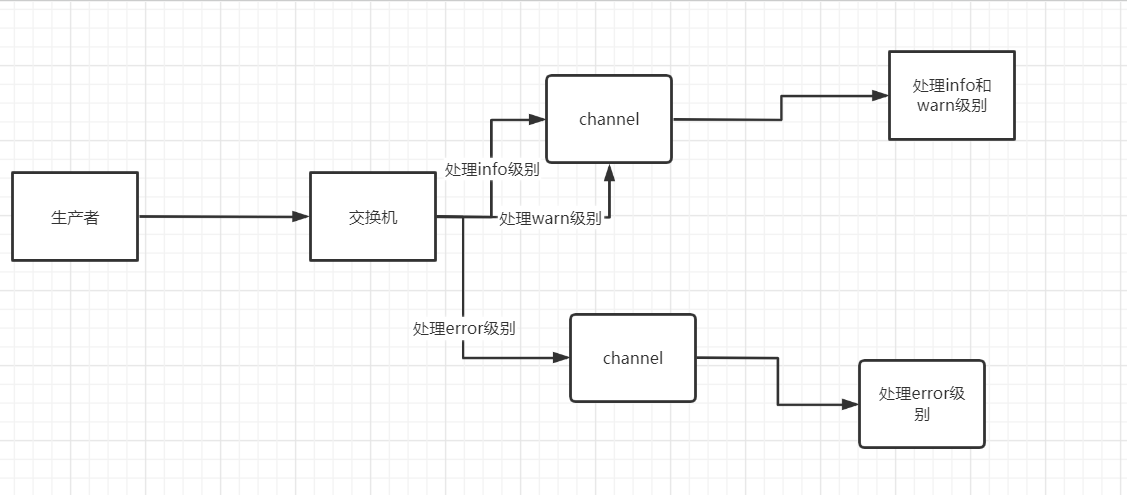
代码:和广播差不多,就是routingkey有点不同
:::: code-group
::: code-group-item 生产者
package com.burny.rabbitmq.six_direct;

import com.burny.rabbitmq.common.Info;
import com.rabbitmq.client.BuiltinExchangeType;
import com.rabbitmq.client.Channel;
import com.rabbitmq.client.ConfirmListener;
import lombok.SneakyThrows;
import lombok.extern.slf4j.Slf4j;

import java.io.IOException;
import java.nio.charset.StandardCharsets;
import java.util.Scanner;

/**
 * @Note TODO
 * @Author cyx
 *
 */
@Slf4j
public class Producer {
    private static final Integer batch = 100;

    @SneakyThrows
    public static void main(String[] args) {
        //如果发送前需要确保消费者已经处于监听状态,否则消息会丢失
        Channel channel = Info.getC();
        //channel.exchangeDeclare(Info.exchange_name, BuiltinExchangeType.FANOUT);
        channel.confirmSelect();
        channel.exchangeDeclare(Info.exchange_name, BuiltinExchangeType.DIRECT, true, false, null);
        //internal 参数:如果为true 则无法发第二遍
        Scanner scanner = new Scanner(System.in);


        ConfirmListener confirmListener1 = new ConfirmListener() {
            Integer a=0;
            @Override
            public void handleAck(long deliveryTag, boolean multiple) throws IOException {
                log.info("消息已别接收,deliveryTag:{},监听器收到的总次数:{}",deliveryTag,a);
                a++;
            }

            @Override
            public void handleNack(long deliveryTag, boolean multiple) throws IOException {
                System.out.println("消息已经被接拒收");


            }
        };
        channel.addConfirmListener(confirmListener1);

        while (scanner.hasNext()) {
            byte[] bytes = scanner.next().getBytes(StandardCharsets.UTF_8);
            String s = new String(bytes);
            for (int i = 0; i < 10; i++) {
                if (i%2==0){
                    channel.basicPublish(Info.exchange_name, "info", null, (s+"\t"+i+"\t"+"info").getBytes(StandardCharsets.UTF_8));
                    System.out.println("info:"+"发送次数" + i +";发送内容info:"+ (new String(bytes)+"info")+";下一次发送的deliveryTag"+channel.getNextPublishSeqNo());
                }
                if (i%2==1){
                    channel.basicPublish(Info.exchange_name, "warn", null, (s+"\t"+i+"\t"+"warn").getBytes(StandardCharsets.UTF_8));
                    System.out.println("warn:"+"发送次数" + i +";发送内容:warn"+ (new String(bytes)+"warn")+";下一次发送的deliveryTag"+channel.getNextPublishSeqNo());
                }
                if (i%5==0){
                    channel.basicPublish(Info.exchange_name, "error", null, (s+"\t"+i+"\t"+"error").getBytes(StandardCharsets.UTF_8));
                    System.out.println("error:"+"发送次数" + i +";发送内容:error"+ (new String(bytes)+"error")+";下一次发送的deliveryTag"+channel.getNextPublishSeqNo());
                }
            }
        }


    }


}
:::
::: code-group-item 消费者1
package com.burny.rabbitmq.six_direct;

import com.burny.rabbitmq.common.Info;
import com.rabbitmq.client.Channel;
import lombok.SneakyThrows;

/**
 * @Note TODO
 * @Author cyx
 *
 */

public class Consumer01 {
    @SneakyThrows
    public static void main(String[] args) {
        Channel channel = Info.getC();
        String queue = channel.queueDeclare().getQueue();
        //绑定交换机与队列
        channel.queueBind(queue,Info.exchange_name,"info",null);
        channel.queueBind(queue,Info.exchange_name,"warn",null);


        channel.basicConsume(queue,false,((message,delivery)->{
            System.out.println(new String(delivery.getBody()));
            channel.basicAck(delivery.getEnvelope().getDeliveryTag(),false);
        }),(consumerTag -> {
            System.out.println(new String(consumerTag));
        }));
    }
}
:::
::: code-group-item 消费者2
package com.burny.rabbitmq.six_direct;

import com.burny.rabbitmq.common.Info;
import com.rabbitmq.client.Channel;
import lombok.SneakyThrows;

/**
 * @Note TODO
 * @Author cyx
 *
 */

public class Consumer02 {
    @SneakyThrows
    public static void main(String[] args) {
        Channel channel = Info.getC();
        //生成临时队列,队列名称是随机的,当消费者断开与队列的连接,则队列会自动删除.
        String queue = channel.queueDeclare().getQueue();
        //绑定交换机与队列
        channel.queueBind(queue,Info.exchange_name,"error",null);

        channel.basicConsume(queue,true,((consumerTag,message)->{
            System.out.println(new String(message.getBody()));
        }),(consumerTag -> {
            System.out.println(new String(consumerTag));
        }));
    }
}
:::
::::
生产者
21:30:15.869 [main] DEBUG com.rabbitmq.client.impl.ConsumerWorkService - Creating executor service with 4 thread(s) for consumer work service
我是发送内容
info:发送次数0;发送内容info:我是发送内容info;下一次发送的deliveryTag2
error:发送次数0;发送内容:error我是发送内容error;下一次发送的deliveryTag3
warn:发送次数1;发送内容:warn我是发送内容warn;下一次发送的deliveryTag4
info:发送次数2;发送内容info:我是发送内容info;下一次发送的deliveryTag5
warn:发送次数3;发送内容:warn我是发送内容warn;下一次发送的deliveryTag6
info:发送次数4;发送内容info:我是发送内容info;下一次发送的deliveryTag7
warn:发送次数5;发送内容:warn我是发送内容warn;下一次发送的deliveryTag8
error:发送次数5;发送内容:error我是发送内容error;下一次发送的deliveryTag9
info:发送次数6;发送内容info:我是发送内容info;下一次发送的deliveryTag10
warn:发送次数7;发送内容:warn我是发送内容warn;下一次发送的deliveryTag11
info:发送次数8;发送内容info:我是发送内容info;下一次发送的deliveryTag12
warn:发送次数9;发送内容:warn我是发送内容warn;下一次发送的deliveryTag13
21:30:38.497 [AMQP Connection 192.168.1.176:5672] INFO com.burny.rabbitmq.six_direct.Producer - 消息已别接收,deliveryTag:4,监听器收到的总次数:0
21:30:38.499 [AMQP Connection 192.168.1.176:5672] INFO com.burny.rabbitmq.six_direct.Producer - 消息已别接收,deliveryTag:12,监听器收到的总次数:1
消费者1
21:30:19.939 [main] DEBUG com.rabbitmq.client.impl.ConsumerWorkService - Creating executor service with 4 thread(s) for consumer work service
我是发送内容	0	info
我是发送内容	1	warn
我是发送内容	2	info
我是发送内容	3	warn
我是发送内容	4	info
我是发送内容	5	warn
我是发送内容	6	info
我是发送内容	7	warn
我是发送内容	8	info
我是发送内容	9	warn
消费者2
21:30:23.667 [main] DEBUG com.rabbitmq.client.impl.ConsumerWorkService - Creating executor service with 4 thread(s) for consumer work service
我是发送内容	0	error
我是发送内容	5	error
主题交换机(Topic)
存在A,B,C三个客户端,分别处理 info warn error 级别的日志.当有一个trace级别的日志,既需要info warn 级别处理,不给error处理,则广播模式(扇出模式,发布订阅模式) 和直接交换机 满足不了这种需求.而主题交换机能做的不止于此.
topic 中的routingkey 写法
# 和*
# 匹配多个单词:注意是单词,不是单个字母
* 匹配单个单词
当一个队列绑定的# ,则相当于fanout.
如果队列绑定中没有 # 和* 没有出现,则是direct类型
如果同一个队列有有个条件(or关系,即满足其他即可配队列处理),如果消息同时满足了两个条件,但对于同一个队列来说,只能处理一次
*.*.a
    匹配 a.b.a
    不匹配b.a

#.a
    匹配
    a.a.a.b.a
    a
代码以及结果
这个测试可以有所提高.
:::: code-group
::: code-group-item 生产者
package com.burny.rabbitmq.severn_topic;

import com.burny.rabbitmq.common.Info;
import com.rabbitmq.client.BuiltinExchangeType;
import com.rabbitmq.client.Channel;
import com.rabbitmq.client.ConfirmListener;
import lombok.SneakyThrows;
import lombok.extern.slf4j.Slf4j;

import java.io.IOException;
import java.nio.charset.StandardCharsets;
import java.util.Scanner;

/**
 * @Note TODO
 * @Author cyx
 *
 */
@Slf4j
public class Producer {

    @SneakyThrows
    public static void main(String[] args) {
        //如果发送前需要确保消费者已经处于监听状态,否则消息会丢失
        Channel channel = Info.getC();
        //channel.exchangeDeclare(Info.exchange_name, BuiltinExchangeType.FANOUT);
        channel.confirmSelect();
        channel.exchangeDeclare(Info.exchange_name, BuiltinExchangeType.TOPIC, true, false, null);
        //internal 参数:如果为true 则无法发第二遍
        Scanner scanner = new Scanner(System.in);


        ConfirmListener confirmListener1 = new ConfirmListener() {
            Integer a=0;
            @Override
            public void handleAck(long deliveryTag, boolean multiple) throws IOException {
                log.info("消息已别接收,deliveryTag:{},监听器收到的总次数:{}",deliveryTag,a);
                a++;
            }

            @Override
            public void handleNack(long deliveryTag, boolean multiple) throws IOException {
                System.out.println("消息已经被接拒收");


            }
        };

        while (scanner.hasNext()) {
            byte[] bytes = scanner.next().getBytes(StandardCharsets.UTF_8);
            String s = new String(bytes);
            for (int i = 0; i < 10; i++) {
                //"*.info.*"
                //*.*.warn
                //"error.#"

                if (i%2==0){
                    channel.addConfirmListener(confirmListener1);

                    channel.basicPublish(Info.exchange_name, "a.info.a", null, (s+"\t"+i+"\t"+"info").getBytes(StandardCharsets.UTF_8));
                    System.out.println("info:"+"发送次数" + i +";发送内容info:"+ (new String(bytes)+"info")+";下一次发送的deliveryTag"+channel.getNextPublishSeqNo());
                }
                if (i%2==1){
                    channel.addConfirmListener(confirmListener1);

                    channel.basicPublish(Info.exchange_name, "a.a.warn", null, (s+"\t"+i+"\t"+"warn").getBytes(StandardCharsets.UTF_8));
                    System.out.println("warn:"+"发送次数" + i +";发送内容:warn"+ (new String(bytes)+"warn")+";下一次发送的deliveryTag"+channel.getNextPublishSeqNo());
                }
                if (i%5==0){
                    channel.addConfirmListener(confirmListener1);

                    channel.basicPublish(Info.exchange_name, "error.a.a", null, (s+"\t"+i+"\t"+"error").getBytes(StandardCharsets.UTF_8));
                    System.out.println("error:"+"发送次数" + i +";发送内容:error"+ (new String(bytes)+"error")+";下一次发送的deliveryTag"+channel.getNextPublishSeqNo());
                }
            }
        }


    }


}
:::
::: code-group-item 消费者1
package com.burny.rabbitmq.severn_topic;

import com.burny.rabbitmq.common.Info;
import com.rabbitmq.client.Channel;
import lombok.SneakyThrows;

/**
 * @Note TODO
 * @Author cyx
 *
 */

public class Consumer01 {
    @SneakyThrows
    public static void main(String[] args) {
        Channel channel = Info.getC();
        String queue = channel.queueDeclare().getQueue();
        //绑定交换机与队列
        channel.queueBind(queue,Info.exchange_name,"*.info.*",null);
        channel.queueBind(queue,Info.exchange_name,"*.*.warn",null);


        channel.basicConsume(queue,false,((message,delivery)->{
            System.out.println(new String(delivery.getBody())+"\t"+delivery.getEnvelope().getRoutingKey());
            channel.basicAck(delivery.getEnvelope().getDeliveryTag(),false);
        }),(consumerTag -> {
            System.out.println(new String(consumerTag));
        }));
    }
}
:::
::: code-group-item 消费者2
package com.burny.rabbitmq.severn_topic;

import com.burny.rabbitmq.common.Info;
import com.rabbitmq.client.Channel;
import lombok.SneakyThrows;

/**
 * @Note TODO
 * @Author cyx
 *
 */

public class Consumer02 {
    @SneakyThrows
    public static void main(String[] args) {
        Channel channel = Info.getC();
        //生成临时队列,队列名称是随机的,当消费者断开与队列的连接,则队列会自动删除.
        String queue = channel.queueDeclare().getQueue();
        //绑定交换机与队列
        channel.queueBind(queue,Info.exchange_name,"error.#",null);

        channel.basicConsume(queue,true,((consumerTag,message)->{
            System.out.println(new String(message.getBody())+"\t"+message.getEnvelope().getRoutingKey());
        }),(consumerTag -> {
            System.out.println(new String(consumerTag));
        }));
    }
}
:::
::::
生产者
22:09:18.842 [main] DEBUG com.rabbitmq.client.impl.ConsumerWorkService - Creating executor service with 4 thread(s) for consumer work service
a
info:发送次数0;发送内容info:ainfo;下一次发送的deliveryTag2
error:发送次数0;发送内容:erroraerror;下一次发送的deliveryTag3
warn:发送次数1;发送内容:warnawarn;下一次发送的deliveryTag4
info:发送次数2;发送内容info:ainfo;下一次发送的deliveryTag5
warn:发送次数3;发送内容:warnawarn;下一次发送的deliveryTag6
info:发送次数4;发送内容info:ainfo;下一次发送的deliveryTag7
warn:发送次数5;发送内容:warnawarn;下一次发送的deliveryTag8
error:发送次数5;发送内容:erroraerror;下一次发送的deliveryTag9
info:发送次数6;发送内容info:ainfo;下一次发送的deliveryTag10
warn:发送次数7;发送内容:warnawarn;下一次发送的deliveryTag11
info:发送次数8;发送内容info:ainfo;下一次发送的deliveryTag12
warn:发送次数9;发送内容:warnawarn;下一次发送的deliveryTag13
22:09:25.225 [AMQP Connection 192.168.1.176:5672] INFO com.burny.rabbitmq.severn_topic.Producer - 消息已别接收,deliveryTag:5,监听器收到的总次数:0
22:09:25.226 [AMQP Connection 192.168.1.176:5672] INFO com.burny.rabbitmq.severn_topic.Producer - 消息已别接收,deliveryTag:5,监听器收到的总次数:1
22:09:25.226 [AMQP Connection 192.168.1.176:5672] INFO com.burny.rabbitmq.severn_topic.Producer - 消息已别接收,deliveryTag:5,监听器收到的总次数:2
22:09:25.226 [AMQP Connection 192.168.1.176:5672] INFO com.burny.rabbitmq.severn_topic.Producer - 消息已别接收,deliveryTag:5,监听器收到的总次数:3
22:09:25.226 [AMQP Connection 192.168.1.176:5672] INFO com.burny.rabbitmq.severn_topic.Producer - 消息已别接收,deliveryTag:5,监听器收到的总次数:4
22:09:25.226 [AMQP Connection 192.168.1.176:5672] INFO com.burny.rabbitmq.severn_topic.Producer - 消息已别接收,deliveryTag:5,监听器收到的总次数:5
22:09:25.226 [AMQP Connection 192.168.1.176:5672] INFO com.burny.rabbitmq.severn_topic.Producer - 消息已别接收,deliveryTag:5,监听器收到的总次数:6
22:09:25.226 [AMQP Connection 192.168.1.176:5672] INFO com.burny.rabbitmq.severn_topic.Producer - 消息已别接收,deliveryTag:5,监听器收到的总次数:7
22:09:25.226 [AMQP Connection 192.168.1.176:5672] INFO com.burny.rabbitmq.severn_topic.Producer - 消息已别接收,deliveryTag:5,监听器收到的总次数:8
22:09:25.227 [AMQP Connection 192.168.1.176:5672] INFO com.burny.rabbitmq.severn_topic.Producer - 消息已别接收,deliveryTag:5,监听器收到的总次数:9
22:09:25.227 [AMQP Connection 192.168.1.176:5672] INFO com.burny.rabbitmq.severn_topic.Producer - 消息已别接收,deliveryTag:5,监听器收到的总次数:10
22:09:25.227 [AMQP Connection 192.168.1.176:5672] INFO com.burny.rabbitmq.severn_topic.Producer - 消息已别接收,deliveryTag:5,监听器收到的总次数:11
22:09:25.228 [AMQP Connection 192.168.1.176:5672] INFO com.burny.rabbitmq.severn_topic.Producer - 消息已别接收,deliveryTag:9,监听器收到的总次数:12
22:09:25.228 [AMQP Connection 192.168.1.176:5672] INFO com.burny.rabbitmq.severn_topic.Producer - 消息已别接收,deliveryTag:9,监听器收到的总次数:13
22:09:25.229 [AMQP Connection 192.168.1.176:5672] INFO com.burny.rabbitmq.severn_topic.Producer - 消息已别接收,deliveryTag:9,监听器收到的总次数:14
22:09:25.229 [AMQP Connection 192.168.1.176:5672] INFO com.burny.rabbitmq.severn_topic.Producer - 消息已别接收,deliveryTag:9,监听器收到的总次数:15
22:09:25.229 [AMQP Connection 192.168.1.176:5672] INFO com.burny.rabbitmq.severn_topic.Producer - 消息已别接收,deliveryTag:9,监听器收到的总次数:16
22:09:25.229 [AMQP Connection 192.168.1.176:5672] INFO com.burny.rabbitmq.severn_topic.Producer - 消息已别接收,deliveryTag:9,监听器收到的总次数:17
22:09:25.229 [AMQP Connection 192.168.1.176:5672] INFO com.burny.rabbitmq.severn_topic.Producer - 消息已别接收,deliveryTag:9,监听器收到的总次数:18
22:09:25.229 [AMQP Connection 192.168.1.176:5672] INFO com.burny.rabbitmq.severn_topic.Producer - 消息已别接收,deliveryTag:9,监听器收到的总次数:19
22:09:25.229 [AMQP Connection 192.168.1.176:5672] INFO com.burny.rabbitmq.severn_topic.Producer - 消息已别接收,deliveryTag:9,监听器收到的总次数:20
22:09:25.230 [AMQP Connection 192.168.1.176:5672] INFO com.burny.rabbitmq.severn_topic.Producer - 消息已别接收,deliveryTag:9,监听器收到的总次数:21
22:09:25.230 [AMQP Connection 192.168.1.176:5672] INFO com.burny.rabbitmq.severn_topic.Producer - 消息已别接收,deliveryTag:9,监听器收到的总次数:22
22:09:25.230 [AMQP Connection 192.168.1.176:5672] INFO com.burny.rabbitmq.severn_topic.Producer - 消息已别接收,deliveryTag:9,监听器收到的总次数:23
22:09:25.231 [AMQP Connection 192.168.1.176:5672] INFO com.burny.rabbitmq.severn_topic.Producer - 消息已别接收,deliveryTag:12,监听器收到的总次数:24
22:09:25.232 [AMQP Connection 192.168.1.176:5672] INFO com.burny.rabbitmq.severn_topic.Producer - 消息已别接收,deliveryTag:12,监听器收到的总次数:25
22:09:25.232 [AMQP Connection 192.168.1.176:5672] INFO com.burny.rabbitmq.severn_topic.Producer - 消息已别接收,deliveryTag:12,监听器收到的总次数:26
22:09:25.232 [AMQP Connection 192.168.1.176:5672] INFO com.burny.rabbitmq.severn_topic.Producer - 消息已别接收,deliveryTag:12,监听器收到的总次数:27
22:09:25.232 [AMQP Connection 192.168.1.176:5672] INFO com.burny.rabbitmq.severn_topic.Producer - 消息已别接收,deliveryTag:12,监听器收到的总次数:28
22:09:25.232 [AMQP Connection 192.168.1.176:5672] INFO com.burny.rabbitmq.severn_topic.Producer - 消息已别接收,deliveryTag:12,监听器收到的总次数:29
22:09:25.232 [AMQP Connection 192.168.1.176:5672] INFO com.burny.rabbitmq.severn_topic.Producer - 消息已别接收,deliveryTag:12,监听器收到的总次数:30
22:09:25.232 [AMQP Connection 192.168.1.176:5672] INFO com.burny.rabbitmq.severn_topic.Producer - 消息已别接收,deliveryTag:12,监听器收到的总次数:31
22:09:25.232 [AMQP Connection 192.168.1.176:5672] INFO com.burny.rabbitmq.severn_topic.Producer - 消息已别接收,deliveryTag:12,监听器收到的总次数:32
22:09:25.232 [AMQP Connection 192.168.1.176:5672] INFO com.burny.rabbitmq.severn_topic.Producer - 消息已别接收,deliveryTag:12,监听器收到的总次数:33
22:09:25.232 [AMQP Connection 192.168.1.176:5672] INFO com.burny.rabbitmq.severn_topic.Producer - 消息已别接收,deliveryTag:12,监听器收到的总次数:34
22:09:25.232 [AMQP Connection 192.168.1.176:5672] INFO com.burny.rabbitmq.severn_topic.Producer - 消息已别接收,deliveryTag:12,监听器收到的总次数:35
消费者1
22:08:12.502 [main] DEBUG com.rabbitmq.client.impl.ConsumerWorkService - Creating executor service with 4 thread(s) for consumer work service
a
a	0	info	a.info.a
a	1	warn	a.a.warn
a	2	info	a.info.a
a	3	warn	a.a.warn
a	4	info	a.info.a
a	5	warn	a.a.warn
a	6	info	a.info.a
a	7	warn	a.a.warn
a	8	info	a.info.a
a	9	warn	a.a.warn
a	0	info	a.info.a
a	1	warn	a.a.warn
a	2	info	a.info.a
a	3	warn	a.a.warn
a	4	info	a.info.a
a	5	warn	a.a.warn
a	6	info	a.info.a
a	7	warn	a.a.warn
a	8	info	a.info.a
a	9	warn	a.a.warn
消费者2
a	0	error	error.a.a
a	5	error	error.a.a
a	0	error	error.a.a
a	5	error	error.a.a
死信队列
无法被消费的信息,一般来说 生产者将消息投递到broker 或者queue中,消费者从队列去除消息进行消费,但由于某些时候,导致队列中的某些消息无法被消费,这样的消息如果没有后续处理,就变成死信 ,多条组成死信队列
原因
消息TTL过期
队列达到了最大的长度(队列满足了,无法再添加数据到mq中)
消息被拒绝(basic.reject 或basic.nack)并且设置 requeue=false (重新放入队列false)
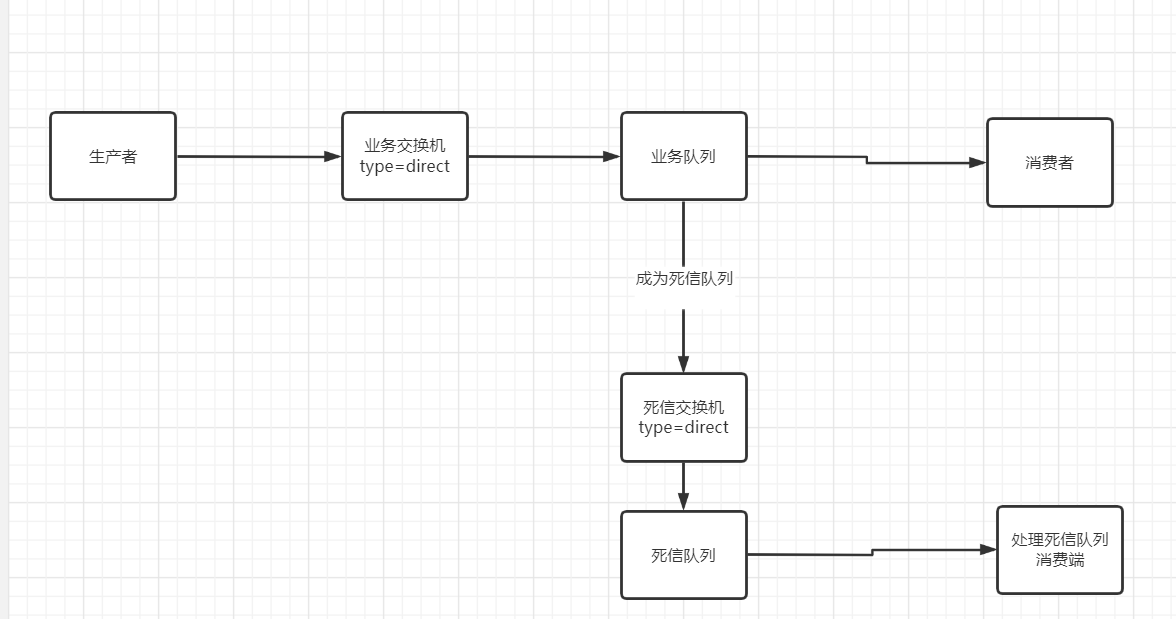
死信队列是在消费者转发到死信队列,而不是生产端转发到死信队列
- 如果是消费者设置Thread.sleep() 的时候设置延迟时间,,则不会放到死信队列。
- 如果是将业务消费端停止掉,则新发的会放到死信队列.(实验唯一成功的实例)
- 用的是异步函数.这也是最奇怪的地方.生产端每次发送都是已被接收并且已经被消费确认.
TTL
:::: code-group ::: code-group-itme 生产端
package com.burny.rabbitmq.eight_dead;

import com.burny.rabbitmq.common.Info;
import com.rabbitmq.client.AMQP;
import com.rabbitmq.client.BuiltinExchangeType;
import com.rabbitmq.client.Channel;
import com.rabbitmq.client.ConfirmListener;
import lombok.SneakyThrows;
import lombok.extern.slf4j.Slf4j;

import java.io.IOException;
import java.nio.charset.StandardCharsets;
import java.util.HashMap;
import java.util.Scanner;

/**
 * @Note TODO
 * @Author cyx
 *
 */
@Slf4j
public class Producer {

    @SneakyThrows
    public static void main(String[] args) {
        //如果发送前需要确保消费者已经处于监听状态,否则消息会丢失
        Channel channel = Info.getC();
        //交换机名字;交换机类型;是否持久化;是否自动删除,参数
        channel.exchangeDeclare(Info.exchange_name, BuiltinExchangeType.DIRECT, true, false, null);
        ConfirmListener confirmListener1 = new ConfirmListener() {
            //仅仅用于
            @Override
            public void handleAck(long deliveryTag, boolean multiple) throws IOException {
                log.info("消息已被接收,deliveryTag:{}",deliveryTag);
            }

            @Override
            public void handleNack(long deliveryTag, boolean multiple) throws IOException {
                log.info("消息已经被接拒收,deliveryTag:{}",deliveryTag);
            }
        };
        channel.addConfirmListener(confirmListener1);
        channel.confirmSelect();
        AMQP.BasicProperties properties=new AMQP.BasicProperties().builder().expiration("1").build();
            String s = new String("我是发送内容");
            for (int i = 0; i < 100; i++) {
                channel.basicPublish(Info.exchange_name, Info.dead_routing_key, properties, (s).getBytes(StandardCharsets.UTF_8));
                log.info("发送次数" + i +";发送内容:"+ (new String(s))+";下一次发送的deliveryTag"+channel.getNextPublishSeqNo());
        }


    }

}
::: ::: code-group-itme 消费者
package com.burny.rabbitmq.eight_dead;

import com.burny.rabbitmq.common.Info;
import com.rabbitmq.client.BasicProperties;
import com.rabbitmq.client.BuiltinExchangeType;
import com.rabbitmq.client.Channel;
import lombok.SneakyThrows;
import lombok.extern.slf4j.Slf4j;

import java.util.HashMap;

/**
 * @Note TODO
 * @Author cyx
 *
 */
@Slf4j
public class Consumer01 {
    @SneakyThrows
    public static void main(String[] args) {
        Channel channel = Info.getC();

        //声明死信交换机
        //生命死信交换机,死信交换机类型;是否持久化,是否自动删除,是否是内部的,参数
        channel.exchangeDeclare(Info.dead_exchange_name, BuiltinExchangeType.DIRECT,true,false,true,null);
        channel.queueDeclare(Info.dead_queue_name,false,false,false,null);
        channel.queueBind(Info.dead_queue_name,Info.dead_exchange_name,Info.dead_routing_key,null);
        //消费端队列 设置routingkey
        HashMap<String, Object> map=new HashMap<>();
        map.put("x-dead-letter-exchange",Info.dead_exchange_name);
        map.put("x-dead-letter-routing-key",Info.dead_routing_key);
        //成为死信队列2 原因:设置最大长度
        //map.put("x-max-length",10);
        //过期时间可以由生产端指定,只可以设置一次,如果生产端设置的话可以设置多次
        //map.put("x-message-ttl",10000);
        //new BasicProperties() 提供另外一种方式设置属性
        //业务消费端队列
        channel.queueDeclare(Info.queue_name,false,false,false,map);
        //消费端队列与业务交换机绑定
        channel.queueBind(Info.queue_name,Info.exchange_name,Info.dead_routing_key,null);

        channel.basicConsume(Info.queue_name,false,((message,delivery)->{
            try {
                Thread.sleep(10000);
            } catch (InterruptedException e) {
                throw new RuntimeException(e);
            }
            log.info(Info.pre+new String(delivery.getBody()));
            channel.basicAck(delivery.getEnvelope().getDeliveryTag(),false);
        }),(consumerTag -> {
            log.info(Info.callback+new String(consumerTag));
        }));
    }
}
::: ::: code-group-itme 死信交换机
package com.burny.rabbitmq.eight_dead;

import com.burny.rabbitmq.common.Info;
import com.rabbitmq.client.Channel;
import lombok.SneakyThrows;
import lombok.extern.slf4j.Slf4j;

/**
 * @Note TODO
 * @Author cyx
 *
 */

@Slf4j
public class Dead {

    @SneakyThrows
    public static void main(String[] args) {
        Channel channel = Info.getC();
        channel.basicConsume(Info.dead_queue_name,false,((message,delivery)->{
            log.info(Info.pre+new String(delivery.getBody()));
            channel.basicAck(delivery.getEnvelope().getDeliveryTag(),false);
        }),(consumerTag -> {
            log.info(Info.callback+new String(consumerTag));
        }));
    }
}
::: ::::
执行顺序结果,此非常重要,需要认真看下
- 先启动生产者
结果
D:\soft\jdk\jdk8\installpath\bin\java.exe -javaagent:D:\soft\idea\2022\ideaIU-2022.2.win\lib\idea_rt.jar=65241:D:\soft\idea\2022\ideaIU-2022.2.win\bin -Dfile.encoding=UTF-8 -classpath D:\soft\jdk\jdk8\installpath\jre\lib\charsets.jar;D:\soft\jdk\jdk8\installpath\jre\lib\deploy.jar;D:\soft\jdk\jdk8\installpath\jre\lib\ext\access-bridge-64.jar;D:\soft\jdk\jdk8\installpath\jre\lib\ext\cldrdata.jar;D:\soft\jdk\jdk8\installpath\jre\lib\ext\dnsns.jar;D:\soft\jdk\jdk8\installpath\jre\lib\ext\jaccess.jar;D:\soft\jdk\jdk8\installpath\jre\lib\ext\jfxrt.jar;D:\soft\jdk\jdk8\installpath\jre\lib\ext\localedata.jar;D:\soft\jdk\jdk8\installpath\jre\lib\ext\nashorn.jar;D:\soft\jdk\jdk8\installpath\jre\lib\ext\sunec.jar;D:\soft\jdk\jdk8\installpath\jre\lib\ext\sunjce_provider.jar;D:\soft\jdk\jdk8\installpath\jre\lib\ext\sunmscapi.jar;D:\soft\jdk\jdk8\installpath\jre\lib\ext\sunpkcs11.jar;D:\soft\jdk\jdk8\installpath\jre\lib\ext\zipfs.jar;D:\soft\jdk\jdk8\installpath\jre\lib\javaws.jar;D:\soft\jdk\jdk8\installpath\jre\lib\jce.jar;D:\soft\jdk\jdk8\installpath\jre\lib\jfr.jar;D:\soft\jdk\jdk8\installpath\jre\lib\jfxswt.jar;D:\soft\jdk\jdk8\installpath\jre\lib\jsse.jar;D:\soft\jdk\jdk8\installpath\jre\lib\management-agent.jar;D:\soft\jdk\jdk8\installpath\jre\lib\plugin.jar;D:\soft\jdk\jdk8\installpath\jre\lib\resources.jar;D:\soft\jdk\jdk8\installpath\jre\lib\rt.jar;D:\work\project\burny-rabbitmq\burny-rabbitmq-01\build\classes\java\main;D:\work\project\burny-rabbitmq\burny-rabbitmq-01\out\production\resources;D:\soft\gradle\repo\caches\modules-2\files-2.1\org.springframework.boot\spring-boot-starter-web\2.7.1\29f47f503f9955b1a9746870aeaebdba448416d\spring-boot-starter-web-2.7.1.jar;D:\soft\gradle\repo\caches\modules-2\files-2.1\com.rabbitmq\amqp-client\5.15.0\39b6429ad779befe3b963b4737838c63d04f7980\amqp-client-5.15.0.jar;D:\soft\gradle\repo\caches\modules-2\files-2.1\commons-io\commons-io\2.11.0\a2503f302b11ebde7ebc3df41daebe0e4eea3689\commons-io-2.11.0.jar;D:\soft\gradle\repo\caches\modules-2\files-2.1\org.projectlombok\lombok\1.18.24\13a394eed5c4f9efb2a6d956e2086f1d81e857d9\lombok-1.18.24.jar;D:\soft\gradle\repo\caches\modules-2\files-2.1\org.springframework.boot\spring-boot-starter-json\2.7.1\711889df8474d7f0271b1e25cd75a9249e0a4621\spring-boot-starter-json-2.7.1.jar;D:\soft\gradle\repo\caches\modules-2\files-2.1\org.springframework.boot\spring-boot-starter\2.7.1\48f7e04459ccc16d3532bfc486c1b6d629e6e0fc\spring-boot-starter-2.7.1.jar;D:\soft\gradle\repo\caches\modules-2\files-2.1\org.springframework.boot\spring-boot-starter-tomcat\2.7.1\c99fe94b685f1707907afb84ecb998ac13271ead\spring-boot-starter-tomcat-2.7.1.jar;D:\soft\gradle\repo\caches\modules-2\files-2.1\org.springframework\spring-webmvc\5.3.21\a62db425cc29c48e138846e706ca37acb138ca13\spring-webmvc-5.3.21.jar;D:\soft\gradle\repo\caches\modules-2\files-2.1\org.springframework\spring-web\5.3.21\317aadd37f70ba34ff93d068343e3110b5dcf2f\spring-web-5.3.21.jar;D:\soft\gradle\repo\caches\modules-2\files-2.1\org.slf4j\slf4j-api\1.7.36\6c62681a2f655b49963a5983b8b0950a6120ae14\slf4j-api-1.7.36.jar;D:\soft\gradle\repo\caches\modules-2\files-2.1\com.fasterxml.jackson.datatype\jackson-datatype-jsr310\2.13.3\ad2f4c61aeb9e2a8bb5e4a3ed782cfddec52d972\jackson-datatype-jsr310-2.13.3.jar;D:\soft\gradle\repo\caches\modules-2\files-2.1\com.fasterxml.jackson.module\jackson-module-parameter-names\2.13.3\f71c4ecc1a403787c963f68bc619b78ce1d2687b\jackson-module-parameter-names-2.13.3.jar;D:\soft\gradle\repo\caches\modules-2\files-2.1\com.fasterxml.jackson.datatype\jackson-datatype-jdk8\2.13.3\d4884595d5aab5babdb00ddbd693b8fd36b5ec3c\jackson-datatype-jdk8-2.13.3.jar;D:\soft\gradle\repo\caches\modules-2\files-2.1\com.fasterxml.jackson.core\jackson-databind\2.13.3\56deb9ea2c93a7a556b3afbedd616d342963464e\jackson-databind-2.13.3.jar;D:\soft\gradle\repo\caches\modules-2\files-2.1\org.springframework.boot\spring-boot-starter-logging\2.7.1\461cf82dc10505f47d3ce2146bd01721177cde4a\spring-boot-starter-logging-2.7.1.jar;D:\soft\gradle\repo\caches\modules-2\files-2.1\org.springframework.boot\spring-boot-autoconfigure\2.7.1\923ad789b004e8cc17d67853b1e4d3db11946f0\spring-boot-autoconfigure-2.7.1.jar;D:\soft\gradle\repo\caches\modules-2\files-2.1\org.springframework.boot\spring-boot\2.7.1\8e49b8e7e9ea470a7772f489532264732ab206a2\spring-boot-2.7.1.jar;D:\soft\gradle\repo\caches\modules-2\files-2.1\jakarta.annotation\jakarta.annotation-api\1.3.5\59eb84ee0d616332ff44aba065f3888cf002cd2d\jakarta.annotation-api-1.3.5.jar;D:\soft\gradle\repo\caches\modules-2\files-2.1\org.springframework\spring-core\5.3.21\1b0c9be6b972e4c615f175c70fc32e80557e68e8\spring-core-5.3.21.jar;D:\soft\gradle\repo\caches\modules-2\files-2.1\org.yaml\snakeyaml\1.30\8fde7fe2586328ac3c68db92045e1c8759125000\snakeyaml-1.30.jar;D:\soft\gradle\repo\caches\modules-2\files-2.1\org.apache.tomcat.embed\tomcat-embed-websocket\9.0.64\2a5e4f1f04830f2bfd01108ddc59a451c4baef34\tomcat-embed-websocket-9.0.64.jar;D:\soft\gradle\repo\caches\modules-2\files-2.1\org.apache.tomcat.embed\tomcat-embed-core\9.0.64\2d91a06d1b93ba13a2cca9e9ea7c143a64037351\tomcat-embed-core-9.0.64.jar;D:\soft\gradle\repo\caches\modules-2\files-2.1\org.apache.tomcat.embed\tomcat-embed-el\9.0.64\227363669235feab54519102af723a54d1a7850e\tomcat-embed-el-9.0.64.jar;D:\soft\gradle\repo\caches\modules-2\files-2.1\org.springframework\spring-context\5.3.21\fe371c85f02b8c6690fc3b3d0950ef4f965db0cd\spring-context-5.3.21.jar;D:\soft\gradle\repo\caches\modules-2\files-2.1\org.springframework\spring-expression\5.3.21\ca8c5822fc528066ec717f1e74160a1575c43192\spring-expression-5.3.21.jar;D:\soft\gradle\repo\caches\modules-2\files-2.1\org.springframework\spring-aop\5.3.21\58ec4ff7a0ce30a1e2612f04ad0fb13ea806705\spring-aop-5.3.21.jar;D:\soft\gradle\repo\caches\modules-2\files-2.1\org.springframework\spring-beans\5.3.21\e3eae7e6d211381642a0b7507a5215e3ac1b32e1\spring-beans-5.3.21.jar;D:\soft\gradle\repo\caches\modules-2\files-2.1\com.fasterxml.jackson.core\jackson-annotations\2.13.3\7198b3aac15285a49e218e08441c5f70af00fc51\jackson-annotations-2.13.3.jar;D:\soft\gradle\repo\caches\modules-2\files-2.1\com.fasterxml.jackson.core\jackson-core\2.13.3\a27014716e4421684416e5fa83d896ddb87002da\jackson-core-2.13.3.jar;D:\soft\gradle\repo\caches\modules-2\files-2.1\ch.qos.logback\logback-classic\1.2.11\4741689214e9d1e8408b206506cbe76d1c6a7d60\logback-classic-1.2.11.jar;D:\soft\gradle\repo\caches\modules-2\files-2.1\org.apache.logging.log4j\log4j-to-slf4j\2.17.2\17dd0fae2747d9a28c67bc9534108823d2376b46\log4j-to-slf4j-2.17.2.jar;D:\soft\gradle\repo\caches\modules-2\files-2.1\org.slf4j\jul-to-slf4j\1.7.36\ed46d81cef9c412a88caef405b58f93a678ff2ca\jul-to-slf4j-1.7.36.jar;D:\soft\gradle\repo\caches\modules-2\files-2.1\org.springframework\spring-jcl\5.3.21\b41a2888c0e708f9fd12cf9cc0c29cebbcab2e5e\spring-jcl-5.3.21.jar;D:\soft\gradle\repo\caches\modules-2\files-2.1\ch.qos.logback\logback-core\1.2.11\a01230df5ca5c34540cdaa3ad5efb012f1f1f792\logback-core-1.2.11.jar;D:\soft\gradle\repo\caches\modules-2\files-2.1\org.apache.logging.log4j\log4j-api\2.17.2\f42d6afa111b4dec5d2aea0fe2197240749a4ea6\log4j-api-2.17.2.jar com.burny.rabbitmq.eight_dead.Producer
23:22:40.528 [main] DEBUG com.rabbitmq.client.impl.ConsumerWorkService - Creating executor service with 4 thread(s) for consumer work service
23:22:40.674 [main] INFO com.burny.rabbitmq.eight_dead.Producer - 发送次数0;发送内容:我是发送内容;下一次发送的deliveryTag2
23:22:40.674 [main] INFO com.burny.rabbitmq.eight_dead.Producer - 发送次数1;发送内容:我是发送内容;下一次发送的deliveryTag3
23:22:40.674 [main] INFO com.burny.rabbitmq.eight_dead.Producer - 发送次数2;发送内容:我是发送内容;下一次发送的deliveryTag4
23:22:40.674 [main] INFO com.burny.rabbitmq.eight_dead.Producer - 发送次数3;发送内容:我是发送内容;下一次发送的deliveryTag5
23:22:40.674 [main] INFO com.burny.rabbitmq.eight_dead.Producer - 发送次数4;发送内容:我是发送内容;下一次发送的deliveryTag6
23:22:40.675 [main] INFO com.burny.rabbitmq.eight_dead.Producer - 发送次数5;发送内容:我是发送内容;下一次发送的deliveryTag7
23:22:40.675 [main] INFO com.burny.rabbitmq.eight_dead.Producer - 发送次数6;发送内容:我是发送内容;下一次发送的deliveryTag8
23:22:40.675 [main] INFO com.burny.rabbitmq.eight_dead.Producer - 发送次数7;发送内容:我是发送内容;下一次发送的deliveryTag9
23:22:40.675 [main] INFO com.burny.rabbitmq.eight_dead.Producer - 发送次数8;发送内容:我是发送内容;下一次发送的deliveryTag10
23:22:40.676 [main] INFO com.burny.rabbitmq.eight_dead.Producer - 发送次数9;发送内容:我是发送内容;下一次发送的deliveryTag11
23:22:40.676 [AMQP Connection 192.168.1.176:5672] INFO com.burny.rabbitmq.eight_dead.Producer - 消息已被接收,deliveryTag:1
23:22:40.676 [main] INFO com.burny.rabbitmq.eight_dead.Producer - 发送次数10;发送内容:我是发送内容;下一次发送的deliveryTag12
23:22:40.676 [main] INFO com.burny.rabbitmq.eight_dead.Producer - 发送次数11;发送内容:我是发送内容;下一次发送的deliveryTag13
23:22:40.676 [main] INFO com.burny.rabbitmq.eight_dead.Producer - 发送次数12;发送内容:我是发送内容;下一次发送的deliveryTag14
23:22:40.677 [main] INFO com.burny.rabbitmq.eight_dead.Producer - 发送次数13;发送内容:我是发送内容;下一次发送的deliveryTag15
23:22:40.677 [main] INFO com.burny.rabbitmq.eight_dead.Producer - 发送次数14;发送内容:我是发送内容;下一次发送的deliveryTag16
23:22:40.677 [main] INFO com.burny.rabbitmq.eight_dead.Producer - 发送次数15;发送内容:我是发送内容;下一次发送的deliveryTag17
23:22:40.677 [main] INFO com.burny.rabbitmq.eight_dead.Producer - 发送次数16;发送内容:我是发送内容;下一次发送的deliveryTag18
23:22:40.677 [main] INFO com.burny.rabbitmq.eight_dead.Producer - 发送次数17;发送内容:我是发送内容;下一次发送的deliveryTag19
23:22:40.678 [main] INFO com.burny.rabbitmq.eight_dead.Producer - 发送次数18;发送内容:我是发送内容;下一次发送的deliveryTag20
23:22:40.678 [main] INFO com.burny.rabbitmq.eight_dead.Producer - 发送次数19;发送内容:我是发送内容;下一次发送的deliveryTag21
23:22:40.678 [main] INFO com.burny.rabbitmq.eight_dead.Producer - 发送次数20;发送内容:我是发送内容;下一次发送的deliveryTag22
23:22:40.679 [AMQP Connection 192.168.1.176:5672] INFO com.burny.rabbitmq.eight_dead.Producer - 消息已被接收,deliveryTag:11
23:22:40.679 [main] INFO com.burny.rabbitmq.eight_dead.Producer - 发送次数21;发送内容:我是发送内容;下一次发送的deliveryTag23
23:22:40.681 [main] INFO com.burny.rabbitmq.eight_dead.Producer - 发送次数22;发送内容:我是发送内容;下一次发送的deliveryTag24
23:22:40.682 [AMQP Connection 192.168.1.176:5672] INFO com.burny.rabbitmq.eight_dead.Producer - 消息已被接收,deliveryTag:14
23:22:40.683 [main] INFO com.burny.rabbitmq.eight_dead.Producer - 发送次数23;发送内容:我是发送内容;下一次发送的deliveryTag25
23:22:40.683 [main] INFO com.burny.rabbitmq.eight_dead.Producer - 发送次数24;发送内容:我是发送内容;下一次发送的deliveryTag26
23:22:40.683 [main] INFO com.burny.rabbitmq.eight_dead.Producer - 发送次数25;发送内容:我是发送内容;下一次发送的deliveryTag27
23:22:40.683 [main] INFO com.burny.rabbitmq.eight_dead.Producer - 发送次数26;发送内容:我是发送内容;下一次发送的deliveryTag28
23:22:40.683 [AMQP Connection 192.168.1.176:5672] INFO com.burny.rabbitmq.eight_dead.Producer - 消息已被接收,deliveryTag:22
23:22:40.683 [main] INFO com.burny.rabbitmq.eight_dead.Producer - 发送次数27;发送内容:我是发送内容;下一次发送的deliveryTag29
23:22:40.684 [main] INFO com.burny.rabbitmq.eight_dead.Producer - 发送次数28;发送内容:我是发送内容;下一次发送的deliveryTag30
23:22:40.684 [main] INFO com.burny.rabbitmq.eight_dead.Producer - 发送次数29;发送内容:我是发送内容;下一次发送的deliveryTag31
23:22:40.684 [main] INFO com.burny.rabbitmq.eight_dead.Producer - 发送次数30;发送内容:我是发送内容;下一次发送的deliveryTag32
23:22:40.685 [main] INFO com.burny.rabbitmq.eight_dead.Producer - 发送次数31;发送内容:我是发送内容;下一次发送的deliveryTag33
23:22:40.685 [main] INFO com.burny.rabbitmq.eight_dead.Producer - 发送次数32;发送内容:我是发送内容;下一次发送的deliveryTag34
23:22:40.685 [main] INFO com.burny.rabbitmq.eight_dead.Producer - 发送次数33;发送内容:我是发送内容;下一次发送的deliveryTag35
23:22:40.686 [main] INFO com.burny.rabbitmq.eight_dead.Producer - 发送次数34;发送内容:我是发送内容;下一次发送的deliveryTag36
23:22:40.686 [main] INFO com.burny.rabbitmq.eight_dead.Producer - 发送次数35;发送内容:我是发送内容;下一次发送的deliveryTag37
23:22:40.686 [main] INFO com.burny.rabbitmq.eight_dead.Producer - 发送次数36;发送内容:我是发送内容;下一次发送的deliveryTag38
23:22:40.686 [main] INFO com.burny.rabbitmq.eight_dead.Producer - 发送次数37;发送内容:我是发送内容;下一次发送的deliveryTag39
23:22:40.686 [main] INFO com.burny.rabbitmq.eight_dead.Producer - 发送次数38;发送内容:我是发送内容;下一次发送的deliveryTag40
23:22:40.687 [AMQP Connection 192.168.1.176:5672] INFO com.burny.rabbitmq.eight_dead.Producer - 消息已被接收,deliveryTag:29
23:22:40.687 [main] INFO com.burny.rabbitmq.eight_dead.Producer - 发送次数39;发送内容:我是发送内容;下一次发送的deliveryTag41
23:22:40.687 [main] INFO com.burny.rabbitmq.eight_dead.Producer - 发送次数40;发送内容:我是发送内容;下一次发送的deliveryTag42
23:22:40.687 [main] INFO com.burny.rabbitmq.eight_dead.Producer - 发送次数41;发送内容:我是发送内容;下一次发送的deliveryTag43
23:22:40.688 [main] INFO com.burny.rabbitmq.eight_dead.Producer - 发送次数42;发送内容:我是发送内容;下一次发送的deliveryTag44
23:22:40.688 [main] INFO com.burny.rabbitmq.eight_dead.Producer - 发送次数43;发送内容:我是发送内容;下一次发送的deliveryTag45
23:22:40.688 [main] INFO com.burny.rabbitmq.eight_dead.Producer - 发送次数44;发送内容:我是发送内容;下一次发送的deliveryTag46
23:22:40.689 [main] INFO com.burny.rabbitmq.eight_dead.Producer - 发送次数45;发送内容:我是发送内容;下一次发送的deliveryTag47
23:22:40.689 [main] INFO com.burny.rabbitmq.eight_dead.Producer - 发送次数46;发送内容:我是发送内容;下一次发送的deliveryTag48
23:22:40.689 [main] INFO com.burny.rabbitmq.eight_dead.Producer - 发送次数47;发送内容:我是发送内容;下一次发送的deliveryTag49
23:22:40.689 [main] INFO com.burny.rabbitmq.eight_dead.Producer - 发送次数48;发送内容:我是发送内容;下一次发送的deliveryTag50
23:22:40.689 [main] INFO com.burny.rabbitmq.eight_dead.Producer - 发送次数49;发送内容:我是发送内容;下一次发送的deliveryTag51
23:22:40.690 [main] INFO com.burny.rabbitmq.eight_dead.Producer - 发送次数50;发送内容:我是发送内容;下一次发送的deliveryTag52
23:22:40.690 [main] INFO com.burny.rabbitmq.eight_dead.Producer - 发送次数51;发送内容:我是发送内容;下一次发送的deliveryTag53
23:22:40.690 [main] INFO com.burny.rabbitmq.eight_dead.Producer - 发送次数52;发送内容:我是发送内容;下一次发送的deliveryTag54
23:22:40.691 [main] INFO com.burny.rabbitmq.eight_dead.Producer - 发送次数53;发送内容:我是发送内容;下一次发送的deliveryTag55
23:22:40.691 [main] INFO com.burny.rabbitmq.eight_dead.Producer - 发送次数54;发送内容:我是发送内容;下一次发送的deliveryTag56
23:22:40.691 [main] INFO com.burny.rabbitmq.eight_dead.Producer - 发送次数55;发送内容:我是发送内容;下一次发送的deliveryTag57
23:22:40.692 [main] INFO com.burny.rabbitmq.eight_dead.Producer - 发送次数56;发送内容:我是发送内容;下一次发送的deliveryTag58
23:22:40.692 [main] INFO com.burny.rabbitmq.eight_dead.Producer - 发送次数57;发送内容:我是发送内容;下一次发送的deliveryTag59
23:22:40.692 [main] INFO com.burny.rabbitmq.eight_dead.Producer - 发送次数58;发送内容:我是发送内容;下一次发送的deliveryTag60
23:22:40.692 [AMQP Connection 192.168.1.176:5672] INFO com.burny.rabbitmq.eight_dead.Producer - 消息已被接收,deliveryTag:39
23:22:40.692 [main] INFO com.burny.rabbitmq.eight_dead.Producer - 发送次数59;发送内容:我是发送内容;下一次发送的deliveryTag61
23:22:40.692 [main] INFO com.burny.rabbitmq.eight_dead.Producer - 发送次数60;发送内容:我是发送内容;下一次发送的deliveryTag62
23:22:40.693 [main] INFO com.burny.rabbitmq.eight_dead.Producer - 发送次数61;发送内容:我是发送内容;下一次发送的deliveryTag63
23:22:40.693 [main] INFO com.burny.rabbitmq.eight_dead.Producer - 发送次数62;发送内容:我是发送内容;下一次发送的deliveryTag64
23:22:40.693 [main] INFO com.burny.rabbitmq.eight_dead.Producer - 发送次数63;发送内容:我是发送内容;下一次发送的deliveryTag65
23:22:40.694 [main] INFO com.burny.rabbitmq.eight_dead.Producer - 发送次数64;发送内容:我是发送内容;下一次发送的deliveryTag66
23:22:40.694 [main] INFO com.burny.rabbitmq.eight_dead.Producer - 发送次数65;发送内容:我是发送内容;下一次发送的deliveryTag67
23:22:40.694 [main] INFO com.burny.rabbitmq.eight_dead.Producer - 发送次数66;发送内容:我是发送内容;下一次发送的deliveryTag68
23:22:40.695 [main] INFO com.burny.rabbitmq.eight_dead.Producer - 发送次数67;发送内容:我是发送内容;下一次发送的deliveryTag69
23:22:40.695 [main] INFO com.burny.rabbitmq.eight_dead.Producer - 发送次数68;发送内容:我是发送内容;下一次发送的deliveryTag70
23:22:40.695 [main] INFO com.burny.rabbitmq.eight_dead.Producer - 发送次数69;发送内容:我是发送内容;下一次发送的deliveryTag71
23:22:40.695 [main] INFO com.burny.rabbitmq.eight_dead.Producer - 发送次数70;发送内容:我是发送内容;下一次发送的deliveryTag72
23:22:40.695 [main] INFO com.burny.rabbitmq.eight_dead.Producer - 发送次数71;发送内容:我是发送内容;下一次发送的deliveryTag73
23:22:40.696 [main] INFO com.burny.rabbitmq.eight_dead.Producer - 发送次数72;发送内容:我是发送内容;下一次发送的deliveryTag74
23:22:40.696 [main] INFO com.burny.rabbitmq.eight_dead.Producer - 发送次数73;发送内容:我是发送内容;下一次发送的deliveryTag75
23:22:40.696 [main] INFO com.burny.rabbitmq.eight_dead.Producer - 发送次数74;发送内容:我是发送内容;下一次发送的deliveryTag76
23:22:40.696 [main] INFO com.burny.rabbitmq.eight_dead.Producer - 发送次数75;发送内容:我是发送内容;下一次发送的deliveryTag77
23:22:40.696 [main] INFO com.burny.rabbitmq.eight_dead.Producer - 发送次数76;发送内容:我是发送内容;下一次发送的deliveryTag78
23:22:40.696 [AMQP Connection 192.168.1.176:5672] INFO com.burny.rabbitmq.eight_dead.Producer - 消息已被接收,deliveryTag:48
23:22:40.696 [main] INFO com.burny.rabbitmq.eight_dead.Producer - 发送次数77;发送内容:我是发送内容;下一次发送的deliveryTag79
23:22:40.700 [AMQP Connection 192.168.1.176:5672] INFO com.burny.rabbitmq.eight_dead.Producer - 消息已被接收,deliveryTag:59
23:22:40.701 [main] INFO com.burny.rabbitmq.eight_dead.Producer - 发送次数78;发送内容:我是发送内容;下一次发送的deliveryTag80
23:22:40.701 [main] INFO com.burny.rabbitmq.eight_dead.Producer - 发送次数79;发送内容:我是发送内容;下一次发送的deliveryTag81
23:22:40.701 [main] INFO com.burny.rabbitmq.eight_dead.Producer - 发送次数80;发送内容:我是发送内容;下一次发送的deliveryTag82
23:22:40.702 [main] INFO com.burny.rabbitmq.eight_dead.Producer - 发送次数81;发送内容:我是发送内容;下一次发送的deliveryTag83
23:22:40.702 [main] INFO com.burny.rabbitmq.eight_dead.Producer - 发送次数82;发送内容:我是发送内容;下一次发送的deliveryTag84
23:22:40.702 [main] INFO com.burny.rabbitmq.eight_dead.Producer - 发送次数83;发送内容:我是发送内容;下一次发送的deliveryTag85
23:22:40.702 [main] INFO com.burny.rabbitmq.eight_dead.Producer - 发送次数84;发送内容:我是发送内容;下一次发送的deliveryTag86
23:22:40.702 [main] INFO com.burny.rabbitmq.eight_dead.Producer - 发送次数85;发送内容:我是发送内容;下一次发送的deliveryTag87
23:22:40.702 [main] INFO com.burny.rabbitmq.eight_dead.Producer - 发送次数86;发送内容:我是发送内容;下一次发送的deliveryTag88
23:22:40.703 [main] INFO com.burny.rabbitmq.eight_dead.Producer - 发送次数87;发送内容:我是发送内容;下一次发送的deliveryTag89
23:22:40.703 [AMQP Connection 192.168.1.176:5672] INFO com.burny.rabbitmq.eight_dead.Producer - 消息已被接收,deliveryTag:69
23:22:40.703 [main] INFO com.burny.rabbitmq.eight_dead.Producer - 发送次数88;发送内容:我是发送内容;下一次发送的deliveryTag90
23:22:40.703 [AMQP Connection 192.168.1.176:5672] INFO com.burny.rabbitmq.eight_dead.Producer - 消息已被接收,deliveryTag:79
23:22:40.703 [main] INFO com.burny.rabbitmq.eight_dead.Producer - 发送次数89;发送内容:我是发送内容;下一次发送的deliveryTag91
23:22:40.703 [main] INFO com.burny.rabbitmq.eight_dead.Producer - 发送次数90;发送内容:我是发送内容;下一次发送的deliveryTag92
23:22:40.703 [main] INFO com.burny.rabbitmq.eight_dead.Producer - 发送次数91;发送内容:我是发送内容;下一次发送的deliveryTag93
23:22:40.704 [main] INFO com.burny.rabbitmq.eight_dead.Producer - 发送次数92;发送内容:我是发送内容;下一次发送的deliveryTag94
23:22:40.704 [main] INFO com.burny.rabbitmq.eight_dead.Producer - 发送次数93;发送内容:我是发送内容;下一次发送的deliveryTag95
23:22:40.704 [main] INFO com.burny.rabbitmq.eight_dead.Producer - 发送次数94;发送内容:我是发送内容;下一次发送的deliveryTag96
23:22:40.704 [main] INFO com.burny.rabbitmq.eight_dead.Producer - 发送次数95;发送内容:我是发送内容;下一次发送的deliveryTag97
23:22:40.705 [main] INFO com.burny.rabbitmq.eight_dead.Producer - 发送次数96;发送内容:我是发送内容;下一次发送的deliveryTag98
23:22:40.705 [main] INFO com.burny.rabbitmq.eight_dead.Producer - 发送次数97;发送内容:我是发送内容;下一次发送的deliveryTag99
23:22:40.705 [main] INFO com.burny.rabbitmq.eight_dead.Producer - 发送次数98;发送内容:我是发送内容;下一次发送的deliveryTag100
23:22:40.705 [main] INFO com.burny.rabbitmq.eight_dead.Producer - 发送次数99;发送内容:我是发送内容;下一次发送的deliveryTag101
23:22:40.710 [AMQP Connection 192.168.1.176:5672] INFO com.burny.rabbitmq.eight_dead.Producer - 消息已被接收,deliveryTag:89
23:22:40.711 [AMQP Connection 192.168.1.176:5672] INFO com.burny.rabbitmq.eight_dead.Producer - 消息已被接收,deliveryTag:96
23:22:40.712 [AMQP Connection 192.168.1.176:5672] INFO com.burny.rabbitmq.eight_dead.Producer - 消息已被接收,deliveryTag:100
此时的消费者还没启动.但是消费已经被接收!!!
启动消费者.此时消费者是没有任何消息进行消费
启动死信消费者
重启下生产者,则会显示
消息已经被接收,跟上面可以压缩的结果一样此时消费者进行消费,全部积压在消费者.而不会到死信队列!!!

关闭消费者,
重启生产者,则消息进入死信队列,死信消费端立即处理
消费者队列达到最大
:::: code-group
::: code-group-item 消费者
        //消费端队列 设置routingkey
        HashMap<String, Object> map=new HashMap<>();
        map.put("x-dead-letter-exchange",Info.dead_exchange_name);
        map.put("x-dead-letter-routing-key",Info.dead_routing_key);
        //成为死信队列2 原因:设置最大长度
        map.put("x-max-length",10);
        //过期时间可以由生产端指定,只可以设置一次,如果生产端设置的话可以设置多次
        //map.put("x-message-ttl",10000);
        //new BasicProperties() 提供另外一种方式设置属性
        //业务消费端队列
        channel.queueDeclare(Info.queue_name,false,false,false,map);
:::
::::
消费拒绝
:::: code-group
::: code-group-item 消费者
 channel.basicConsume(Info.queue_name,false,((message,delivery)->{
            //拒绝收消息
            //参数:标记,重新放入生产者队列
            channel.basicReject(delivery.getEnvelope().getDeliveryTag(),false);
            log.info(Info.pre+new String(delivery.getBody()));
            //接收消息
            //参数:标记,批量应答
            channel.basicAck(delivery.getEnvelope().getDeliveryTag(),false);
        }),(consumerTag -> {
            log.info(Info.callback+new String(consumerTag));
        }));
:::
::::
延迟队列
队列内部是有序的,最重要的特性就体现它的延时属性上,延时队列中的元素是希望在制定时间到了以后或之前去除和处理.
上述死信队列中:成为死信队列的第一种方法TTL过期时间就是延迟队列.生产者生产后,必须要经过TTL时间才能到达死信队列.此时进过TTL时间则称为 死信队列;
延迟队列使用的场景
- 订单在十分钟之内未支付则自动取消
- 用户发起退款,如果三天内没有得到处理则通知相关运行人员
- 预定会议后,需要再预定时间点前10分钟通知各个与会人员参加人员
这些场景看起来都是定时任务,但是实际是延迟队列.
Rabbit中的TTL
队列中的TTL
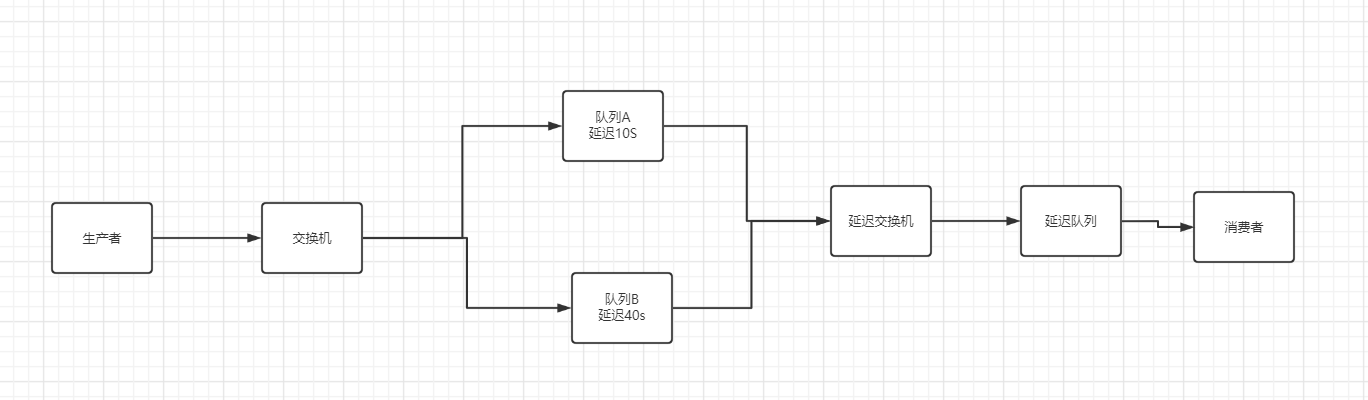
文件
信息定义说明:busi_ex 、 busi_q 代表的是普通交换机 或者 普通队列; busi 取business 即业务的意思
d 代表的是dead 即死信
结果:
2022-08-27 20:02:12.240  INFO 5004 --- [io-10001-exec-1] c.b.r.nine_lazy_queue.SendMsgController  : 当前时间2022-08-27T20:02:12.239,发送一条消息给两个TTL队列:我是发送内容
2022-08-27 20:02:22.298  INFO 5004 --- [ntContainer#0-1] c.b.r.n.TTLConsumerListener              : 当前时间:2022-08-27T20:02:22.298,获取消息:10s我是发送内容
2022-08-27 20:02:52.266  INFO 5004 --- [ntContainer#0-1] c.b.r.n.TTLConsumerListener              : 当前时间:2022-08-27T20:02:52.266,获取消息:40s我是发送内容
这里有一个需要注意地方
  @Bean(Info.busi_queue2)
    public Queue busi_queue2() {
        return QueueBuilder
                .durable(Info.busi_queue2)
                .ttl(40 * 1000)
                .expires(40*1000)
                .deadLetterExchange(Info.dead_exchange)
                .deadLetterRoutingKey(Info.rt_q1_to_d_ex)
                .build();
    }
如果是 ttl= expires的时间 不会打印消费内容
2022-08-27 21:26:58.751  INFO 18360 --- [io-10001-exec-1] c.b.r.nine_lazy_queue.SendMsgController  : 当前时间2022-08-27T21:26:58.751,发送一条消息给两个TTL队列:我是发送内容
2022-08-27 21:27:08.814  INFO 18360 --- [ntContainer#0-1] c.b.r.n.TTLConsumerListener              : 当前时间:2022-08-27T21:27:08.814,获取消息:10s我是发送内容
如果是ttl < expires 都会打印
2022-08-27 21:34:03.877  INFO 8568 --- [io-10001-exec-1] c.b.r.nine_lazy_queue.SendMsgController  : 当前时间2022-08-27T21:34:03.877,发送一条消息给两个TTL队列:我是发送内容
2022-08-27 21:34:13.944  INFO 8568 --- [ntContainer#0-1] c.b.r.n.TTLConsumerListener              : 当前时间:2022-08-27T21:34:13.944,获取消息:10s我是发送内容
2022-08-27 21:34:43.908  INFO 8568 --- [ntContainer#0-1] c.b.r.n.TTLConsumerListener              : 当前时间:2022-08-27T21:34:43.908,获取消息:40s我是发送内容
如果是ttl> expires 不会打印消费内容
2022-08-27 21:26:58.751  INFO 18360 --- [io-10001-exec-1] c.b.r.nine_lazy_queue.SendMsgController  : 当前时间2022-08-27T21:26:58.751,发送一条消息给两个TTL队列:我是发送内容
2022-08-27 21:27:08.814  INFO 18360 --- [ntContainer#0-1] c.b.r.n.TTLConsumerListener              : 当前时间:2022-08-27T21:27:08.814,获取消息:10s我是发送内容
延迟队列优化--自定义延迟时间
⚠️不可能是新增一个时间要求,例如某事件过期30s ,如果新增一个需求是过期1min .就新增一个队列.需要有一个队列适合任意时间.
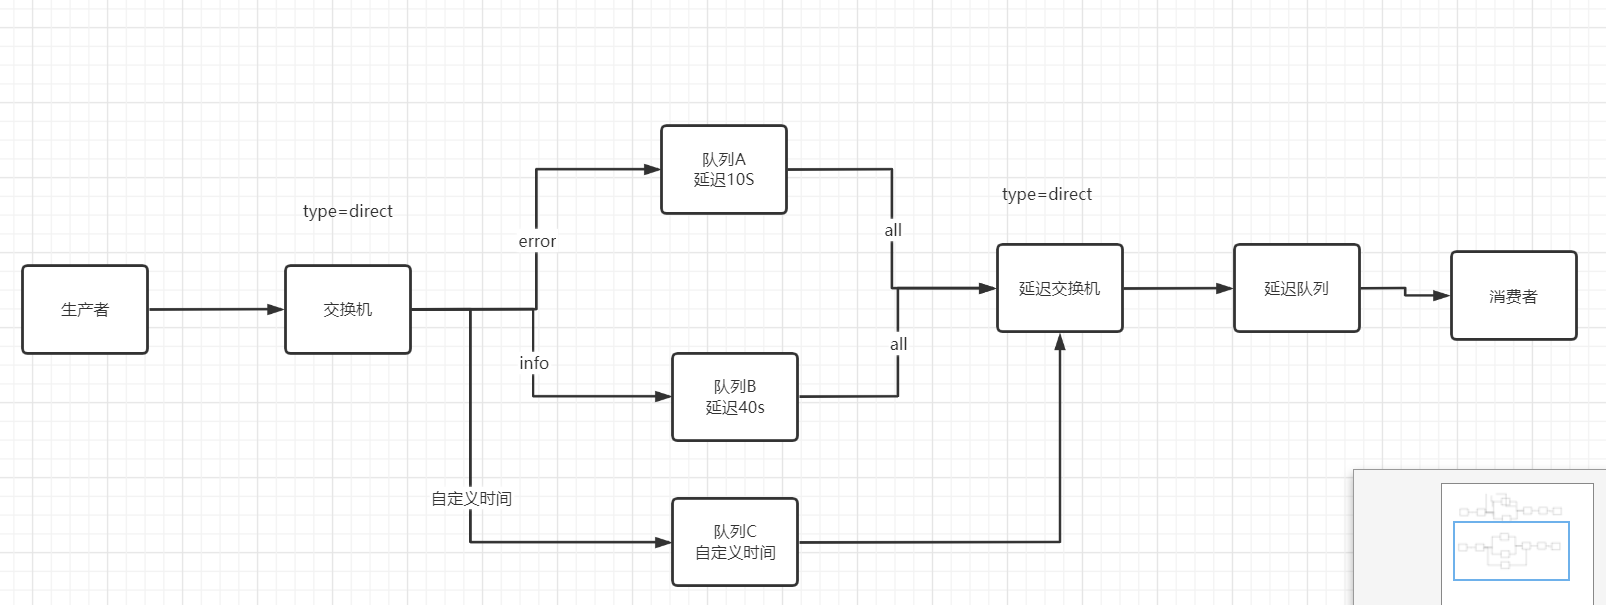
上面说的问题。expire 和ttl
    @Bean(Info.busi_custtl_queue)
    public Queue busi_custtl_queue() {
        return QueueBuilder
                .durable(Info.busi_custtl_queue)
                .deadLetterExchange(Info.dead_exchange)
                .deadLetterRoutingKey(Info.rt_b_custtl_to_d)
                .build();
    }

    @Bean
    public Binding busi_custtl_queue2dead_exchange(@Qualifier(Info.busi_custtl_queue) Queue busi_custtl_queue, @Qualifier(Info.busi_exchange) DirectExchange busi_exchange) {
        return BindingBuilder.bind(busi_custtl_queue).to(busi_exchange).with(Info.rt_b_ex_to_custtl);
    }
    public static final String busi_custtl_queue = "busi_custtl_queue";
    public static final String rt_b_ex_to_custtl = "rt_b_ex_to_custtl";
    public static final String rt_b_custtl_to_d = "rt_b_custtl_to_d";
 @GetMapping("/sendMsg/{data}/{ttl}")
    public void sendMsg(@PathVariable(value = "data") String data, @PathVariable(value = "ttl") Integer ttl) {
        //log.info("当前时间{},发送一条消息给两个TTL队列:{}", LocalDateTime.now(), data);
        //
        //rabbitTemplate.convertAndSend(Info.busi_exchange, Info.rt_b_ex_to_q1,  data);
        //rabbitTemplate.convertAndSend(Info.busi_exchange, Info.rt_b_ex_to_q2, data);
        log.info("当前时间{},发送一条消息给自定义TTL队列,TTL 时间:{} ,消息内:{}", LocalDateTime.now(), ttl, data);

        rabbitTemplate.convertAndSend(Info.busi_exchange, Info.rt_b_ex_to_custtl, data, message -> {
            message.getMessageProperties().setExpiration(String.valueOf(ttl * 1000));
            return message;
        });

    }
消费端代码不变.
⚠️此种情况结果下并不会打印死信队列中被消费
查看网上的说法:
- ttl 队列有效期 (队头:过期即成为死信,转入死信队列.原来的队列就删除了)
- expire 消息有效期(等到消费的时候才 去去校验是否过期,如果过期了才成为死信队列,再把原来的队列删除掉.而不是过期的时候就已经删除掉了.) 这个也说明了上述的验证 是打印不出来消息成为死信队列.
当我们设置消息有效期之后,消息过期了就会从队列中删除了(进入死信队列),但是两种方式对应的 删除时机有一些差异
(1) 全局 ------ 消息进入 RabbitMQ 是存在一个消息队列中的,队列的头部是最早要过期的消息,所以 RabbitMQ 只需要一个定时任务,从头部开始扫描是否有过期消息,有的话就直接删除。
(2) 局部 ------ 这种方式当消息过期时并不会立马被删除,而是当消息要投递给消费者的时候才会去删除。因为这种方式,每条消息的过期时间都不一样,想要知道哪条消息过期,必须要遍历队列中的所有消息才能实现,当消息比较多时这样就比较耗费性能了。因此对于这种方式,当消息需要投递给消费者时才去删除。
————————————————
版权声明:本文为CSDN博主「天怎么不会塌」的原创文章,遵循CC 4.0 BY-SA版权协议,转载请附上原文出处链接及本声明。
原文链接:https://blog.csdn.net/weixin_50983264/article/details/125283084
基于死信队列存在的问题--惰性检查,队列先进先出
惰性检查
前提 约定当前时间为0s
第一次发送  自定义过期时间  20 s
立马发送第二次
第二次发送  自定过期时间  2s
结果
  第一次 发送的内容  过期时间 为   20s 即在第20s
  第二次 发送的内容  过期时间 为   20s+2s
而不是
第一次发送20s
第二次发送2s
接收第二次发送2s
接收第一次发送20s
总结:前一个 发送的延迟时长 比后一个发送的延迟时长 长时,需要先执行前一个后再执行第二个.好比 数据结构总的队列.先进先出的特点
rabbitmq 插件(rabbitmq_delayed_message_exchange)实现延迟队列
安装
[安装路径] /usr/lib/rabbitmq/lib/rabbitmq_server-3.10.7/plugins
rabbitmq-plugins enable rabbitmq_delayed_message_exchange

注意:安装时不需要带 .ex 不需要带版本号,不然会报找不到插件。也不要随意更改插件 文件 名称
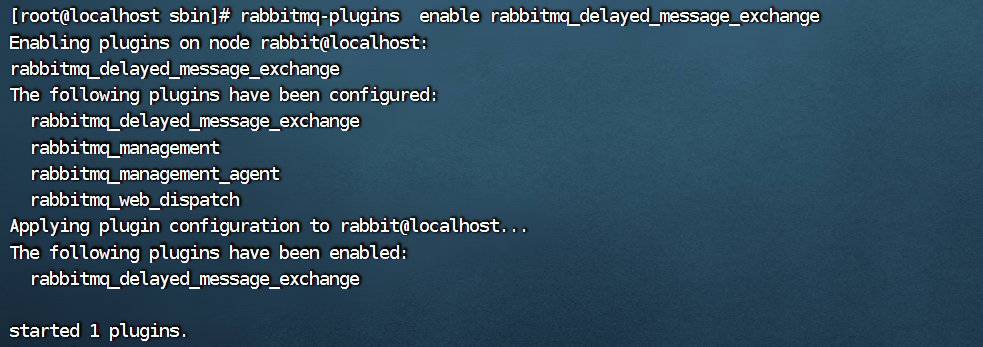

systemctl restart rabbitmq-server
安装完 可以在交换机找到 延迟交换机(注意,之前是通过延迟队列形成.现在是直接放在了交换机)
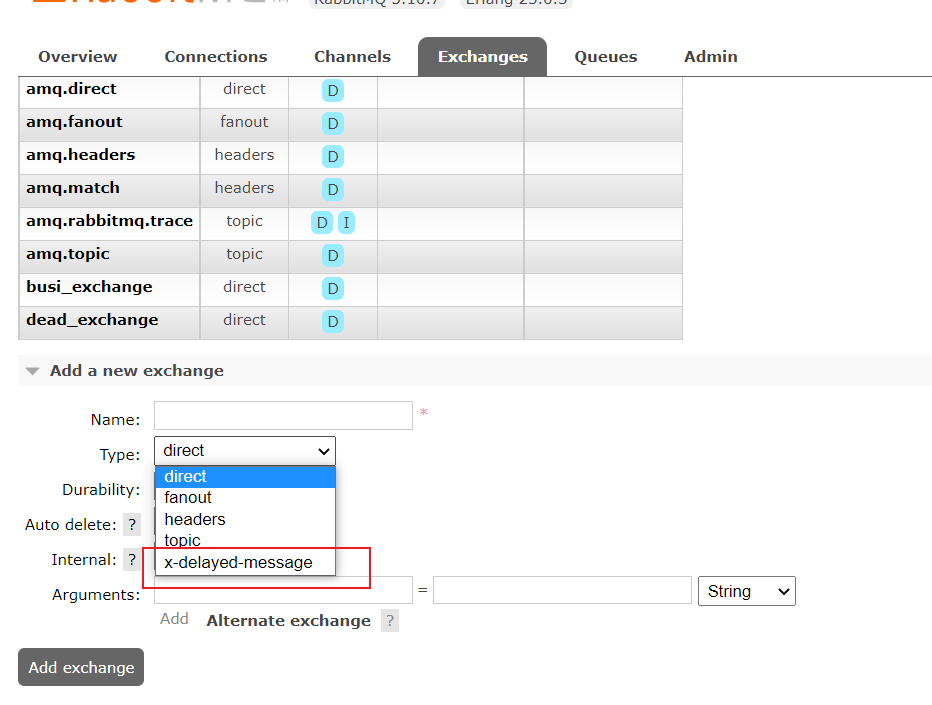
实现
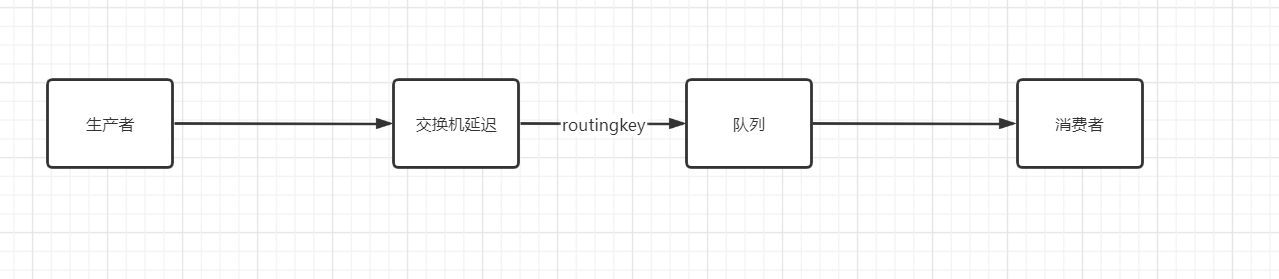
package com.burny.rabbitmq.nine_lazy_queue;

import org.springframework.amqp.core.Binding;
import org.springframework.amqp.core.BindingBuilder;
import org.springframework.amqp.core.CustomExchange;
import org.springframework.amqp.core.Queue;
import org.springframework.beans.factory.annotation.Qualifier;
import org.springframework.context.annotation.Bean;
import org.springframework.context.annotation.Configuration;

import java.util.HashMap;
import java.util.Map;

/**
 * @Note TODO
 * @Author cyx
 *
 */

@Configuration
public class DelayPlugin {

    //自定义交换机  -延迟交换机
    @Bean(Info.delay_exchange_name)
    public CustomExchange delay_exchange_name(){
        Map<String,Object> map=new HashMap<>();
        //固定写法
        map.put("x-delayed-type","direct");
        //String name, String type, boolean durable, boolean autoDelete, Map<String, Object> arguments
        return new CustomExchange(Info.delay_exchange_name,"x-delayed-message",false,false,map);
    }

    @Bean(Info.delay_queue_name)
    public Queue delay_queue_name(){
        return new Queue(Info.delay_queue_name);
    }

    @Bean
    public Binding delay_exchange_name_to_delay_queue_name(@Qualifier(Info.delay_queue_name) Queue queue ,@Qualifier(Info.delay_exchange_name) CustomExchange customExchange){

        return BindingBuilder.bind(queue).to(customExchange).with(Info.rt_delay_exchange_name_to_delay_queue_name).noargs();

    }
}
    public static final String delay_queue_name = "delay_queue_name";
    public static final String delay_exchange_name = "delay_exchange_name";
    public static final String  rt_delay_exchange_name_to_delay_queue_name = "rt_delay_exchange_name_to_delay_queue_name";
:::code-group
::: code-group-itme 生产者
    @GetMapping("/sendMsg/{data}/{ttl}")
    public void sendMsg(@PathVariable(value = "data") String data, @PathVariable(value = "ttl") Integer ttl) {
        //log.info("当前时间{},发送一条消息给两个TTL队列:{}", LocalDateTime.now(), data);
        //
        //rabbitTemplate.convertAndSend(Info.busi_exchange, Info.rt_b_ex_to_q1,  data);
        //rabbitTemplate.convertAndSend(Info.busi_exchange, Info.rt_b_ex_to_q2, data);
        log.info("当前时间{},发送一条消息给自定义TTL队列,TTL 时间:{} ,消息内:{}", LocalDateTime.now(), ttl, data);

        //rabbitTemplate.convertAndSend(Info.busi_exchange, Info.rt_b_ex_to_custtl, data, message -> {
        //    //message.getMessageProperties().setExpiration(String.valueOf(ttl * 1000));
        //          message.getMessageProperties().setExpiration(String.valueOf(ttl * 1000));

        //    return message;
        //});

        rabbitTemplate.convertAndSend(Info.delay_exchange_name,Info.rt_delay_exchange_name_to_delay_queue_name,data+ttl,propertis->{
            //对比
            ///     message.getMessageProperties().setExpiration(String.valueOf(ttl * 1000));

            propertis.getMessageProperties().setDelay(ttl*1000);
            return propertis;
        });
:::
:::code-group-item 消费者
    @RabbitListener(queues = Info.delay_queue_name)
    public void delay(Message message, Channel channel) throws Exception {
        String msg = new String(message.getBody(), StandardCharsets.UTF_8);
        log.info("类型:{},当前时间:{},获取消息:{}", "延迟插件",LocalDateTime.now(), msg);
    }
:::
::: code-group-item
2022-08-28 00:55:59.135  INFO 4336 --- [io-10001-exec-1] o.a.c.c.C.[Tomcat].[localhost].[/]       : Initializing Spring DispatcherServlet 'dispatcherServlet'
2022-08-28 00:55:59.135  INFO 4336 --- [io-10001-exec-1] o.s.web.servlet.DispatcherServlet        : Initializing Servlet 'dispatcherServlet'
2022-08-28 00:55:59.138  INFO 4336 --- [io-10001-exec-1] o.s.web.servlet.DispatcherServlet        : Completed initialization in 3 ms
2022-08-28 00:55:59.248  INFO 4336 --- [io-10001-exec-1] c.b.r.nine_lazy_queue.SendMsgController  : 当前时间2022-08-28T00:55:59.248,发送一条消息给自定义TTL队列,TTL 时间:20 ,消息内:我是发送内容
2022-08-28 00:56:01.567  INFO 4336 --- [io-10001-exec-3] c.b.r.nine_lazy_queue.SendMsgController  : 当前时间2022-08-28T00:56:01.567,发送一条消息给自定义TTL队列,TTL 时间:5 ,消息内:我是发送内容
2022-08-28 00:56:06.599  INFO 4336 --- [ntContainer#1-1] c.b.r.n.TTLConsumerListener              : 类型:延迟插件,当前时间:2022-08-28T00:56:06.599,获取消息:我是发送内容5
2022-08-28 00:56:06.802  INFO 4336 --- [io-10001-exec-5] c.b.r.nine_lazy_queue.SendMsgController  : 当前时间2022-08-28T00:56:06.802,发送一条消息给自定义TTL队列,TTL 时间:2 ,消息内:我是发送内容
2022-08-28 00:56:08.807  INFO 4336 --- [ntContainer#1-1] c.b.r.n.TTLConsumerListener              : 类型:延迟插件,当前时间:2022-08-28T00:56:08.807,获取消息:我是发送内容2
2022-08-28 00:56:19.274  INFO 4336 --- [ntContainer#1-1] c.b.r.n.TTLConsumerListener              : 类型:延迟插件,当前时间:2022-08-28T00:56:19.274,获取消息:我是发送内容20
2022-08-28 01:00:15 JRebel: Reloading class 'com.burny.rabbitmq.nine_lazy_queue.SendMsgController'.
:::
:::
总结
利用延迟队列插件 比 TTL更符合日常的需求.
延时队列其他选择
- Java的DelayQueue
- Resis 的zset
- Quartz
- Kafka 时间轮
TTL未实现事项
- expires 实现不了
- setdelay(Integer ) 和 setExpire(String) 的区别
SpingBoot发布确认
RabbitMQ 交换机不存在 或者 队列不存在 生产者无法投
tips:以下只需要到达交换机就会返回确认.仅仅说明到达.
如果是交换机到队列有误,交换机也会返回确认收到
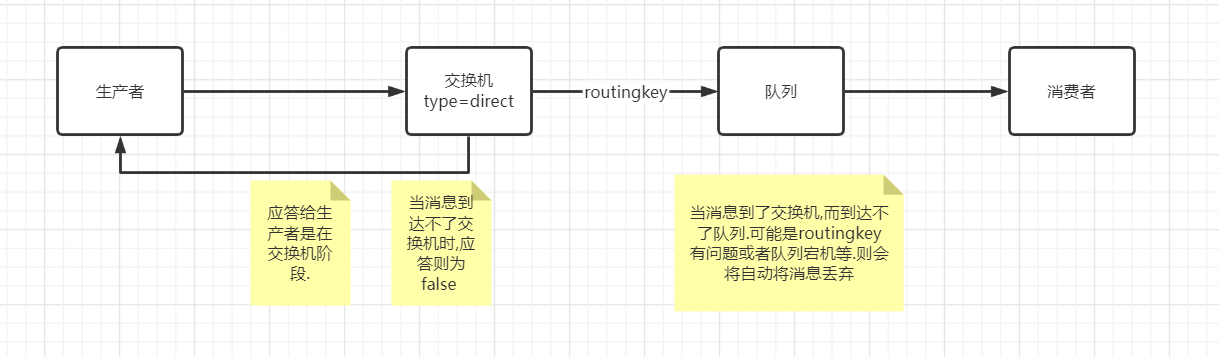
spring:
  rabbitmq:
    username: root
    password: root
    host: 192.168.1.176
    port: 5672
    virtual-host: /
    connection-timeout: 20000
    publisher-confirm-type: CORRELATED

    # 取值:
    none:禁用发布确认模式,是默认值
    correlated: 发布消息成功到交换机猴会出发回调方法
    simple: 有两种效果(相当于之前用的同步确认)
    		其一:与correalated 效果一致
    		其二:发布消息成功后使用 rabbitTemplate调用waitForConfirms 或者 waitforconfirmsordie 方法 等待broker节点返回发送结果,根据返回结果来判定下一步的逻辑,要注意的点事waitForConfirmsOrDire 方法如果返回false 则会关闭 channel ,接下来服务法发送消息到broker.
:::: code-group
::: code-group-item 配置
package com.burny.rabbitmq.ten_confirm;


import lombok.extern.slf4j.Slf4j;
import org.springframework.amqp.core.*;
import org.springframework.beans.factory.annotation.Qualifier;
import org.springframework.context.annotation.Bean;
import org.springframework.context.annotation.Configuration;

/**
 * @Note TODO
 * @Author cyx
 *
 */
@Slf4j
@Configuration
public class Config {

    @Bean(Info.busi_exchange)
    public DirectExchange c_busi_exchange() {
        return new DirectExchange(Info.busi_exchange);
    }

    @Bean(Info.busi_quque)
    public Queue c_busi_quque() {
        return QueueBuilder.durable(Info.busi_quque).build();
    }

    @Bean
    public Binding busi_exchange_to_busi_quque(@Qualifier(Info.busi_quque) Queue busi_quque, @Qualifier(Info.busi_exchange) DirectExchange busi_exchange) {
        return BindingBuilder.bind(busi_quque).to(busi_exchange).with(Info.busi_exchange_to_busi_quque);
    }
}
:::
:::code-group-item 信息
package com.burny.rabbitmq.ten_confirm;

import lombok.extern.slf4j.Slf4j;

/**
 * @Note TODO
 * @Author cyx
 *
 */
@Slf4j
public class Info {


    //如果是持久化队列或者交换机,每次更滑pre 方便开发,不需要每次都delete 掉交换机或者队列
    //public static  final  String  pre="a";

    public static final String busi_exchange = "c_busi_exchange";
    public static final String busi_quque = "c_busi_quque";
    public static final String busi_exchange_to_busi_quque = "c_busi_exchange_to_busi_quque";


}
:::
:::code-group-item 生产端
package com.burny.rabbitmq.ten_confirm;

import lombok.extern.slf4j.Slf4j;
import org.springframework.amqp.core.Correlation;
import org.springframework.amqp.rabbit.connection.CorrelationData;
import org.springframework.amqp.rabbit.core.RabbitTemplate;
import org.springframework.beans.factory.annotation.Autowired;
import org.springframework.web.bind.annotation.GetMapping;
import org.springframework.web.bind.annotation.PathVariable;
import org.springframework.web.bind.annotation.RequestMapping;
import org.springframework.web.bind.annotation.RestController;

/**
 * @Note TODO
 * @Author cyx
 *
 */
@Slf4j
@RestController
@RequestMapping("/c")
public class ProController {


    @Autowired
    RabbitTemplate rabbitTemplate;

    @GetMapping("/{data}")
    public void pro(@PathVariable String data) {
        //for (int i = 0; i < 100; i++) {
        //绑定id
        CorrelationData correlationData=new CorrelationData();
        correlationData.setId("id");
        log.info("生产者:发送内容:{}", data);
        data="生产者:"+data;
        //发送正确
        rabbitTemplate.convertAndSend(Info.busi_exchange, Info.busi_exchange_to_busi_quque, data,correlationData);
        //错误的交换机 结果: 交换机确认回调:
        //2022-08-28 13:57:24.607  INFO 24612 --- [nectionFactory6] c.b.r.ten_confirm.ExchangeCallBack       : 交换机确认回调:交换机已经收到消息并且处理失败,ID为id,原因:channel error; protocol method: #method<channel.close>(reply-code=404, reply-text=NOT_FOUND - no exchange 'c_busi_exchangeps' in vhost '/', class-id=60, method-id=40)
        rabbitTemplate.convertAndSend(Info.busi_exchange+"ps", Info.busi_exchange_to_busi_quque, data,correlationData);
        //错误的队列 (routingkey不同) 总结:只要到达交换机就确认
        //结果
        //2022-08-28 13:57:24.612  INFO 24612 --- [nectionFactory6] c.b.r.ten_confirm.ExchangeCallBack       : 交换机确认回调:交换机已经收到消息并且成功处理,ID为id
        rabbitTemplate.convertAndSend(Info.busi_exchange, Info.busi_exchange_to_busi_quque+"sss", data,correlationData);
        //}
    }


}
:::
:::code-group-item消费端
package com.burny.rabbitmq.ten_confirm;

import lombok.extern.slf4j.Slf4j;
import org.springframework.amqp.core.Message;
import org.springframework.amqp.rabbit.annotation.RabbitListener;
import org.springframework.stereotype.Component;

import java.nio.charset.StandardCharsets;

/**
 * @Note TODO
 * @Author cyx
 *
 */

@Component
@Slf4j
public class Consumer {


    @RabbitListener(queues = Info.busi_quque)
    public void confirm(Message properties) {
        log.info("消费者:接收到的内容:{}", new String(properties.getBody(), StandardCharsets.UTF_8));
    }
}
:::
:::code-group-item 交换机确认配置
package com.burny.rabbitmq.ten_confirm;

import lombok.extern.slf4j.Slf4j;
import org.springframework.amqp.rabbit.connection.CorrelationData;
import org.springframework.amqp.rabbit.core.RabbitTemplate;
import org.springframework.beans.factory.annotation.Autowired;
import org.springframework.context.annotation.Configuration;

import javax.annotation.PostConstruct;

/**
 * @Note 继承内部接口需要将该接口注入到rabbitmq里
 * @Author cyx
 *
 */
@Slf4j
@Configuration
public class ExchangeCallBack implements RabbitTemplate.ConfirmCallback {


    @Autowired
    private RabbitTemplate rabbitTemplate;

    @PostConstruct
    public void init(){
        rabbitTemplate.setConfirmCallback(this);
    }

    /**
     *交换机确认回调
     * 1.发送消息 交换机接收到了并且成功处理了 回调
     *   参数
     *   保存毁掉消息的ID以及相关信息
     *    交换机收到消息 true
     *    case null
     *
     * 2. 发送消息 交换机接收 但处理失败 回调
     *   参数
     *   保存毁掉消息的ID以及相关信息
     *   fasle
     *   错误原因
     */

    @Override
    public void confirm(CorrelationData correlationData, boolean ack, String cause) {

        if (ack){
            log.info("交换机确认回调:交换机已经收到消息并且成功处理,ID为{}",correlationData!=null ? correlationData.getId():"");
        }else{
            log.info("交换机确认回调:交换机已经收到消息并且处理失败,ID为{},原因:{}",correlationData!=null ? correlationData.getId():"",cause);
        }
    }
}
:::
::::
结果:
详情
2022-08-28 14:12:48 JRebel: Reconfiguring bean 'proController' [com.burny.rabbitmq.ten_confirm.ProController]
2022-08-28 14:12:48.474  INFO 24612 --- [io-10001-exec-6] c.b.rabbitmq.ten_confirm.ProController   : 生产者:发送内容:我是发送内容
2022-08-28 14:12:48.514 ERROR 24612 --- [.168.1.176:5672] o.s.a.r.c.CachingConnectionFactory       : Shutdown Signal: channel error; protocol method: #method<channel.close>(reply-code=404, reply-text=NOT_FOUND - no exchange 'c_busi_exchangeps' in vhost '/', class-id=60, method-id=40)
2022-08-28 14:12:48.585  INFO 24612 --- [nectionFactory7] c.b.r.ten_confirm.ExchangeCallBack       : 交换机确认回调:交换机已经收到消息并且成功处理,ID为id
2022-08-28 14:12:48.589  INFO 24612 --- [ntContainer#3-1] com.burny.rabbitmq.ten_confirm.Consumer  : 消费者:接收到的内容:生产者:我是发送内容
2022-08-28 14:12:48.598  INFO 24612 --- [nectionFactory7] c.b.r.ten_confirm.ExchangeCallBack       : 交换机确认回调:交换机已经收到消息并且成功处理,ID为id
2022-08-28 14:12:48.599  INFO 24612 --- [nectionFactory8] c.b.r.ten_confirm.ExchangeCallBack       : 交换机确认回调:交换机已经收到消息并且处理失败,ID为id,原因:channel error; protocol method: #method<channel.close>(reply-code=404, reply-text=NOT_FOUND - no exchange 'c_busi_exchangeps' in vhost '/', class-id=60, method-id=40)
回退内容
在仅开启了生产者确认机制的情况下,交换机接收消息猴,会直接给消息生产者发送确认消息,如果发现该消息不可路由,name消息会被直接丢弃,此时生产者是不知道消息被丢弃这个时间.
解决办法:通过设置mandatory 参数可以在消息传递过程中不可达的目的地时将消息返回给生产者.
yarn scp:prod rabbitmq-plugins enable /usr/lib/rabbitmq/lib/rabbitmq_server-3.10.7/plugins/rabbitmq_delayed_message_exchange-3.10.2.ez
::::code-group
:::code-group-item 配置
与上一节一样
:::
:::code-group-item 信息
:::
:::code-group-item 生产端
rabbitTemplate.convertAndSend(Info.busi_exchange, Info.busi_exchange_to_busi_quque + "ddd", data, correlationData);
:::
:::code-group-item消费端
与上一节的消费者一样
:::
:::code-group-item 交换机确认配置
package com.burny.rabbitmq.ten_confirm;

import lombok.extern.slf4j.Slf4j;
import org.springframework.amqp.core.ReturnedMessage;
import org.springframework.amqp.rabbit.connection.CorrelationData;
import org.springframework.amqp.rabbit.core.RabbitTemplate;
import org.springframework.beans.factory.annotation.Autowired;
import org.springframework.context.annotation.Configuration;

import javax.annotation.PostConstruct;

/**
 * @Note 继承内部接口需要将该接口注入到rabbitmq里
 * @Author cyx
 *
 */
@Slf4j
@Configuration
public class ExchangeCallBack implements RabbitTemplate.ConfirmCallback, RabbitTemplate.ReturnsCallback {


    @Autowired
    private RabbitTemplate rabbitTemplate;

    @PostConstruct
    public void init() {
        rabbitTemplate.setConfirmCallback(this);
        rabbitTemplate.setReturnsCallback(this);
    }

    /**
     * 交换机确认回调
     * 1.发送消息 交换机接收到了并且成功处理了 回调
     * 参数
     * 保存毁掉消息的ID以及相关信息
     * 交换机收到消息 true
     * case null
     * <p>
     * 2. 发送消息 交换机接收 但处理失败 回调
     * 参数
     * 保存毁掉消息的ID以及相关信息
     * fasle
     * 错误原因
     */

    @Override
    public void confirm(CorrelationData correlationData, boolean ack, String cause) {

        if (ack) {
            log.info("交换机确认回调:交换机已经收到消息并且成功处理,ID为{}", correlationData != null ? correlationData.getId() : "");
        } else {
            log.info("交换机确认回调:交换机已经收到消息并且处理失败,ID为{},原因:{}", correlationData != null ? correlationData.getId() : "", cause);
        }
    }

    //只有在不可达目的地的时候才进行回退
    @Override
    public void returnedMessage(ReturnedMessage returned) {
        log.info("交换机与队列:有消息被回退 交换机:{},消息内容:{},退回原因:{},路由key:{}", returned.getExchange(), new String(returned.getMessage().getBody()), returned.getReplyCode() + returned.getReplyText(), returned.getRoutingKey());
    }
}
:::
::: code-group-item yml
spring:
  rabbitmq:
    username: root
    password: root
    host: 192.168.1.176
    port: 5672
    virtual-host: /
    connection-timeout: 20000
    publisher-confirm-type: CORRELATED
    publisher-returns: true
    template:
      mandatory: true
:::
::::
结果
2022-08-28 14:34:51.864  INFO 1156 --- [io-10001-exec-3] c.b.rabbitmq.ten_confirm.ProController   : 生产者:发送内容:我是发送内容
2022-08-28 14:34:51.868  INFO 1156 --- [nectionFactory3] c.b.r.ten_confirm.ExchangeCallBack       : 交换机与队列:有消息被回退 交换机:c_busi_exchange,消息内容:生产者:我是发送内容,退回原因:312NO_ROUTE,路由key:c_busi_exchange_to_busi_ququeddd
2022-08-28 14:34:51.869  INFO 1156 --- [nectionFactory4] c.b.r.ten_confirm.ExchangeCallBack       : 交换机确认回调:交换机已经收到消息并且成功处理,ID为id
备份交换机
有了mandatory 参数和回退消息.我们获得了对无法投递消息的感知能力,有机会在生产者的刁曦无法被投递时发现并处理.但有时候我们并不知道该如何处理这些无法路由的消息,最多打个日志.然后触发报警,再来手动处理.而通过日志来处理这无法路由的消息是很不优雅的做法,特别是当生产者所在的服务有多台机器的时候,手动复制日志会更加麻烦而且容易出错.而且设置mandatory 参数会增加生产者的复杂性,,需要添加处理这些被回退的的消息的逻辑,如果既不想丢失信息,又不想增加生产者的处理失败的消息,
前面在设置死信队列的文章中,可以为队列设置死信家换季来存储哪些处理失败的消息,可是这些不可路由的消息根本没有机会进入到队列,因此无法使用死信队列来保存消息
在RabbitMQzhong ,有一种备份交换机的机制存在,可以很好的应对这个问题.什么事备份交换机呢?备份交换机可以理解为RabbitM中家交换机的备胎,当我们为某一个交换机声明一个对应的备份交换机是,就是为他创建一个备胎,当交换机接收到一条不可路由消息时,将会把这条消息转发到备份交换机中,由备份交换机来进行转发和处理.通常备份交换机的类型为Fanout.这样就能把所有消息都投递到与其绑定的队列中,然后我们在备份交换机下绑定一个队列,这样所有哪些原交换机无法被路由的消息,就会都进入这个队列了.当然,我们还可以建立一个报警队列,利用独立的消费者来进行检测和报警.
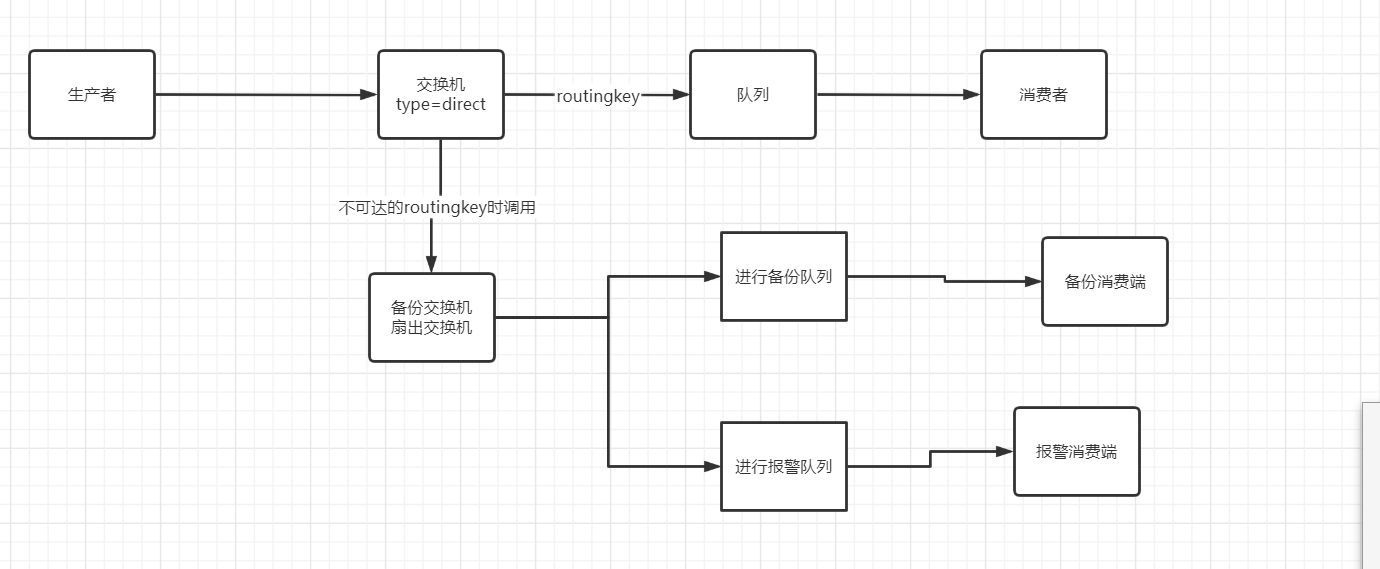
:::: code-group ::: code-group-item 生产端
package com.burny.rabbitmq.ele_backexchange;


import org.springframework.amqp.rabbit.connection.CorrelationData;
import org.springframework.amqp.rabbit.core.RabbitTemplate;
import org.springframework.beans.factory.annotation.Autowired;
import org.springframework.web.bind.annotation.GetMapping;
import org.springframework.web.bind.annotation.PathVariable;
import org.springframework.web.bind.annotation.RequestMapping;
import org.springframework.web.bind.annotation.RestController;

/**
 * @Note TODO
 * @Author cyx
 *
 */

@RestController
@RequestMapping("/back")
public class ProController2 {


    @Autowired
    RabbitTemplate rabbitTemplate;

    @GetMapping("/{data}")
    public void pro(@PathVariable String data) {
        CorrelationData correlationData = new CorrelationData();
       // http://localhost:10009/back/%E6%88%91%E6%98%AF%E5%8F%91%E9%80%81%E5%86%85%E5%AE%B9
        //发送可达的信息
        rabbitTemplate.convertAndSend(Info.confirm_exchange, Info.rt_confirm_exchange_confirm_queue + "ddd", data, correlationData);
        //发送不可达的信息
        rabbitTemplate.convertAndSend(Info.confirm_exchange, Info.rt_confirm_exchange_confirm_queue , data, correlationData);


    }
}
::: ::: code-group-item 消费者
package com.burny.rabbitmq.ele_backexchange;

import lombok.extern.slf4j.Slf4j;
import org.springframework.amqp.core.Message;
import org.springframework.amqp.rabbit.annotation.RabbitListener;
import org.springframework.stereotype.Component;

import java.nio.charset.StandardCharsets;

/**
 * @Note 备份交换机报警队列
 * @Author cyx
 *
 */

@Slf4j
@Component
public class Consumer2 {


    @RabbitListener(queues = Info.back_warn_queue)
    public void receiW(Message message){
        log.warn("备份队列之报警队列收到信息:{}",new String(message.getBody()));
    }

    @RabbitListener(queues = Info.confirm_queue)
    public void confirm(Message properties) {
        log.info("消费者:接收到的内容:{}", new String(properties.getBody(), StandardCharsets.UTF_8));
    }
    @RabbitListener(queues = Info.back_queue)
    public void back(Message properties) {
        log.info("备份队列之普通队列收到消息:{}", new String(properties.getBody(), StandardCharsets.UTF_8));
    }
}
::: ::: code-group-item bean
package com.burny.rabbitmq.ele_backexchange;


import org.springframework.amqp.core.*;
import org.springframework.beans.factory.annotation.Qualifier;
import org.springframework.context.annotation.Bean;
import org.springframework.context.annotation.Configuration;

/**
 * @Note TODO
 * @Author cyx
 *
 */
@Configuration
public class Config2 {

    @Bean(Info.back_exchange)
    public FanoutExchange back_exchange() {
        return new FanoutExchange(Info.back_exchange);
    }
    @Bean(Info.confirm_exchange)
    public DirectExchange confirm_exchange() {
        return ExchangeBuilder.directExchange(Info.confirm_exchange).durable(false).withArgument("alternate-exchange",Info.back_exchange).build();
        //return new DirectExchange(Info.confirm_exchange);
    }

    @Bean(Info.back_queue)
    public Queue back_queue() {
        return QueueBuilder.durable(Info.back_queue).build();
    }
    @Bean(Info.confirm_queue)
    public Queue confirm_queue() {
        return QueueBuilder.durable(Info.confirm_queue).build();
    }

    @Bean(Info.back_warn_queue)
    public Queue back_warn_queue() {
        return QueueBuilder.durable(Info.back_warn_queue).build();
    }

    @Bean
    public Binding back_queue_to_back_exchange(@Qualifier(Info.back_queue) Queue back_queue
            , @Qualifier(Info.back_exchange) FanoutExchange back_exchange) {
        return BindingBuilder.bind(back_queue).to(back_exchange);
    }

    @Bean
    public Binding confirm_queue_to_confirm_exchange(@Qualifier(Info.confirm_queue) Queue confirm_queue
            , @Qualifier(Info.confirm_exchange) DirectExchange confirm_exchange) {
        return BindingBuilder.bind(confirm_queue).to(confirm_exchange).with(Info.rt_confirm_exchange_confirm_queue);
    }

    @Bean
    public Binding back_warn_queue_to_back_exchange(@Qualifier(Info.back_warn_queue) Queue back_warn_queue
            , @Qualifier(Info.back_exchange) FanoutExchange back_exchange) {
        return BindingBuilder.bind(back_warn_queue).to(back_exchange);
    }


}
:::
::: code-group-item yml
spring:
  rabbitmq:
    username: root
    password: root
   # host: 192.168.1.176
    host: 192.168.1.128
    port: 5672
    virtual-host: /
    connection-timeout: 20000
    publisher-confirm-type: CORRELATED
    publisher-returns: true
    template:
      mandatory: true
:::
::: code-group-item Info
  package com.burny.rabbitmq.ele_backexchange;

/**
 * @Note TODO
 * @Author cyx
 *
 */

public class Info {
    public static final String back_exchange = "back_exchange";
    public static final String back_queue = "back_queue";
    public static final String back_warn_queue = "back_warn_queue";

    public static  final String confirm_exchange="confirm_exchange";

    public static  final String confirm_queue="confirm_queue";
    public static final String rt_confirm_exchange_confirm_queue = "rt_confirm_exchange_confirm_queue";
}
:::
::::
结果
2022-09-07 11:31:00.939  INFO 13340 --- [io-10009-exec-1] o.a.c.c.C.[Tomcat].[localhost].[/]       : Initializing Spring DispatcherServlet 'dispatcherServlet'
2022-09-07 11:31:00.940  INFO 13340 --- [io-10009-exec-1] o.s.web.servlet.DispatcherServlet        : Initializing Servlet 'dispatcherServlet'
2022-09-07 11:31:00.953  INFO 13340 --- [io-10009-exec-1] o.s.web.servlet.DispatcherServlet        : Completed initialization in 12 ms
2022-09-07 11:31:01.425  INFO 13340 --- [nectionFactory1] c.b.r.ten_confirm.ExchangeCallBack       : 交换机确认回调:交换机已经收到消息并且成功处理,ID为aa6b0d1c-3475-492e-90f5-e26aa9148836
2022-09-07 11:31:01.439  INFO 13340 --- [nectionFactory1] c.b.r.ten_confirm.ExchangeCallBack       : 交换机确认回调:交换机已经收到消息并且成功处理,ID为aa6b0d1c-3475-492e-90f5-e26aa9148836
2022-09-07 11:31:01.442  WARN 13340 --- [ntContainer#1-1] c.b.rabbitmq.ele_backexchange.Consumer2  : 备份队列之报警队列收到信息:我是发送内容
2022-09-07 11:31:01.442  INFO 13340 --- [ntContainer#0-1] c.b.rabbitmq.ele_backexchange.Consumer2  : 消费者:接收到的内容:我是发送内容
2022-09-07 11:31:01.442  INFO 13340 --- [ntContainer#2-1] c.b.rabbitmq.ele_backexchange.Consumer2  : 备份队列之普通队列收到消息:我是发送内容
::: TIPS
mandatory参数与备份交换机可以一起使用的时候,如果两者同事开启,备份交换机的由下级高
:::
其他知识点
幂等性问题
概念
用户对于同一操作发起的一次请求或者多次请求的结果是一致的,不会因为多次点击而产生了副作用。举个最简单的例子,那就是支付,用户购买商品后支付,支付扣款成功,但是返回结果的时候网络异常,此时钱已经扣了,用户再次点击按钮,此时会进行第二次扣款,返回结果成功,用户查询余额发现多扣钱了,流水记录也变成了两条。在以前的单应用系统中,我们只需要把数据操作放入事务中即可,发生错误立即回滚,但是再响应客户端的时候也有可能出现网络中断或者异常等等
消息重复消费
消费者在消费MQ中的消息时,MQ已把消息发送给消费者,消费者在给MQ返回ack时网络中断,故MQ未收到确认信息,该条消息会重新发给其他的消费者,或者在网络重连后再次发送给该消费者,但实际上该消费者已成功消费了该条消息,造成消费者消费了重复的消息。
解决思路
MQ消费者的幂等性的解决一般使用全局ID或者写个唯一标识比如时间戳或者UUID或者订单消费者消费MQ中的消息也可利用MQ的该id来判断,或者可按自己的规则生成一个全局唯一id,每次消费消息时用该id先判断该消息是否已消费过。
消费端的幂等性保障
在海量订单生成的业务高峰期,生产端有可能就会重复发生了消息,这时候消费端就要实现幂等性,这就意味着我们的消息永远不会被消费多次,即使我们收到了一样的消息。业界主流的幂等性有两种操作:a.唯一ID+指纹码机制,利用数据库主键去重, b.利用redis的原子性去实现
唯一id+指纹码机制
指纹码:我们的一些规则或者时间戳加别的服务给到的唯一信息码,它并不一定是我们系统生成的,基本都是由我们的业务规则拼接而来,但是一定要保证唯一性,然后就利用查询语句进行判断这个id是否存在数据库中,优势就是实现简单就一个拼接,然后查询判断是否重复;劣势就是在高并发时,如果是单个数据库就会有写入性能瓶颈当然也可以采用分库分表提升性能,但也不是我们最推荐的方式。
redis原子性
利用redis执行setnx命令,天然具有幂等性。从而实现不重复消费
队列优先级
概念
在我们系统中有一个订单催付的场景,我们的客户在天猫下的订单,淘宝会及时将订单推送给我们,如果在用户设定的时间内未付款那么就会给用户推送一条短信提醒,很简单的一个功能对吧,但是,tmall商家对我们来说,肯定是要分大客户和小客户的对吧,比如像苹果,小米这样大商家一年起码能给我们创造很大的利润,所以理应当然,他们的订单必须得到优先处理,而曾经我们的后端系统是使用redis来存放的定时轮询,大家都知道redis只能用List做一个简简单单的消息队列,并不能实现一个优先级的场景,所以订单量大了后采用RabbitMQ进行改造和优化,如果发现是大客户的订单给一个相对比较高的优先级,否则就是默认优先级。
界面进行添加
优先级 0到255
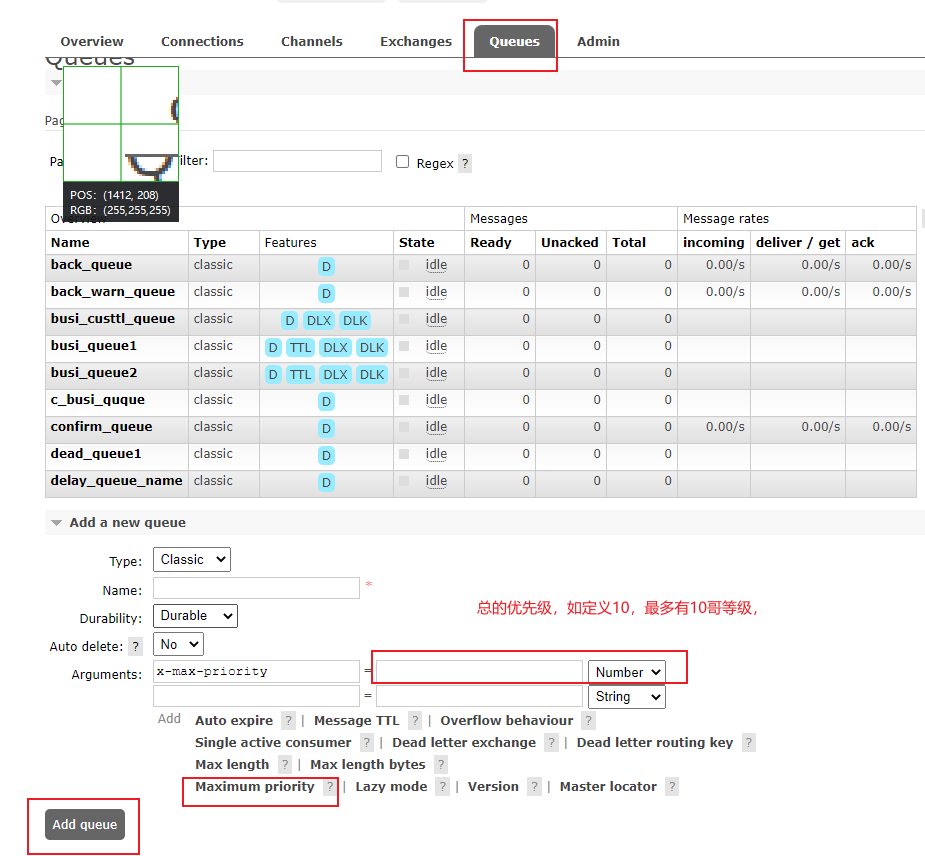
代码添加
- 队列需要设置为优先级队列
- 消息需要设置消息的优先级,消费者需要等待消息已经发送到队列中去消费(同时发送100条数据,这100条数据的排序)
    @Bean(Info.confirm_queue)
    public Queue confirm_queue() {
      return   QueueBuilder.durable(Info.confirm_queue).maxPriority(100).build();
        //return QueueBuilder.durable(Info.confirm_queue).build();
    }
        org.springframework.amqp.core.MessagePostProcessor postProcessor=new org.springframework.amqp.core.MessagePostProcessor() {
            @Override
            public Message postProcessMessage(Message message) throws AmqpException {
                MessageProperties messageProperties = message.getMessageProperties();
                messageProperties.setPriority(10);
                return message;
            }
        };

        rabbitTemplate.convertAndSend(Info.confirm_exchange,Info.rt_confirm_exchange_confirm_queue,data,postProcessor);
生产者
 @GetMapping("/{data}")
    public void pro(@PathVariable String data) {
        CorrelationData correlationData = new CorrelationData();
        //发送可达的信息
        rabbitTemplate.convertAndSend(Info.confirm_exchange, Info.rt_confirm_exchange_confirm_queue + "ddd", data, correlationData);
        //发送不可达的信息
        rabbitTemplate.convertAndSend(Info.confirm_exchange, Info.rt_confirm_exchange_confirm_queue , data, correlationData);

        for (int i = 0; i < 100; i++) {
            if (i%3==0){
                org.springframework.amqp.core.MessagePostProcessor postProcessor=new org.springframework.amqp.core.MessagePostProcessor() {
                    @Override
                    public Message postProcessMessage(Message message) throws AmqpException {
                        MessageProperties messageProperties = message.getMessageProperties();
                        messageProperties.setPriority(3);
                        return message;
                    }
                };
                rabbitTemplate.convertAndSend(Info.confirm_exchange,Info.rt_confirm_exchange_confirm_queue,data,postProcessor);
            } else if (i%5 ==0) {
                org.springframework.amqp.core.MessagePostProcessor postProcessor=new org.springframework.amqp.core.MessagePostProcessor() {
                    @Override
                    public Message postProcessMessage(Message message) throws AmqpException {
                        MessageProperties messageProperties = message.getMessageProperties();
                        messageProperties.setPriority(5);
                        return message;
                    }
                };

                rabbitTemplate.convertAndSend(Info.confirm_exchange,Info.rt_confirm_exchange_confirm_queue,data,postProcessor);

            }else{
                rabbitTemplate.convertAndSend(Info.confirm_exchange,Info.rt_confirm_exchange_confirm_queue,data);

            }

        }


    }
惰性队列
- 默认情况:消息保存在内存中
- 惰性队列:消息是保存在磁盘中
mq中获取了100w条数据
概念
RabbitMQ从3.6.0版本开始引入了惰性队列的概念。惰性队列会尽可能的将消息存入磁盘中,而在消费者消费到相应的消息时才会被加载到内存中,它的一个重要的设计目标是能够支持更长的队列,即支持更多的消息存储。当消费者由于各种各样的原因(比如消费者下线、宕机亦或者是由于维护而关闭等)而致使长时间内不能消费消息造成堆积时,惰性队列就很有必要了。默认情况下,当生产者将消息发送到RabbitMQ的时候,队列中的消息会尽可能的存储在内存之中,这样可以更加快速的将消息发送给消费者。即使是持久化的消息,在被写入磁盘的同时也会在内存中驻留一份备份。当RabbitMQ需要释放内存的时候,会将内存中的消息换页至磁盘中,这个操作会耗费较长的时间,也会阻塞队列的操作,进而无法接收新的消息。虽然RabbitMQ的开发者们一直在升级相关的算法,但是效果始终不太理想,尤其是在消息量特别大的时候。
两种模式
队列具备两种模式:default和lazy。默认的为default模式,在3.6.0之前的版本无需做任何变更。lazy模式即为惰性队列的模式,可以通过调用channel.queueDeclare方法的时候在参数中设置,也可以通过Policy的方式设置,如果一个队列同时使用这两种方式设置的话,那么Policy的方式具备更高的优先级。如果要通过声明的方式改变已有队列的模式的话,那么只能先删除队列,然后再重新声明一个新的。在队列声明的时候可以通过“x-queue-mode”参数来设置队列的模式,取值为“default”和“lazy”。下面示例中演示了一个惰性队列的声明细节:
界面
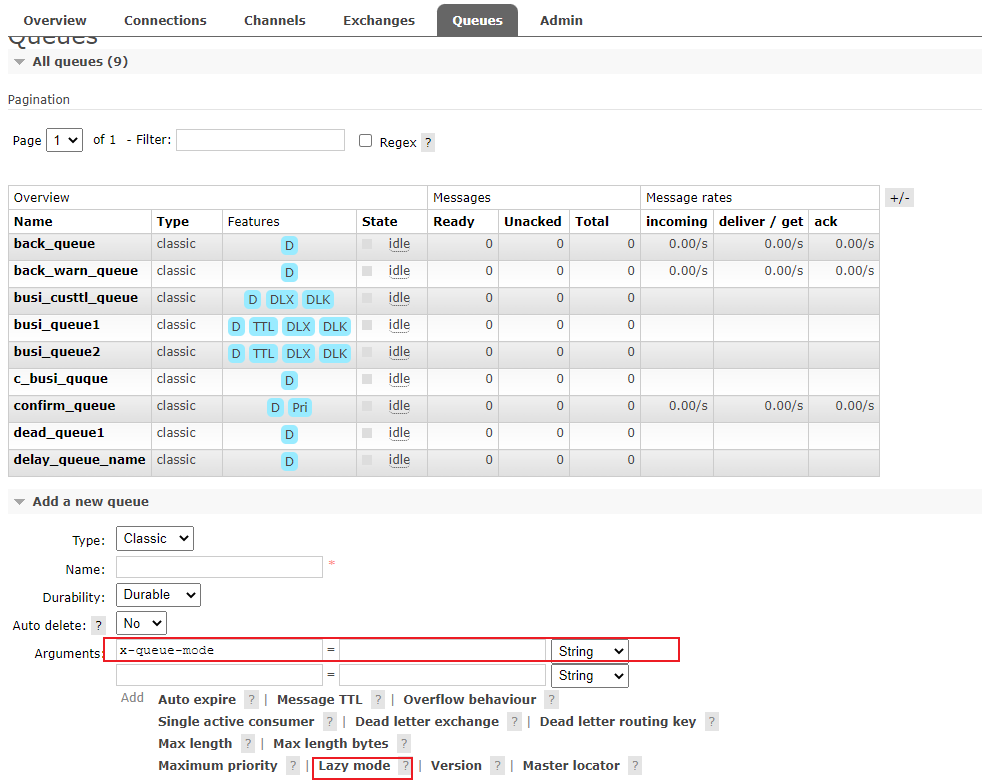
代码
    @Bean(Info.back_queue)
    public Queue back_queue() {
        //return QueueBuilder.durable(Info.back_queue).build();
        return QueueBuilder.durable(Info.back_queue).lazy().build();
    }
在发送1百万条消息,每条消息大概占1KB的情况下,普通队列占用内存是1.2GB,而惰性队列仅仅占用1.5MB,仅保留部分的索引
高可用集群
普通集群
- 无论访问哪一台。都能获取到消息
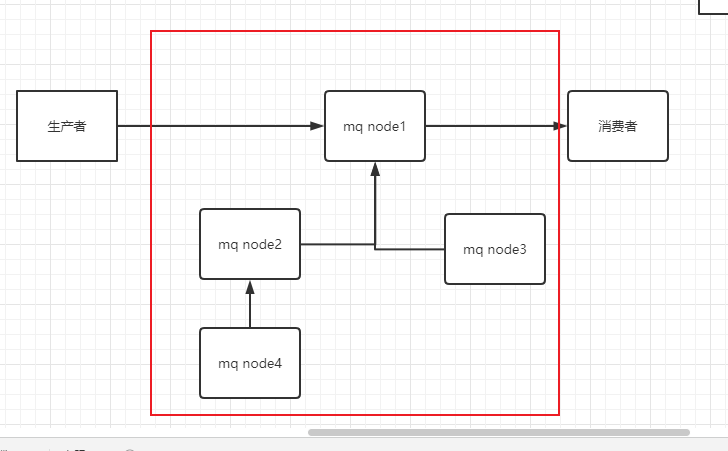
- 修改三个机器的hosts和hostsname,改完需要重启
  192.168.1.109 node1
  192.168.1.142 node2
  192.168.1.148 node3
  # 先在148修改,修改完copy到另外两台服务器
   scp /etc/hosts  root@192.168.1.109:/etc/hosts
   scp /etc/hosts  root@192.168.1.142:/etc/hosts

   vim /etc/hostname
   node1
   node2
   node3

安装erlang
yum install socat logrotate -y mkdir -p /data/soft/rabbitmq/zip cd /data/soft/rabbitmq/zip/ # 上传文件 rpm -ivh erlang-25.0.3-1.el8.x86_64.rpm rpm -ivh rabbitmq-server-3.10.7-1.el8.noarch.rpm chkconfig rabbitmq-server on rabbitmq-plugins enable rabbitmq_management rabbitmqctl add_user root root rabbitmqctl set_permissions -p "/" root ".*" ".*" ".*" reboot- 下载地址
确保各个节点使用的cookie 文件使用的是同一个值
  # 查看服务
  systemctl status rabbitmq-server

 scp /var/lib/rabbitmq/.erlang.cookie  root@node2:/var/lib/rabbitmq/.erlang.cookie
 scp /var/lib/rabbitmq/.erlang.cookie  root@node3:/var/lib/rabbitmq/.erlang.cookie

 # 每台机器执行
 /sbin/service rabbitmq-server stop
  # 每台机器执行
  # 启动rabbitmq 服务,顺带启动erlang虚拟机和rabbitmq应用服务
 rabbitmq-server -detached
# 在节点2执行
rabbitmqctl stop_app # rabbitmqctl stop 会将elang虚拟机关闭,rabbitmqctl stop_app 只关闭rabbitmq服务
rabbitmqctl reset
 rabbitmqctl join_cluster rabbit@node1
 rabbitmqctl start_app

#在节点3zhixing

rabbitmqctl stop_app
rabbitmqctl reset
rabbitmqctl join_cluster rabbit@node1
# 第二次启动时发现ip变了,需要更改/etc/hosts
# 192.168.1.148 node1
 #192.168.1.196 node2
# 192.168.1.118 node3
启动报错小插曲
node1 上启动报错
journalctl -u rabbitmq-server
# 摁F 到文件末尾
发现问题:W
9月 13 10:13:32 node1 rabbitmq-server[136465]: ERROR: could not bind to distribution port 25672, it is in use by another node: rabbit@node1

 systemctl start  rabbitmq-server

 加入端口号
 firewall-cmd --query-port=4369/tcp erlang端口
 firewall-cmd --query-port=25672/tcp 集群通信端口

 firewall-cmd  --zone=public --permanent --add-port=4369/tcp
 firewall-cmd  --zone=public --permanent --add-port=25672/tcp
 firewall-cmd --reload
感谢以下博主
集群状态
rabbitmqctl cluster_status需要重新设置用户
# 创建用户 分配角色 设置权限 分别在三台机器执行
rabbitmqctl add_user admin 123
    rabbitmqctl  set_user_tags admin administrator
    rabbitmqctl set_permissions -p  "/" admin  ".*" ".*" ".*"
解除集群
rabbitmqctl stop_app
rabbitmqctl reset
rabbitmqctl start_app
rabbitmqctl cluster_status
rabbitmqctl forget_cluster_node rabbit@node2(在node1上执行)
rabbitmqctl forget_cluster_node rabbit@node3(在node1上执行)
镜像队列
问题
🔔搭建好了集群,但是在node1 上的队列1 ,node2上是不会存在队列1的.
如果RabbitMQ集群中只有一个Broker节点,那么该节点的失效将导致整体服务的临时性不可用,并且也可能会导致消息的丢失。可以将所有消息都设置为持久化,并且对应队列的durable属性也设置为true,但是这样仍然无法避免由于缓存导致的问题:因为消息在发送之后和被写入磁盘井执行刷盘动作之间存在一个短暂却会产生问题的时间窗。通过publisherconfirm机制能够确保客户端知道哪些消息己经存入磁盘,尽管如此,一般不希望遇到因单点故障导致的服务不可用。
引入镜像队列(MirrorQueue)的机制,可以将队列镜像到集群中的其他Broker节点之上,如果集群中的一个节点失效了,队列能自动地切换到镜像中的另一个节点上以保证服务的可用性。
搭建步骤
firewall-cmd  --zone=public --permanent --add-port=15672/tcp;
firewall-cmd --reload;

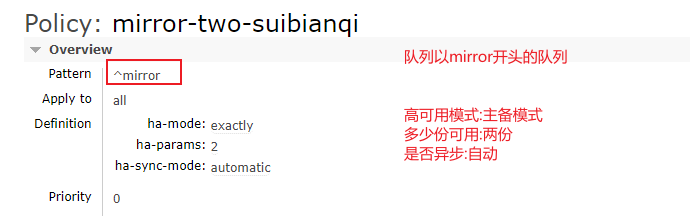
高可用负载均衡
🔔问题:代码已经将ip写死了.如果一个node挂了,不会自动链接到其他node
public static Channel getC() {
    ConnectionFactory factory = new ConnectionFactory();
    factory.setHost(ip);
    factory.setUsername(username);
    factory.setPassword(password);
    //创建连接
    Channel channel;
    try (Connection connection = factory.newConnection()) {
        //获取信道
        channel = connection.createChannel();
        return channel;
    } catch (Exception e) {
        e.printStackTrace();
    }
    return null;
}
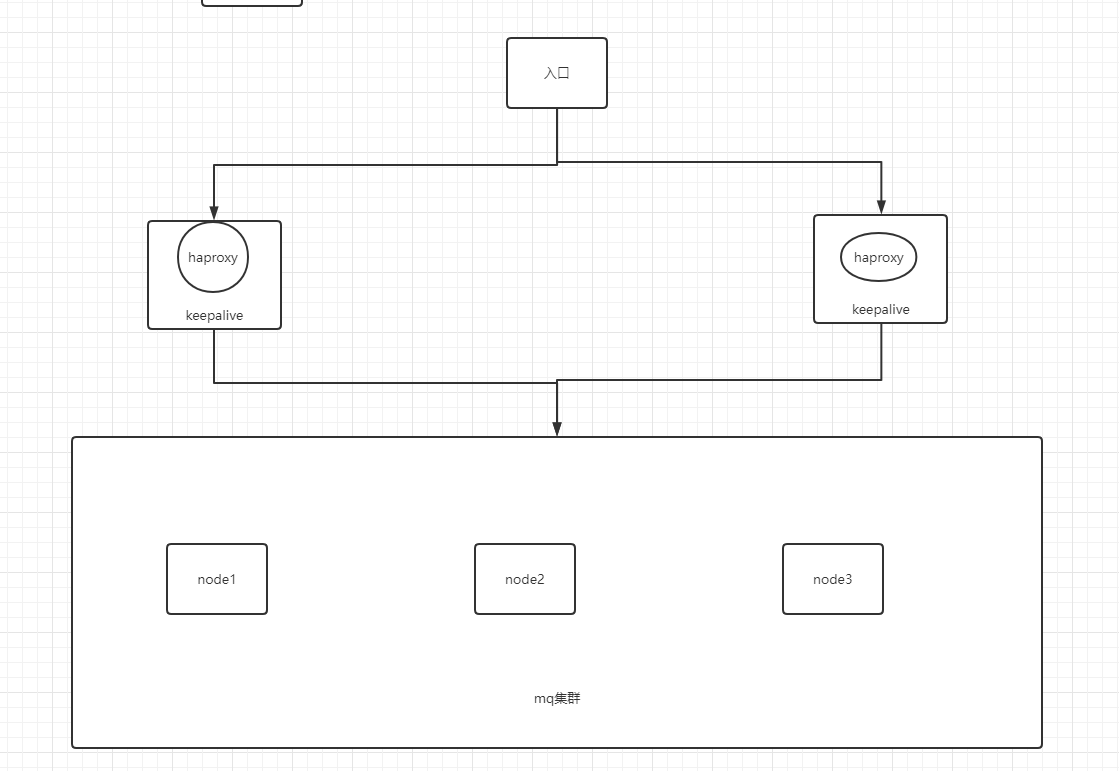
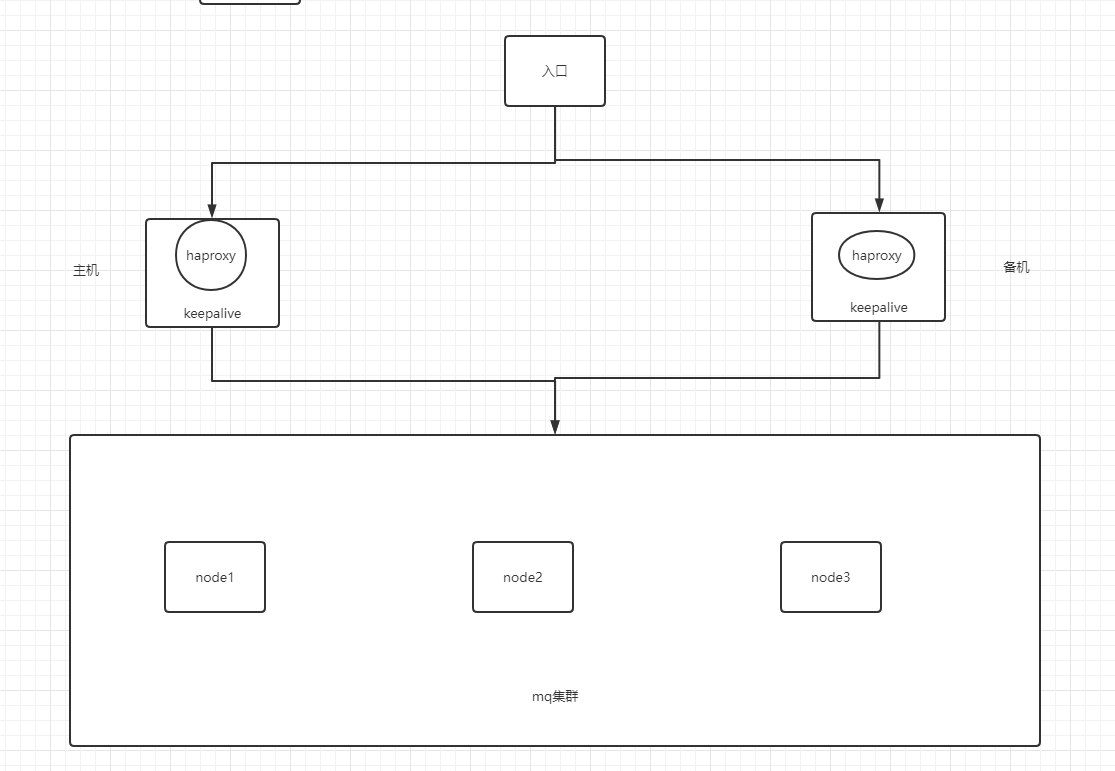
haproxy+keepalive 实现高可用
# 在两台机器上安装haproxy代理
yum install -y haproxy
cd /etc/haproxy/
cp haproxy.cfg haproxy.cfg.bak
vim haproxy.cfg
默认配置
#---------------------------------------------------------------------
# Example configuration for a possible web application.  See the
# full configuration options online.
#
#   https://www.haproxy.org/download/1.8/doc/configuration.txt
#
#---------------------------------------------------------------------

#---------------------------------------------------------------------
# Global settings
#---------------------------------------------------------------------
global
    # to have these messages end up in /var/log/haproxy.log you will
    # need to:
    #
    # 1) configure syslog to accept network log events.  This is done
    #    by adding the '-r' option to the SYSLOGD_OPTIONS in
    #    /etc/sysconfig/syslog
    #
    # 2) configure local2 events to go to the /var/log/haproxy.log
    #   file. A line like the following can be added to
    #   /etc/sysconfig/syslog
    #
    #    local2.*                       /var/log/haproxy.log
    #
    log         127.0.0.1 local2

    chroot      /var/lib/haproxy
    pidfile     /var/run/haproxy.pid
    maxconn     4000
    user        haproxy
    group       haproxy
    daemon

    # turn on stats unix socket
    stats socket /var/lib/haproxy/stats

    # utilize system-wide crypto-policies
    ssl-default-bind-ciphers PROFILE=SYSTEM
    ssl-default-server-ciphers PROFILE=SYSTEM

#---------------------------------------------------------------------
# common defaults that all the 'listen' and 'backend' sections will
# use if not designated in their block
#---------------------------------------------------------------------
defaults
    mode                    http
    log                     global
    option                  httplog
    option                  dontlognull
    option http-server-close
    option forwardfor       except 127.0.0.0/8
    option                  redispatch
    retries                 3
    timeout http-request    10s
    timeout queue           1m
    timeout connect         10s
    timeout client          1m
    timeout server          1m
    timeout http-keep-alive 10s
    timeout check           10s
    maxconn                 3000

#---------------------------------------------------------------------
# main frontend which proxys to the backends
#---------------------------------------------------------------------
frontend main
    bind *:5000
    acl url_static       path_beg       -i /static /images /javascript /stylesheets
    acl url_static       path_end       -i .jpg .gif .png .css .js

    use_backend static          if url_static
    default_backend             app

#---------------------------------------------------------------------
# static backend for serving up images, stylesheets and such
#---------------------------------------------------------------------
backend static
    balance     roundrobin
    server      static 127.0.0.1:4331 check

#---------------------------------------------------------------------
# round robin balancing between the various backends
#---------------------------------------------------------------------
backend app
    balance     roundrobin
    server  app1 127.0.0.1:5001 check
    server  app2 127.0.0.1:5002 check
    server  app3 127.0.0.1:5003 check
    server  app4 127.0.0.1:5004 check
引用的博主的配置(可能由于格式原因有误)
#--------------------------------------------------------------------
global                                         # 全局配置
	log         127.0.0.1 local2                   # 日志输出配置
	chroot      /var/lib/haproxy                   # haproxy工作目录
	pidfile     /var/run/haproxy.pid               # haproxy的pid目录
	maxconn     4000                               # 最大连接数(默认配置)
	user        haproxy                            # 运行haproxy的用户
	group       haproxy                            # haproxy所属组
	nbproc      4                                  # 启动的haproxy进程个数,只能用于守护进程模式的haproxy;默认只启动一个进程,鉴于调试困难等多方面的原因,一般只在单进程仅能打开少数文件描述符的场景中才使用多进程模式;
	daemon                                         # 后台启动
# turn on stats unix socket
	stats socket /var/lib/haproxy/stats            # 用户访问统计数据的接口目录
	 ssl-default-bind-ciphers PROFILE=SYSTEM
    ssl-default-server-ciphers PROFILE=SYSTEM

#--------------------------------------------------------------------
defaults                                       # 默认配置
	mode                    http                   # 默认模式(mode{tcp\http\health})
	log                     global                 # 日志系统与global段一样
	retries                 3                      # 3次连接服务器失败后确定服务器不可用
	timeout connect         10s                    # 默认连接超时时间(可优化)
	timeout client          1m                     # 默认客户端超时时间(可优化)
	timeout server          1m                     # 默认服务器超时时间(可优化)
	timeout check           10s                    # 默认心跳检测超时时间(可优化)
	maxconn                 2048                   # 最大连接数,不要超过全局配置最大连接数

#--------------------------------------------------------------------
##监控查看本地状态##
listen admin_stats
bind *:80                                      # 绑定监控页面监听端口
mode http
option httplog                                 # 日志类别采用httplog
option httpclose                               # 每次请求完毕后主动关闭http通道
log 127.0.0.1 local0 err                       # 定义日志发往的位置,级别为error,所有等于或高于此级别的日志信息将会被发送;
stats uri  /haproxy                            # haproxy监控页面,可以自定义,如http://192.168.47.150/haproxy
stats auth zludon:123                          # 配置监控页面账号密码登录
stats refresh 30s                              # 页面刷新间隔
####################################
##反代监控##
frontend server                                # frontrend前端配置
    bind *:5672
    log global
    mode tcp
    #option forwardfor
    default_backend rabbitmq                  # 定义匹配规则,请求转发至名为"rabbitmq"的后端服务
    maxconn 3
backend rabbitmq                              # 后端服务配置,当frontend请求中名为"rabbitmq"跳转到此配置规则
    mode        tcp
    log         global
    balance     roundrobin                    # 定义负载均衡算法,此处为轮叫(轮询)
# 为后端声明server,格式为:server <name> <address> [:port] [param*]
# <name>:为此服务器指定的主机名,其将出现在日志及警告信息中;
# <address>为此服务器的的IPv4地址,也支持使用可解析的主机名;
# [:port]:指定将连接请求所发往的此服务器时的目标端口;
# [param*]:为此服务器设定的一系参数,其可用的参数非常多,具体请参考官方文档中的说明(http://cbonte.github.io/haproxy-dconv/2.1/configuration.html)
# check:启动对此server执行健康状态检查,其可以借助于额外的其它参数完成更精细的设定,如:inter <delay>:设定健康状态检查的时间间隔,单位为毫秒,默认为2000;也可以使用fastinter和down
# rise <count>:设定健康状态检查中,某离线的server从离线状态转换至正常状态需要成功检查的次数;
# fall <count>:确认server从正常状态转换为不可用状态需要检查的次数;
    server      zabbix  192.168.47.145:5672 check inter 2000s rise 2 fall 3
    server      zabbix1 192.168.47.147:5672 check inter 2000s rise 2 fall 3
    server      zabbix2 192.168.47.129:5672 check inter 2000s rise 2 fall 3
#--------------------------------------------------------------------
根据博主配置进行配置
#---------------------------------------------------------------------
# Example configuration for a possible web application.  See the
# full configuration options online.
#
#   https://www.haproxy.org/download/1.8/doc/configuration.txt
#
#---------------------------------------------------------------------

#---------------------------------------------------------------------
# Global settings
#---------------------------------------------------------------------
global
    # to have these messages end up in /var/log/haproxy.log you will
    # need to:
    #
    # 1) configure syslog to accept network log events.  This is done
    #    by adding the '-r' option to the SYSLOGD_OPTIONS in
    #    /etc/sysconfig/syslog
    #
    # 2) configure local2 events to go to the /var/log/haproxy.log
    #   file. A line like the following can be added to
    #   /etc/sysconfig/syslog
    #
    #    local2.*                       /var/log/haproxy.log
    #
    log         127.0.0.1 local2

    chroot      /var/lib/haproxy
    pidfile     /var/run/haproxy.pid
    maxconn     4000
    user        haproxy
    group       haproxy
    daemon

    # turn on stats unix socket
    stats socket /var/lib/haproxy/stats

    # utilize system-wide crypto-policies
    ssl-default-bind-ciphers PROFILE=SYSTEM
    ssl-default-server-ciphers PROFILE=SYSTEM

#---------------------------------------------------------------------
# common defaults that all the 'listen' and 'backend' sections will
# use if not designated in their block
#---------------------------------------------------------------------
defaults
    mode                    tcp
    log                     global
    option                  tcplog
    option                  dontlognull
    option http-server-close
   # option forwardfor       except 127.0.0.0/8
    option                  redispatch
    retries                 3
    timeout http-request    10s
    timeout queue           1m
    timeout connect         10s
    timeout client          1m
    timeout server          1m
    timeout http-keep-alive 10s
    timeout check           10s
    maxconn                 3000
listen admin_status
  bind       *:80
  mode      http
  option    httplog
  option    httpclose
  log  127.0.0.1 local0  #error
  stats uri /haproxy
  stats auth root:root
  stats refresh 30s
frontend mq
  bind  *:8894
  #log   global
  mode  tcp
 # optioin forwardfor
  default_backend rabbitmq
  maxconn 2048
backend rabbitmq
   mode    tcp
   log     global
   balance roundrobin    #负载均衡算法.轮询
   server   node1  192.168.1.148:5672 check inter 2000s rise 2 fall 3
   server   node2  192.168.1.118:5672 check inter 2000s rise 2 fall 3
   server   node3  192.168.1.196:5672 check inter 2000s rise 2 fall 3
haproxy -f haproxy.cfg # 加载配置文件我
systemctl start haproxy
systemctl enable haproxy
 setsebool -P haproxy_connect_any=1
     systemctl stop firewalld
vim /etc/sysctl.conf # 添加以下两条
net.ipv4.ip_nonlocal_bind=1
net.ipv4.ip_forward = 1
联邦交换机
(broker北京),(broker深圳)彼此之间相距甚远,网络延迟是一个不得不面对的问题。有一个在北京的业务(Client北京)需要连接(broker北京),向其中的交换器exchangeA发送消息,此时的网络延迟很小,(Client北京)可以迅速将消息发送至exchangeA中,就算在开启了publisherconfirm机制或者事务机制的情况下,也可以迅速收到确认信息。此时又有个在深圳的业务(Client深圳)需要向exchangeA发送消息,那么(Client深圳) (broker北京)之间有很大的网络延迟,(Client深圳)将发送消息至exchangeA会经历一定的延迟,尤其是在开启了publisherconfirm机制或者事务机制的情况下,(Client深圳)会等待很长的延迟时间来接收(broker北京)的确认信息,进而必然造成这条发送线程的性能降低,甚至造成一定程度上的阻塞。
将业务(Client深圳)部署到北京的机房可以解决这个问题,但是如果(Client深圳)调用的另些服务都部署在深圳,那么又会引发新的时延问题,总不见得将所有业务全部部署在一个机房,那么容灾又何以实现?这里使用Federation插件就可以很好地解决这个问题.